If your application needs to stay fast and available even during traffic spikes, you can’t rely on a single server to handle it all.
Instead, use a load balancer like HAProxy.
It’s one of the most trusted load balancers in production environments and is used by platforms like GitHub and Reddit to handle millions of connections with efficiency and control.
In this guide, we’ll explain how HAProxy works and when to use it (and when not to). We’ll walk through setup steps, load balancing strategies, ACL rules, high availability patterns, and more with beginner-friendly explanations and examples you can copy.
TL;DR: HAProxy is your go-to load balancer known for its flexibility, control, and uptime.
It routes requests across servers to keep your app fast and available even under heavy load.
It uses ACLs and content-aware logic to route traffic based on paths, headers, or IPs.
It fits both small and scaled setups.
It is used by GitHub, Reddit, and other high-traffic platforms to manage millions of connections.
What Is HAProxy?
HAProxy (High Availability Proxy) is open-source software that operates as a reverse proxy and load balancer for TCP and HTTP applications:
A reverse proxy is a gateway that receives client requests and forwards them to backend servers.
A load balancer distributes incoming traffic across multiple servers to improve performance and prevent overload.
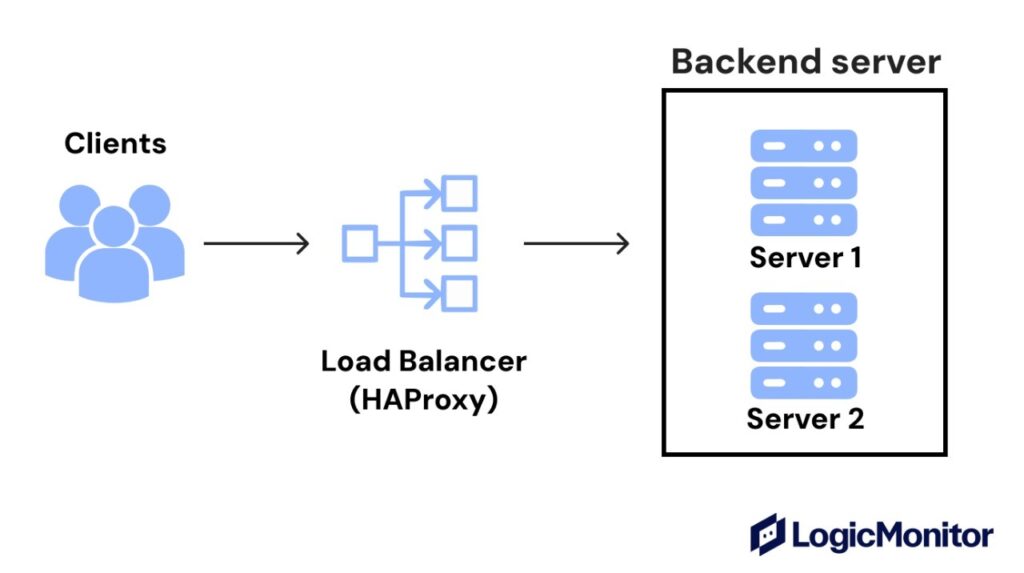
HAProxy improves the availability and performance of your application (website or API) by distributing requests across a pool of backend servers. If one server is slow or offline, HAProxy can automatically detect it via health checks and forwards traffic to healthy servers so users still get a fast, reliable experience.
It is deployed in front of web and application servers as a central point of control for managing client connections and traffic routing. From there, it accepts client connections, applies routing rules, and forwards each request to the selected backend.
To do so, it offers two routing modes, depending on how you want to route traffic:
Layer 4 (“mode tcp”): Routes traffic by IP address and port. It does not inspect the application layer (e.g., HTTP headers or paths), which makes it good for generic TCP services like databases.
Layer 7 (“mode http”): Looks at HTTP details (path, headers, cookies) to route by content. It’s suitable for websites/APIs and multi-app routing under one domain. At L7, you can optionally add logic based on:
URL path (e.g., /api/v1/)
HTTP headers (e.g., User-Agent, Host)
Cookies (e.g., session affinity/sticky sessions)
Request method (GET/POST)
Why Use HAProxy?
Use HAProxy when you need to keep your application available under load and control how requests are routed.
Here are some of its key benefits:
Scalability: Distributes traffic across multiple servers so you can add capacity horizontally without changing your app.
Reliability: Performs active health checks and automatically removes unhealthy servers from the pool to reduce downtime and error rates.
Lower latency: Uses fast load-balancing algorithms and connection pooling to minimize routing overhead and keep response times low.
Real-World Example: Who’s Using HAProxy?
HAProxy is trusted by some of the highest-traffic platforms on the internet. That’s part of what makes it a reliable choice for performance-focused teams.
For example, GitHub uses HAProxy to power parts of its global infrastructure. Their team relies on it for active health checks, efficient connection handling, and full control over traffic flow.
Because it shows HAProxy can scale to meet demanding, real-world workloads. If it works for infrastructure at that level, it’s likely to meet your performance and uptime goals too.
When to Use HAProxy vs. Simpler Options
Let’s see a tabular comparison to understand when HAProxy may be a good fit for you.
HAProxy is a good fit when
A simpler option may be enough when
Traffic is variable or spiky and needs to scale across multiple servers. You need to route traffic based on content (e.g., /api vs. /app). You want built-in features like TLS termination, health checks, and detailed logs. You’re balancing TCP-based services (e.g., databases, message queues).
You’re running a single-server application with consistent, low-volume traffic.You serve static files that can be efficiently handled by a basic web server (like NGINX) or offloaded to a CDN.Your team prefers using a managed cloud load balancer instead of maintaining one.
Core Building Blocks in HAProxy
To configure HAProxy, you define how it handles incoming traffic and where to send it. This starts with three essential components: frontends, backends, and ACLs (access control lists).
Let’s see how each one plays a specific role.
Frontend (The Entry Point)
The frontend defines how HAProxy receives incoming traffic. This is the first part of the configuration that handles client connections, whether from browsers, APIs, or internal systems.
In a frontend, you tell HAProxy which IP address and port to listen on. You also define what protocol mode to use (e.g., tcp or http), which determines whether HAProxy operates at Layer 4 (transport) or Layer 7 (application) for that frontend and what logic should determine where the traffic goes next.
Each frontend can include routing rules, such as ACLs that forward traffic to different backends based on the content of the request.
Here are the key directives you’ll use in a frontend:
Bind sets the IP address and port that HAProxy listens on.
Mode specifies whether to inspect requests at the TCP level (mode tcp) or HTTP level (mode http).
Default_backend sends all requests to a specific backend unless a routing rule overrides it.
Use_backend … if forwards traffic to a different backend when a condition (defined by an ACL) evaluates as true.
Backend (The Server Pool)
A backend defines the pool of servers that HAProxy can forward traffic to. This is where you specify which origin servers are available, how HAProxy should balance requests between them, and what rules apply.
Every backend contains a list of servers and a load-balancing strategy. You can also assign relative weights to servers or enable health checks to automatically detect failures.
Here are the key directives you’ll configure in a backend section:
Server defines a single backend server by its hostname or IP address and the port it listens on. You can also configure options like health checks, connection limits, and weights.
Balance sets the load-balancing algorithm that decides how requests are distributed.
Weight adjusts how much traffic a server receives relative to others in the pool.
You can add multiple servers to a backend and combine these directives to fine-tune request distribution.
Access Control Lists
ACLs let you create flexible, condition-based routing rules. You define a condition like a URL path, HTTP header, or client IP, and then decide what to do if that condition is true.
This is how HAProxy supports advanced use cases, especially in Layer 7 (HTTP) mode, where requests can be routed based on what they contain rather than only where they came from.
ACLs are typically defined and used in the frontend, where HAProxy inspects incoming requests. However, they can also be applied in backend sections for tasks like access control or request modification. If a match is found, traffic is sent to a different backend or blocked entirely.
Here are the core directives involved:
Acl defines the condition to test (e.g., if the URL path starts with /api).
Use_backend … if routes matching traffic to a specific backend.
Http-request deny optionally block traffic that matches a condition.
Note: Each ACL should be named clearly and kept tightly scoped. You can combine multiple conditions using logical operators (and, or) for more complex logic.
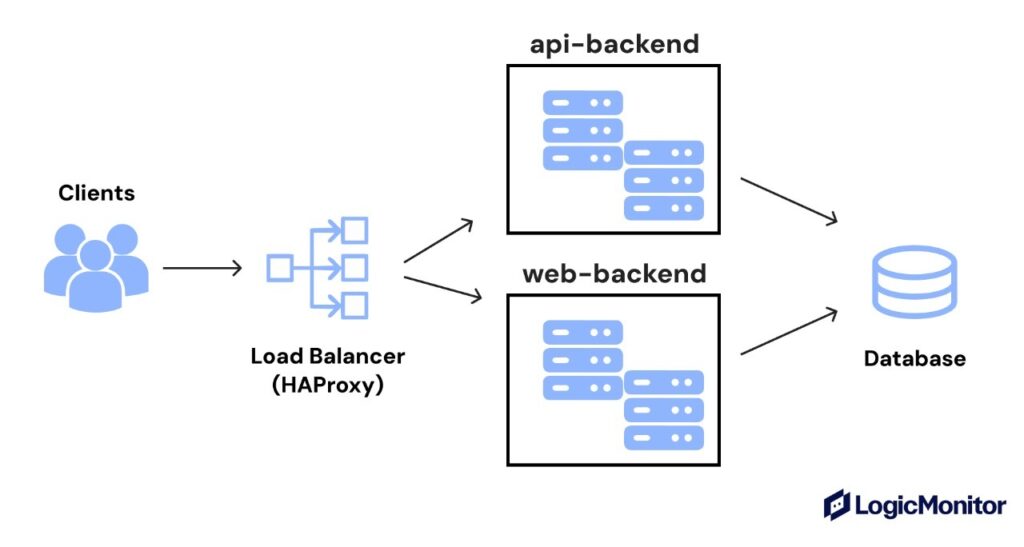
Here’s an example that shows how HAProxy uses a path-based ACL to send API traffic to a separate backend:
frontend main_in

  bind :80

  mode http

  acl is_api path_beg /api

  use_backend api_backend if is_api

  default_backend web_backend

backend web_backend

  balance roundrobin

  server web1 10.0.0.11:80 check

  server web2 10.0.0.12:80 check

backend api_backend

  balance leastconn

  server api1 10.0.1.21:8080 check

  server api2 10.0.1.22:8080 check
This config does the following:
Accepts HTTP traffic on port 80.
Checks if the path begins with /api.
If it does, HAProxy routes the request to api_backend.
All other requests go to web_backend.
Common ACL Patterns You Can Copy
Each ACL has two parts:
A condition (what to match).
An action (what to do if the condition is true).
As above, each ACL defines a condition — such as a URL path, HTTP method, or header. You then use that condition in an action statement, like use_backend or http-request deny, to decide what happens when it matches.
Let’s now go through some common use cases and explain the config lines you’ll see with each:
Route Based on URL Path
You can route based on the URL path, let’s say, when you want to send blog traffic (/blog) to a blog server. Here’s how that would work:
The ACL checks whether the request URL begins with /blog.
If it does, HAProxy routes it to a separate backend.
Here’s what the config looks like:
acl is_blog path_beg /blog

use_backend blog_backend if is_blog
Route Based on Hostname
If you have different services on subdomains, like api.example.com and app.example.com, you may want to route based on hostname. Here’s how it would be:
The ACL checks the Host header to see which subdomain was used.
Then it routes based on that domain.
This is how the config looks:
acl is_api_host hdr(host) -i api.example.com

use_backend api_backend if is_api_host
Route Based on Request Method
You can route requests differently based on the HTTP method — for example, to separate POST/PUT requests (writes) from GET requests (reads). Here’s how it would work:
The ACL checks if the HTTP method is POST or PUT.
If so, it routes those requests to a specific backend.
Here’s what the config looks like:
acl is_write_method method POST PUT

use_backend write_backend if is_write_method
Combine Multiple Conditions
You can even combine multiple conditions using logical operators like:
use_backend blog_backend if is_blog or is_static
This allows you to build precise routing logic for any kind of app, whether you’re working with APIs, static assets, regional content, or split environments.
Load Balancing Techniques
HAProxy supports two core types of load balancing:
Layer 4 (transport level).
Layer 7 (application level).
Each works differently depending on what kind of data you want HAProxy to inspect and what level of routing control you need.
Let’s walk through both.
Layer 4 Load Balancing
Layer 4 load balancing works at the transport layer. HAProxy routes traffic based on low-level information like the client’s IP address and port number.
When a client opens a connection (for example, to a database on port 3306 for MySQL), HAProxy listens on that port and forwards the connection to one of the backend servers in the pool. It accepts the request on a specific port (like 3306 for MySQL), then immediately chooses a backend server from the pool.
It doesn’t know what kind of data is inside. It only forwards the entire connection, byte for byte, to one of the available servers. Once the server responds, the reply is sent back to the client again, without HAProxy inspecting it.
This mode is fast and lightweight because HAProxy doesn’t need to understand the protocol or unpack the request.
Layer 7 Load Balancing
Layer 7 load balancing works at the application layer. In addition to IPs and ports, HAProxy can read the content of HTTP requests like the path, headers, cookies, or query parameters.
When a client sends an HTTP request (like loading a webpage or accessing an API), HAProxy parses parts of that request, such as:
the URL path
the host header
the request method
even cookies and query parameters
It evaluates that data against any ACLs (rules) you’ve defined. For example, if the request path starts with /api, HAProxy can route it to a backend specifically designed for API traffic.
This approach lets you split traffic between multiple services that share the same IP address and port. Routing decisions are based on the contents of the HTTP request rather than just its source or destination.
Layer 4 vs. Layer 7: Key Differences
Here’s a quick comparison table to help you decide which one may be the right fit for your needs:
Criteria
Layer 4 (mode tcp)
Layer 7 (mode http)
What it inspects
IP addresses and ports
HTTP headers, paths, cookies, query params
Flexibility
Low; routing is limited to IP address and port information (no visibility into request content)
High; content-based routing supported
Performance
Fastest (less overhead)
Slower than L4 due to parsing request content, but still highly efficient and production-proven at scale.
Use cases
Databases, mail servers, and generic TCP
Web apps, APIs, and content-aware routing
When to use
You need raw speed and simple rules
Routing depends on what the request says
Choosing the Right Load Balancing Algorithm
HAProxy supports several load-balancing algorithms to control how it distributes traffic across backend servers. Each method serves a specific purpose depending on how your application handles connections.
Let’s walk through the most common algorithms.
Roundrobin (default)
This algorithm distributes requests evenly across all servers in turn, cycling through the list in order. Weighted roundrobin is also supported if you assign different weights to servers.
That’s why you should use this when:
All backend servers have similar capacity
You don’t need session stickiness
Your app handles short-lived connections
Leastconn
This algorithm routes each new connection to the server with the fewest active connections. It takes server weights into account if configured. It’s especially effective when connection durations vary or some requests are much longer than others. (e.g., database queries, live sessions).
So you should use this when:
Backend servers handle long-lived connections
Request durations vary a lot
You want to avoid overloading any one server
Source
This algorithm applies a hash of the client’s source IP (and optionally source port) to consistently map that client to the same backend server. That way, a client always connects to the same backend, which is perfect for basic sticky sessions.
You can use this when:
You want IP-based session persistence
Your app isn’t using cookies or shared session storage
You want predictable routing for repeat clients
Using Weights for Uneven Traffic Distribution
You can control how much traffic a server receives using the weight directive. The higher the weight, the larger the share of connections or requests a server will receive, relative to others in the pool. By default, weights range from 1 to 256.
Take a look at this code block:
backend weighted_backend

  balance roundrobin

  server s1 10.0.3.11:80 check weight 3

  server s2 10.0.3.12:80 check weight 1
In this case, server s1 will receive 3 out of every 4 requests. This is helpful when servers have different CPU or memory capacities.
Health Checks and Failover Handling in HAProxy
When you’re balancing traffic across multiple servers, you don’t want to send requests to one that’s down or overloaded.
That’s why health checks are important.
HAProxy uses active health checks (such as sending periodic TCP connections or HTTP requests) to test whether a backend server is healthy before routing traffic to it. If a server fails the check, HAProxy temporarily removes it from the pool until it recovers.
This improves reliability and shortens downtime without requiring manual intervention.
How HAProxy Performs Health Checks
HAProxy supports TCP and HTTP health checks, depending on your backend type.
TCP checks are the default. HAProxy tries to establish a TCP connection on the server’s port. If the connection fails or times out, the server is marked as down.
HTTP checks go further. HAProxy sends an HTTP request to a specific path and checks the response code. If the server returns an error, it’s marked as unhealthy.
To use HTTP checks, include the option “httpchk” directive in your backend config. For example, here’s a sample HTTP health check using a unique URI:
backend web_backend

  balance roundrobin

  option httpchk GET /healthz

  server web1 10.0.0.11:80 check

  server web2 10.0.0.12:80 check
In this example:
HAProxy sends GET /healthz to each backend server.
If the server responds with a 2xx or 3xx status, it’s considered healthy.
You can make /healthz return a simple “OK” status from your app.
Controlling Health Check Sensitivity
You can fine-tune when a server is marked up or down using these parameters:
inter displays the interval between health checks (in milliseconds).
rise shows the number of consecutive successful checks required before a server is marked as healthy again.
fall specifies the number of failed checks before a server is marked as down.
Here’s an example of all three used together:
server web1 10.0.0.11:80 check inter 3000 rise 2 fall 3
This means:
HAProxy checks the server every 3 seconds.
It’s removed after 3 consecutive failures.
It must pass 2 checks to re-enter the pool.
Handle Failures the Right Way
A common mistake is trying to route around unhealthy servers using ACLs based on response status codes, like detecting a 503 error and then rerouting traffic to another backend.
But that doesn’t work.
Why?
Because by the time HAProxy receives a 503, the request has already reached the backend. So, it’s too late to reroute.
Instead, let health checks handle it.
They work proactively, before the request is sent. And that’s how HAProxy ensures clean failover and uninterrupted service.
Sticky Sessions: When You Need Session Persistence
By default, HAProxy treats each request as independent. That means a user might hit a different backend server every time they make a request, even within the same session.
This is usually fine. But in some cases, it may cause problems.
Sticky sessions, also called session persistence, ensure that once a client is mapped to a backend server, subsequent requests from that client continue to be routed to the same server for the duration of their session.
HAProxy supports sticky sessions using:
Cookies, which are inserted by HAProxy or tracked from the backend
App session tracking with session identifiers tied to a specific server
Tradeoffs to Be Aware Of
Sticky sessions solve one problem but introduce a few others. So, here’s what you must keep in mind:
Horizontal scaling gets harder: When traffic is tied to specific servers, some backends may get overloaded while others sit idle. That can reduce the efficiency of load balancing.
Cacheability is reduced: Sticky sessions tie users to specific servers. So, it limits the ability to serve identical responses from a shared cache layer or CDN
Blue/green deployments can be tricky: Sticky sessions can accidentally “trap” users on old versions of the app during a rollout, especially if different servers run different code versions.
Session state remains backend-bound: If the backend crashes, session data may be lost unless it’s stored externally (e.g., in a database).
When to Use Sticky Sessions
Here’s a table to help you identify when to use sticky sessions and when not:
Use sticky sessions when
Avoid sticky sessions when
• Your app stores session data in local memory on each server (not shared across servers)
• Features like logins or shopping carts break when requests go to different backends
• Your infrastructure doesn’t support shared session storage
• You’re using stateless APIs that don’t rely on session state
• Session state is already stored externally (e.g., in a database, Redis, or another centralized store)
• You want to maximize flexibility, cacheability, and scaling across all backends
How to Set Up HAProxy
Here’s a four-step guide to help you set up HAProxy:
Step 1: Install HAProxy
To install HAProxy, you have a few options:
Use your system’s package manager.
Run it as a Docker container for portability and simplified deployment.
Use HAProxy Enterprise if you need premium features like advanced security modules or commercial support.
Select the method that best suits your infrastructure and operating system. Most teams start with the open-source version and upgrade later if needed.
Step 2: Configure the Frontend and Backend
Once HAProxy is installed, the next step is to define where it listens (frontend) and where it sends traffic (backend).
Start by editing your haproxy.cfg file:
In the frontend section, specify the IP and port to listen on (e.g., bind :80), and the operating mode (http or tcp). You can also define ACLs in the frontend to control routing decisions.
In the backend section, list your origin servers with their IP addresses and ports using the server directive (e.g., server app1 10.0.0.11:80 check).
You’ll also define routing rules here, either a default backend or content-based logic using ACLs.
Step 3: Select a Load Balancing Algorithm
HAProxy gives you several load-balancing strategies. Choose one based on your traffic pattern:
roundrobin cycles through servers in order (default).
leastconn sends requests to the server with the fewest active connections so it’s best for long-lived sessions.
source uses a hash of the client’s IP (and optionally port) to consistently route them to the same server, which makes it helpful for sticky sessions.
You can also assign weights to individual servers if you want to control how often they receive traffic.
Step 4: Enable SSL/TLS Termination
To handle HTTPS traffic, HAProxy needs to decrypt incoming SSL requests.
You’ll do this by:
Adding the SSL option in your bind directive (e.g., bind *:443 ssl crt /etc/ssl/haproxy.pem).
Pointing to your TLS certificate using the crt option. You can also point to a directory containing multiple certificates for SNI support.
With this setup, HAProxy acts as the TLS terminator. It handles the secure connection from the client, then forwards plain HTTP internally to your backend.
Monitor HAProxy Traffic in Real Time
Once HAProxy is live, you need visibility into what it’s doing.
HAProxy offers two core observability tools out of the box:
A built-in Stats page (web dashboard for live metrics).
Structured logs (via syslog) for detailed request-by-request analysis.
1. HAProxy Stats Page
The Stats page is a lightweight web-based interface that shows the real-time status of the frontends, backends, and servers. You can view connection counts, queue depths, server health, uptime, and much more—all without using the command line.
Note: Never expose the Stats page to the public internet. Use authentication, IP restrictions, or both.
To enable it, you’ll need to configure a dedicated stats section in your HAProxy config.
For example, here’s how you can enable the Stats page with basic auth:
HAProxy doesn’t write logs directly to files. Instead, by default, HAProxy forwards logs to syslog. On most systems, logs go to:
/var/log/haproxy.log
Or through rsyslog or journald, depending on your OS
To enable HTTP-level logs, make sure your frontend uses mode http and includes:
option httplog
You can then customize the log format to show fields like:
%ci (client IP)
%r (full HTTP request)
%s (status code)
%Tt (total request time in milliseconds)
Avoid a Single Point of Failure in Your Load Balancer Layer
HAProxy improves application uptime by distributing traffic across multiple backend servers.
But what happens if your load balancer itself goes down?
Without proper redundancy, the load balancer becomes a single point of failure (SPOF). That means even if your backend servers are healthy, users still can’t reach them if HAProxy fails.
To solve this, production deployments usually run multiple HAProxy instances in a high-availability setup. That way, if one instance fails, another can take over.
Its two most common patterns are:
active/standby
active/active
1. Active/Standby with Floating IP
In this setup, you run two HAProxy instances. One is active and handles all traffic. The other remains in standby mode, ready to take over if the primary fails.
The key to this setup is a floating IP (Virtual IP, or VIP) managed by a protocol such as VRRP (commonly via Keepalived). It always points to the active HAProxy node. If that node goes offline, the floating IP automatically switches to the standby.
Here’s how it works:
Clients connect to a single IP (the floating IP).
HAProxy A is active. HAProxy B monitors its health.
If A fails, B takes over and binds to the floating IP.
Downtime is minimized to seconds or less.
This pattern is simple and reliable. It works well when only one load balancer is needed to handle traffic volume.
2. Active/Active for Higher Throughput
In this pattern, both HAProxy instances are active and share traffic at the same time. This scales throughput and reduces idle resources.
Each HAProxy instance has its own IP address. Traffic is distributed across them by external mechanisms such as DNS round-robin, global load balancers (GSLB), or upstream routers. This means failover behavior depends on DNS TTLs or how quickly the upstream reroutes traffic.
You can still use health monitoring and failover logic, but both nodes are fully engaged from the start.
So before you opt for this, you must consider the following:
Ensure session stickiness is handled correctly if your app requires it. For example, you might rely on cookies that work across both instances.
If one node fails, traffic shifts to the remaining node. So make sure it has enough headroom to handle the full load.
This pattern is ideal when you’re scaling out, running in containerized environments, or using HAProxy in front of multiple regional clusters.
In both patterns, HAProxy’s health check system continuously monitors backend servers (and optionally peer load balancers) to detect failures early.
HAProxy vs. NGINX vs. LoadMaster
When choosing a load balancer or reverse proxy, your decision depends on how much flexibility, control, and customization you need and how much operational overhead you’re willing to manage.
Let’s break down how HAProxy compares to two popular alternatives: NGINX and Kemp LoadMaster.
HAProxy is open-source, highly customizable, and built for advanced routing and high-performance environments.
NGINX is also open-source but more commonly used for static content, caching, and lightweight reverse proxy setups. It also supports L4 and L7 load balancing, though its configuration and feature set for traffic management are less advanced than HAProxy’s.
Kemp LoadMaster is a commercial product. It offers a fully managed experience with a GUI, support, and enterprise features, but at the cost of flexibility and higher licensing fees.
Which One to Choose
Here’s a quick side-by-side overview of all three tools to help you decide which is better for you.
Enterprises needing a managed and plug-and-play LB
Low (prebuilt features)
Very easy (GUI-based)
Paid (license required)
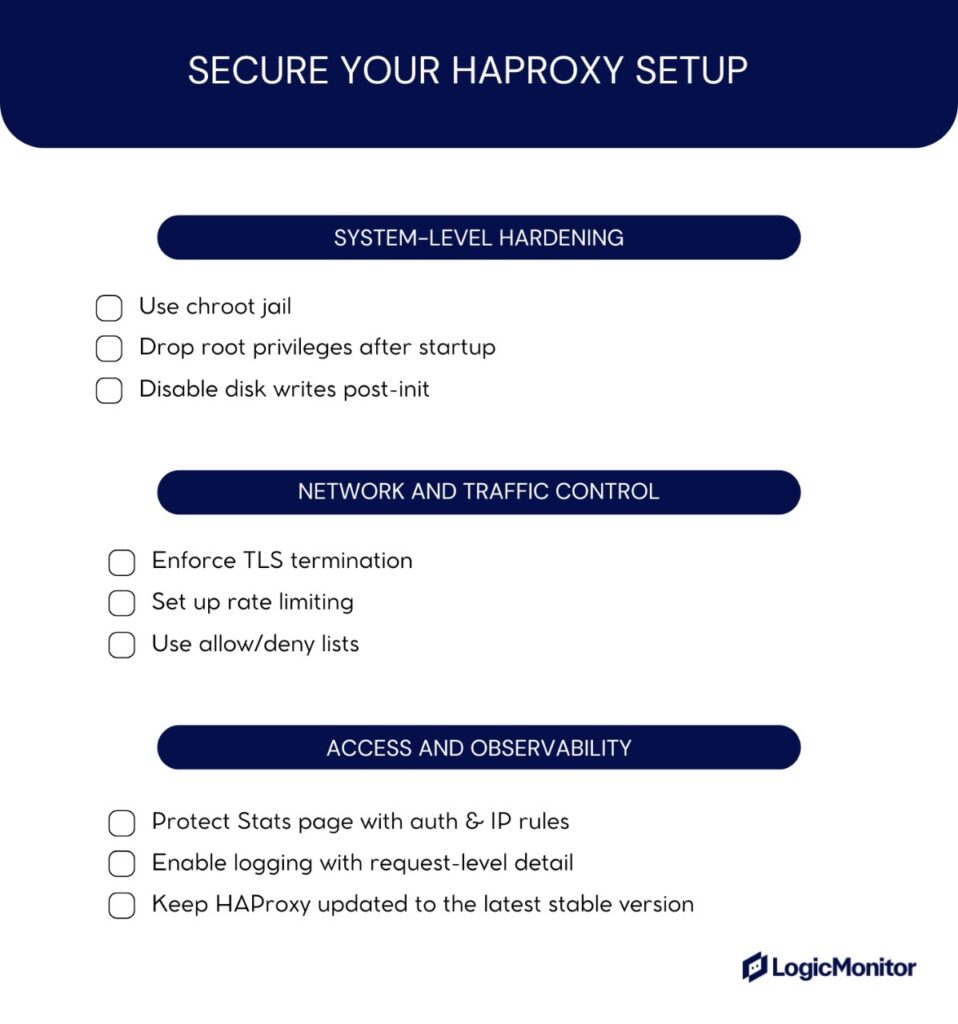
Secure Your HAProxy Setup With This Quick Checklist
Once your HAProxy instance is running, it’s important to reduce the attack surface — limiting exposed services, running with minimal privileges, and applying least-access principles. That means you should lock down unnecessary privileges, tighten access, and follow best practices that prevent misuse in production.
Here’s a quick security checklist you can apply to any HAProxy deployment:
Your Next Step: Start Small and Scale Up
Now that you understand how HAProxy works and what it’s capable of, start with basic deployment:
Route traffic to at least two backend servers to validate load balancing and failover behavior.
Test health checks
Observe logs in real time.
From there, layer on ACLs, TLS termination, and sticky sessions as your architecture grows.
Already use HAProxy?
Use our checklists and examples in this guide to strengthen your setup for high availability, security, and scale.
FAQs
Is HAProxy a Reverse Proxy or a Load Balancer?
It’s both. HAProxy acts as a reverse proxy (terminating client connections and forwarding them to backends) and as a load balancer (spreading traffic across multiple servers).
Is HAProxy a Layer 7 Load Balancer?
Yes. HAProxy supports Layer 7 (application layer) load balancing, with rules based on paths, headers, cookies, and methods. But it also supports Layer 4 (transport layer) for simpler, faster routing.
Which Is Better, NGINX or HAProxy?
It depends on your use case.
Choose HAProxy for advanced traffic control, detailed observability, and high-performance load balancing.
Choose NGINX for simpler configurations, static content, or lightweight proxying needs.
How Do I Set Up SSL Termination With HAProxy?
You configure the bind directive with the SSL option and specify your certificate. For example:
bind *:443 ssl crt /etc/haproxy/certs/site.pem
This allows HAProxy to decrypt HTTPS traffic before routing it internally.
Can I Use HAProxy With Docker?
Yes, HAProxy works in Docker, but it requires advanced networking. You’ll need to configure macvlan interfaces, custom networks to expose ports correctly, or network namespaces carefully. It’s possible, but not beginner-friendly.