Adding Kubernetes Cluster Using LogicMonitor Web Portal
Last updated - 25 July, 2025
With the LM Container Helm chart, deployment becomes faster as Argus, Collectorset-Controller, and kube-state-metrics (KSM) are installed together. All these components together monitor events and metrics of Kubernetes clusters and their resources.
Requirements
Install Helm. For more information, see Helm documentation.
Procedure
1. Log in to the LogicMonitor account as an administrator.
Note: Ensure to switch new UI Preview.
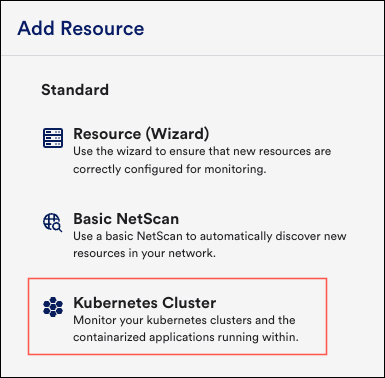
2. Navigate to Resources > Add Resource > Kubernetes Cluster.
The Add Kubernetes Cluster page is displayed.
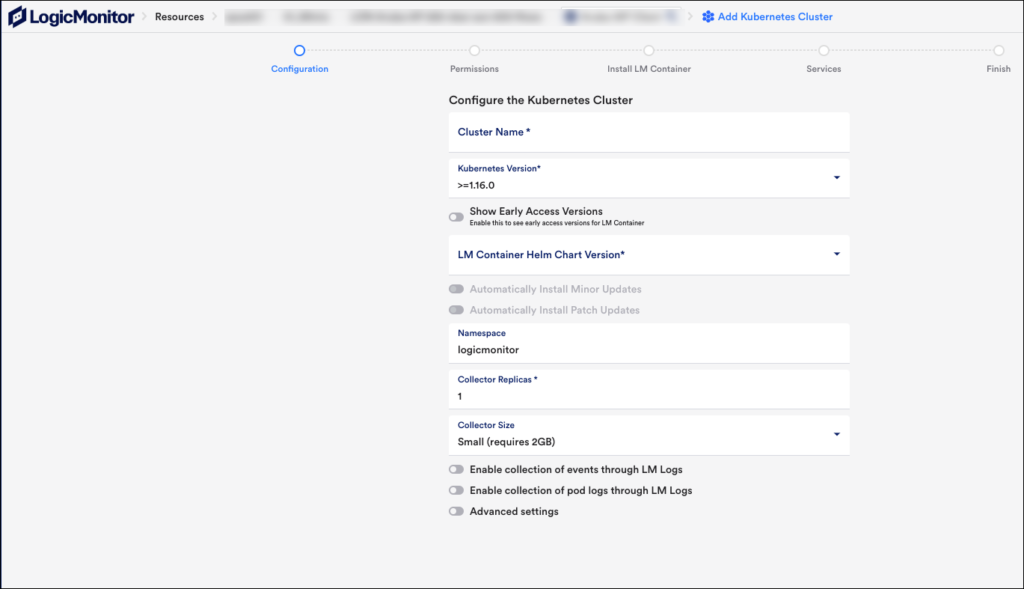
3. On the Configuration step, enter the following details:
- Cluster Name: Enter the name of the Kubernetes cluster.
- Kubernetes Version: Select the appropriate Kubernetes Version Criterion as per your Kubernetes Cluster.
- (Optional) Show Early Access Versions: Toggle to see the early access versions for LM Container.
- LM Container Version: Select the required LM Container Version for installation from the drop-down list.
- Namespace: (Optional – defaults to LogicMonitor) Enter the namespace information.
- Collector Replicas: (Defaults to 1) Enter the number of collector replicas required.
- Collector Size: (Optional – defaults to small) Select the required collector size from the drop-down list.
- (Optional) You can toggle Enable collection of events through LM Logs and Enable collection of pos logs through LM Logs to collect the Kubernetes events and pod logs collection.
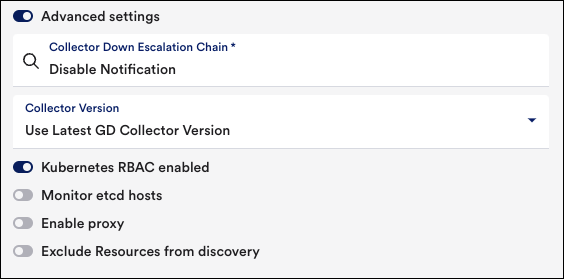
- Advanced Settings: (Optional) You can configure the following options::
- Collector Down Escalation Chain: (defaults to no escalation) Select the required escalation chain.
- Collector Version: (Optional – defaults to latest Generally Available) Select the required Collector Version from the drop-down list.
- Optionally, you can can also toggle the required options, such as Kubernetes RBAC enabled, Monitor etcd hosts, Enable proxy, and Exclude Resources from discovery.
- Collector Down Escalation Chain: (defaults to no escalation) Select the required escalation chain.
Note: To exclude resources from discovery, toggle Exclude Resources from discovery option and enter the rule in the Exclude Rule field. For more information, see Filtering Kubernetes Resources for Monitoring.
4. Click Next: Permissions.
The Permission step is displayed.
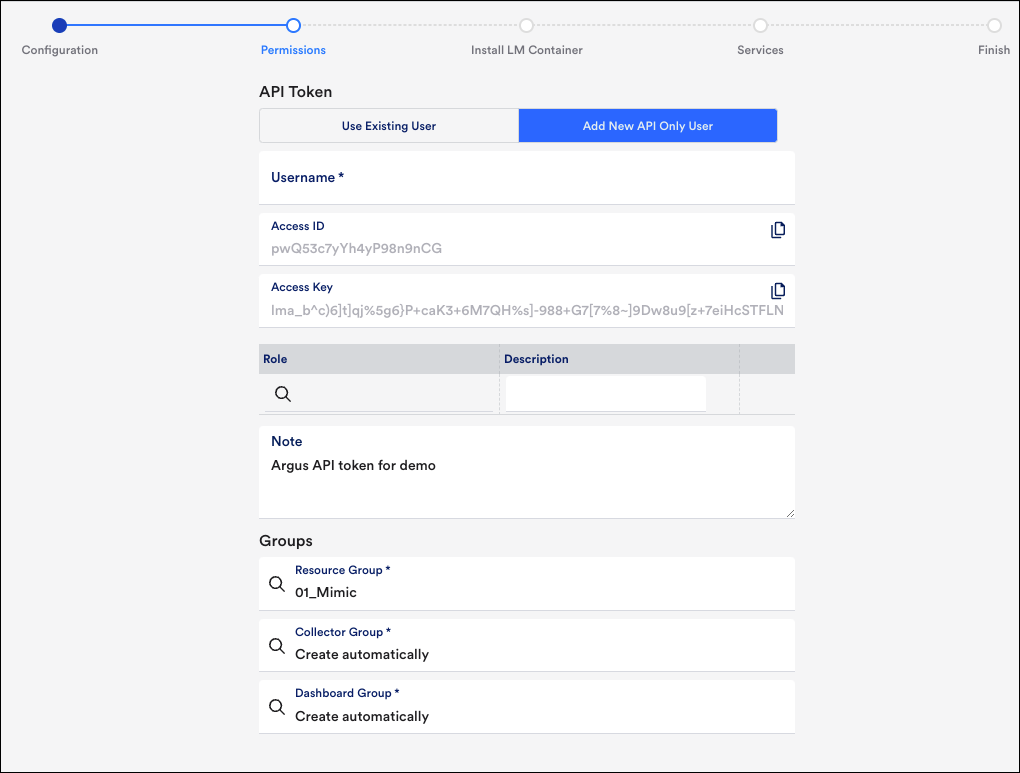
5. In the API Token section, you can add the details for an existing user or the new API user.
- Click Use Existing User and enter the following details:
- Username: Enter the username of an existing user.
Once you enter the username, the Access ID, Access Key, Role, and Note details are displayed.
- Username: Enter the username of an existing user.
- Click Add New API Only User and enter the following details:
- Username: Enter the name of the new user.
The Access ID and Access Key for the new user are automatically populated.
Recommendation: Encode your Access ID and Access Key using user defined secrets. For more information, see User Defined Secrets in LM Container. - Role and Description: Click the Search icon and select the role for the user. Enter the description of the role in the Description field.
- Resource Group: Enter the resource group name.
- Collector Group: Enter the collector group name.
- Dashboard Group: Enter the dashboard group name.
- Username: Enter the name of the new user.
Note: Any user except an out-of-the-box administrator user role can create API tokens. For creating API tokens for authentication purposes, ensure to check the Allow Creation of API Token checkbox under Settings > User Profile. For more information, see API Tokens.
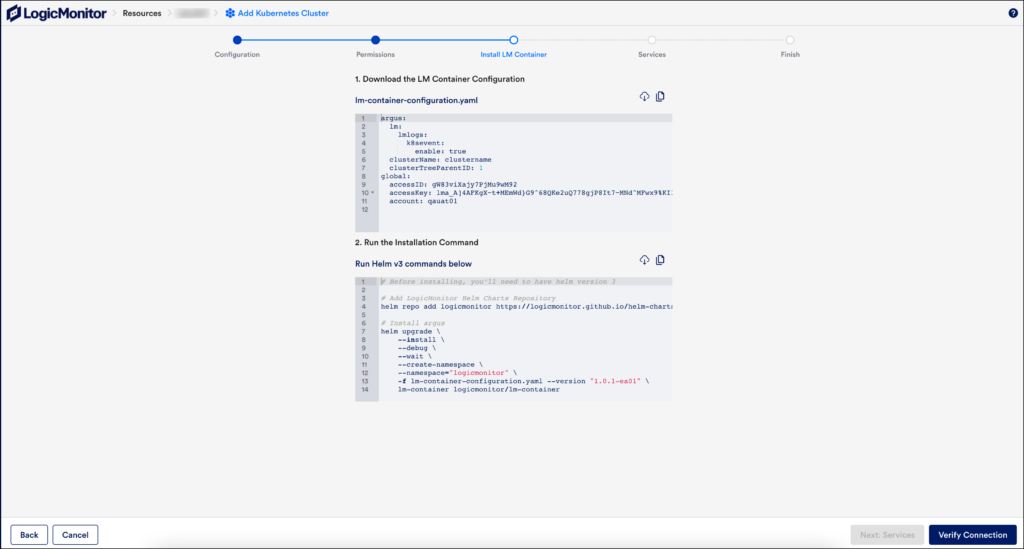
7. On the Install LM Container step, do the following:
6. Click on Next: Install LM Container.
- Copy or Download the generated LM Container Configuration file.
- Run the Helm commands displayed in the Run the Installation Command section to install LM Container from the shell where the helm is installed and the Kubernetes cluster is made accessible.
- Once you run the commands successfully, ensure all pods in the LogicMonitor namespace (or where the LM Container have installed them) are up and running with healthy status. (For example, x/y – x are running healthy from expected y to run.)
- Return to the Install LM Container page, and click Verify Connection.
- Once the verification of connection is successful, click on Next: Services.
8. On the Services page, configure logical services to group together cluster resources in a single unit to monitor its aggregate metrics. For more information, see About LM™ Service Insight.
- Add Kubernetes label key-value pairs, using which LogicMonitor will group all resources of the cluster.
- Click Finish.
LM Services will get created and installation will be completed.
Once the LM Container is successfully installed on Kubernetes Cluster, you can view discovered and well-organized view of Kubernetes cluster resources. Navigate to the Resources page and select the resource group named “Kubernetes Cluster: <desired cluster name>”.
In addition, if you want to add a Kubernetes cluster using CLI, see Installing LM Container Helm Chart for Monitoring Kubernetes Clusters.


