Creating a Basic NetScan
Last updated - 05 September, 2025
When setting up a NetScan, you can create a basic NetScan or advanced NetScan. A basic NetScan is simplified and intended for use during initial setup and by new users. An advanced NetScan has more options and supports additional methods for discovering devices. For more information, see Creating an Advanced NetScans.
Creating a Basic NetScan
- In LogicMonitor, navigate to Settings > NetScans > All NetScans.
- Click Add NetScan Options drop-down menu.
- Select Add Basic NetScan.
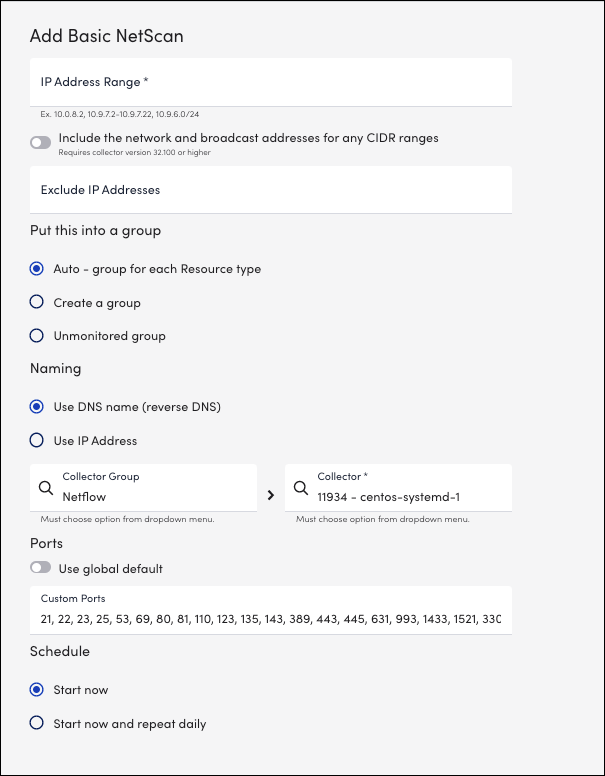
The Add Basic NetScan window is displayed.
- On the Add NetScan page, add or select the required options:
- IP Address Range – (Required) Enter the IP address range. Following are the examples:
- A hyphenated range: 10.9.8.2-10.9.8.240
- CIDR notation: 192.168.1.0/24 (i.e. 192.168.1.1 through 192.168.1.254)
- Comma-separated : 10.9.8.4, 10.9.8.8
- Mixture separated by commas: 10.9.8.2, 10.9.7.2-10.9.7.22, 10.9.6.0/24
- IP Address Range – (Required) Enter the IP address range. Following are the examples:
You can toggle the Include the network and broadcast addresses for any CIDR ranges option to include the required network and broadcast address.
Note: You must install collector version 32.100 or higher.
- Exclude IP Address: (Optional) Enter the range and/or comma-separated list of IP addresses to exclude them from the NetScan list.
- From the Put this into a group section, select any one of the options:
- Auto–group for each device type – Enables you to dynamically group resources based on the following types: Windows, Linux, VMware, Hyper-V, Network, SQL databases, Misc., NetApp, and EMC. These dynamic groups use AppliesTo scripting. You can modify these script statements as required. For more information, see AppliesTo Scripting Overview.
The grouping process is tied to the Devices By Type parent resource group, which contains the default dynamic groups. You can restore the deleted groups if you select the Devices By Type option. - Create a group – This enables you to create a new resource group. All resources discovered using NetScan are placed into this group, regardless of their properties.
- Unmonitored group – Groups all discovered resources into the “Unmonitored Resources” group. You can view the unmonitored resources from the Resource Tree or by navigating to Settings > NetScan > Unmonitored Resources. You can add the resources for monitoring from this group. For more information, see Unmonitored Resources.
- Auto–group for each device type – Enables you to dynamically group resources based on the following types: Windows, Linux, VMware, Hyper-V, Network, SQL databases, Misc., NetApp, and EMC. These dynamic groups use AppliesTo scripting. You can modify these script statements as required. For more information, see AppliesTo Scripting Overview.
- From the Naming section, select one of the following options:
- Use DNS name (reverse DNS) or Use IP Address – You can choose to either name discovered resources using DNS name (reverse DNS) which uses your DNS resolution, or IP address.
Note: If you select the Use DNS name (reverse DNS) option, ensure your DNS is clean and accurate before starting a NetScan.
- Collector Group and Collector fields – Select the required collector group for adding NetScan.
- Collector – Based on the selected collector group, select the required collector for adding NetScan.
Note: The results of a NetScan can show the manufacturer of the network interface based on MAC address lookup. This feature requires NPCAP, which is available as an option during installation with Collector 25.3xx or can be obtained separately and installed along with your existing Collector.
- From the Ports section, select the following option:
- Use global default — Enable the option to use the global default settings.
Note: If you would like to modify the global default list of ports, then disable the Use global default option. - In the Custom Ports field, enter the open TCP ports, to determine what type of device it is (e.g. Windows usually has ports 135 and 3389 open while Linux does not.)
- Use global default — Enable the option to use the global default settings.
- From the Schedule section, select one of the following options:
- Start now – Manually runs the scan once.
- Start now and repeat daily – This enables you to set a daily schedule to run the scans.
- Start now – Manually runs the scan once.
Note: If you want more scheduling options, see Creating an Advanced NetScan.


