
LogicMonitor Users
Last updated - 30 March, 2026
Users in LogicMonitor allow individual access to your LogicMonitor account and portal. Depending on the permissions you assign to the user, you can restrict or grant access to certain areas of your account and portal.
When you create a user, you use a wizard in your LogicMonitor portal to add the user to your portal, assign a role to the user (roles restrict or grant access), and configure additional settings, such as adding the user to a group or forcing the user to change their password at initial login.
In addition to assigning role to a user, you can also grant view permissions to specific pages in your LogicMonitor portal to determine visibility for the user within the portal. It is a user-level access and view permission. If a page is not enabled for the user, the user does not have access to that page in the portal regardless of the permission levels provided to the user by the assigned role. For example, if a user does not have view permission to Logs, Traces, and Reports, then in the portal, the Logs, Traces, and Reports pages are not visible to that user. If the same user has an Admin role with “read” and “write” permission to Logs, Traces, and Reports, then the user can access public APIs through tools such as Postman and send API requests for Logs, Traces, and Reports. Before making any API requests, LogicMonitor checks for the permissions granted to the user’s role.
Requirements for Adding a User
To add a user, you need a user assigned “User Access” in the Settings Role permissions. For more information, see LogicMonitor Roles.
Adding a Role
- In LogicMonitor, navigate to Settings > Users and Roles.
- Select the Users tab.
The Users table is displayed with user groups and users. - Select Add User Options, and then select Add User.
The Add User wizard is displayed to walk you through adding a role to your portal. - At the Basic step of the wizard, do the following:
- In the Username field, enter a name for the user.
You can enter a name or an email address that is used to log in to the account.
Note: An email notification is sent to the email associated with the user if this setting is modified.
- (Optional) In the First Name and Last Name fields, enter names to help identify the user.
Note: An email notification is sent to the email associated with the user if this setting is modified.
- In the Email field, enter the primary email address for the user.
This contact method is used for email alert and report delivery.
The email verification link is sent to the users in the following scenarios:
- When a new user is created
- When the existing user updates the email ID
The user must select the link provided in the email to complete the verification process and activate the account.
Note: An email notification is sent to the email associated with the user if this setting is modified.
- In the Password field, enter the password the user needs to use during initial login. Re-enter the password in the Retype Password field.
The passwords must be a minimum of 12 characters and a maximum of 256 characters, the password must contain:
- At least one uppercase letter
- At least one lowercase letter
- At least one digit
- At least one of the following special characters: ~, !, $, %, ^, (, ), _, –, +, =, }, {, ], [, @, #, &, \, |, ;, :, < , >, . ,?, /
Note: In addition to the password conditions, your password is verified automatically for any previous data breaches using the Have I Been Pwned integration with LogicMonitor. This integration allows LogicMonitor to check if you are using a compromised login password when creating an account, updating an account, and resetting the password to your account. If you wish to verify your password manually, see Have I Been Pwned.
Note: An email notification is sent to the email associated with the user if this setting is modified.
- To prompt the user for a password change at initial login, toggle the Force Password Change switch.
- To require the user to use two-factor authentication at next login, toggle the Enable two factor authentication? switch.
For more information about LogicMonitor’s implementation of this additional security layer, see Two-Factor Authentication.
Note: Two-factor authentication is not enforced when logging in through the mobile client.
Note: An email notification is sent to the email associated with the user if this setting is modified.
- (Optional) In the Enter phone number field, enter a valid phone number.
This is the phone number that is used for voice alerts and native SMS alerts.
Note: An email notification is sent to the email associated with the user if this setting is modified.
- (Optional) In the SMS Email Address field, enter an email address that is available as a contact method for email SMS alerts, and then select the format for the email SMS alert notifications from Email Format.
The “Full-text” option sends the entire alert message, and “Short (160 chars)” option sends an abbreviated version.
Note: An email notification is sent to the email associated with the user if this setting is modified.
- From TimeZone, select the time zone for the user.
By default, the time zone specified for the LogicMonitor account is applied to all users. Selecting a different time zone from the account allows the user to view and configure time-based data and settings relative to their local region. Users have the ability to toggle between their configured time zone and the account time zone after they are added to the portal.
All events a user configures (for example, SDT, Collector upgrades, report delivers, SLA periods) are configured in their specified time zone. This can be overriden using the time zone settings in the applicable event. - Select a timeout value at user-level from the User Inactive Session Timeout dropdown menu to log users out of the LogicMonitor portal after a specified time.
The default value is “Timeout not applied”. Inactivity for the specified length of time results in a user account being logged out.Important: When a timeout value is set at the user level, it overrides the timeout value configured at the portal level. - Toggle the Enable Persistent Session switch to enable uninterrupted access for specific users.
When you enable this setting, the user is excluded from the session timeout defined by the Keep Me Signed In security setting. This setting is useful for accounts that require continuous access, such as Network Operations Center (NOC) displays or service accounts.By default, LogicMonitor disables persistent sessions for all new and existing users. You must explicitly enable this setting for each user as needed. - In the User Groups. settings, assign the user to one or more previously-configured user groups.
If you do not assign the user to a group, the user is assigned to the default “Ungrouped” group in the users table. For more information, see Adding a User Group. - In Status, select whether to make the user active or suspended.
Users are active by default. Suspended users will be unable to log in to the system. - (Optional) In the Note field, enter any information for reference.
This information does not display anywhere else in the portal.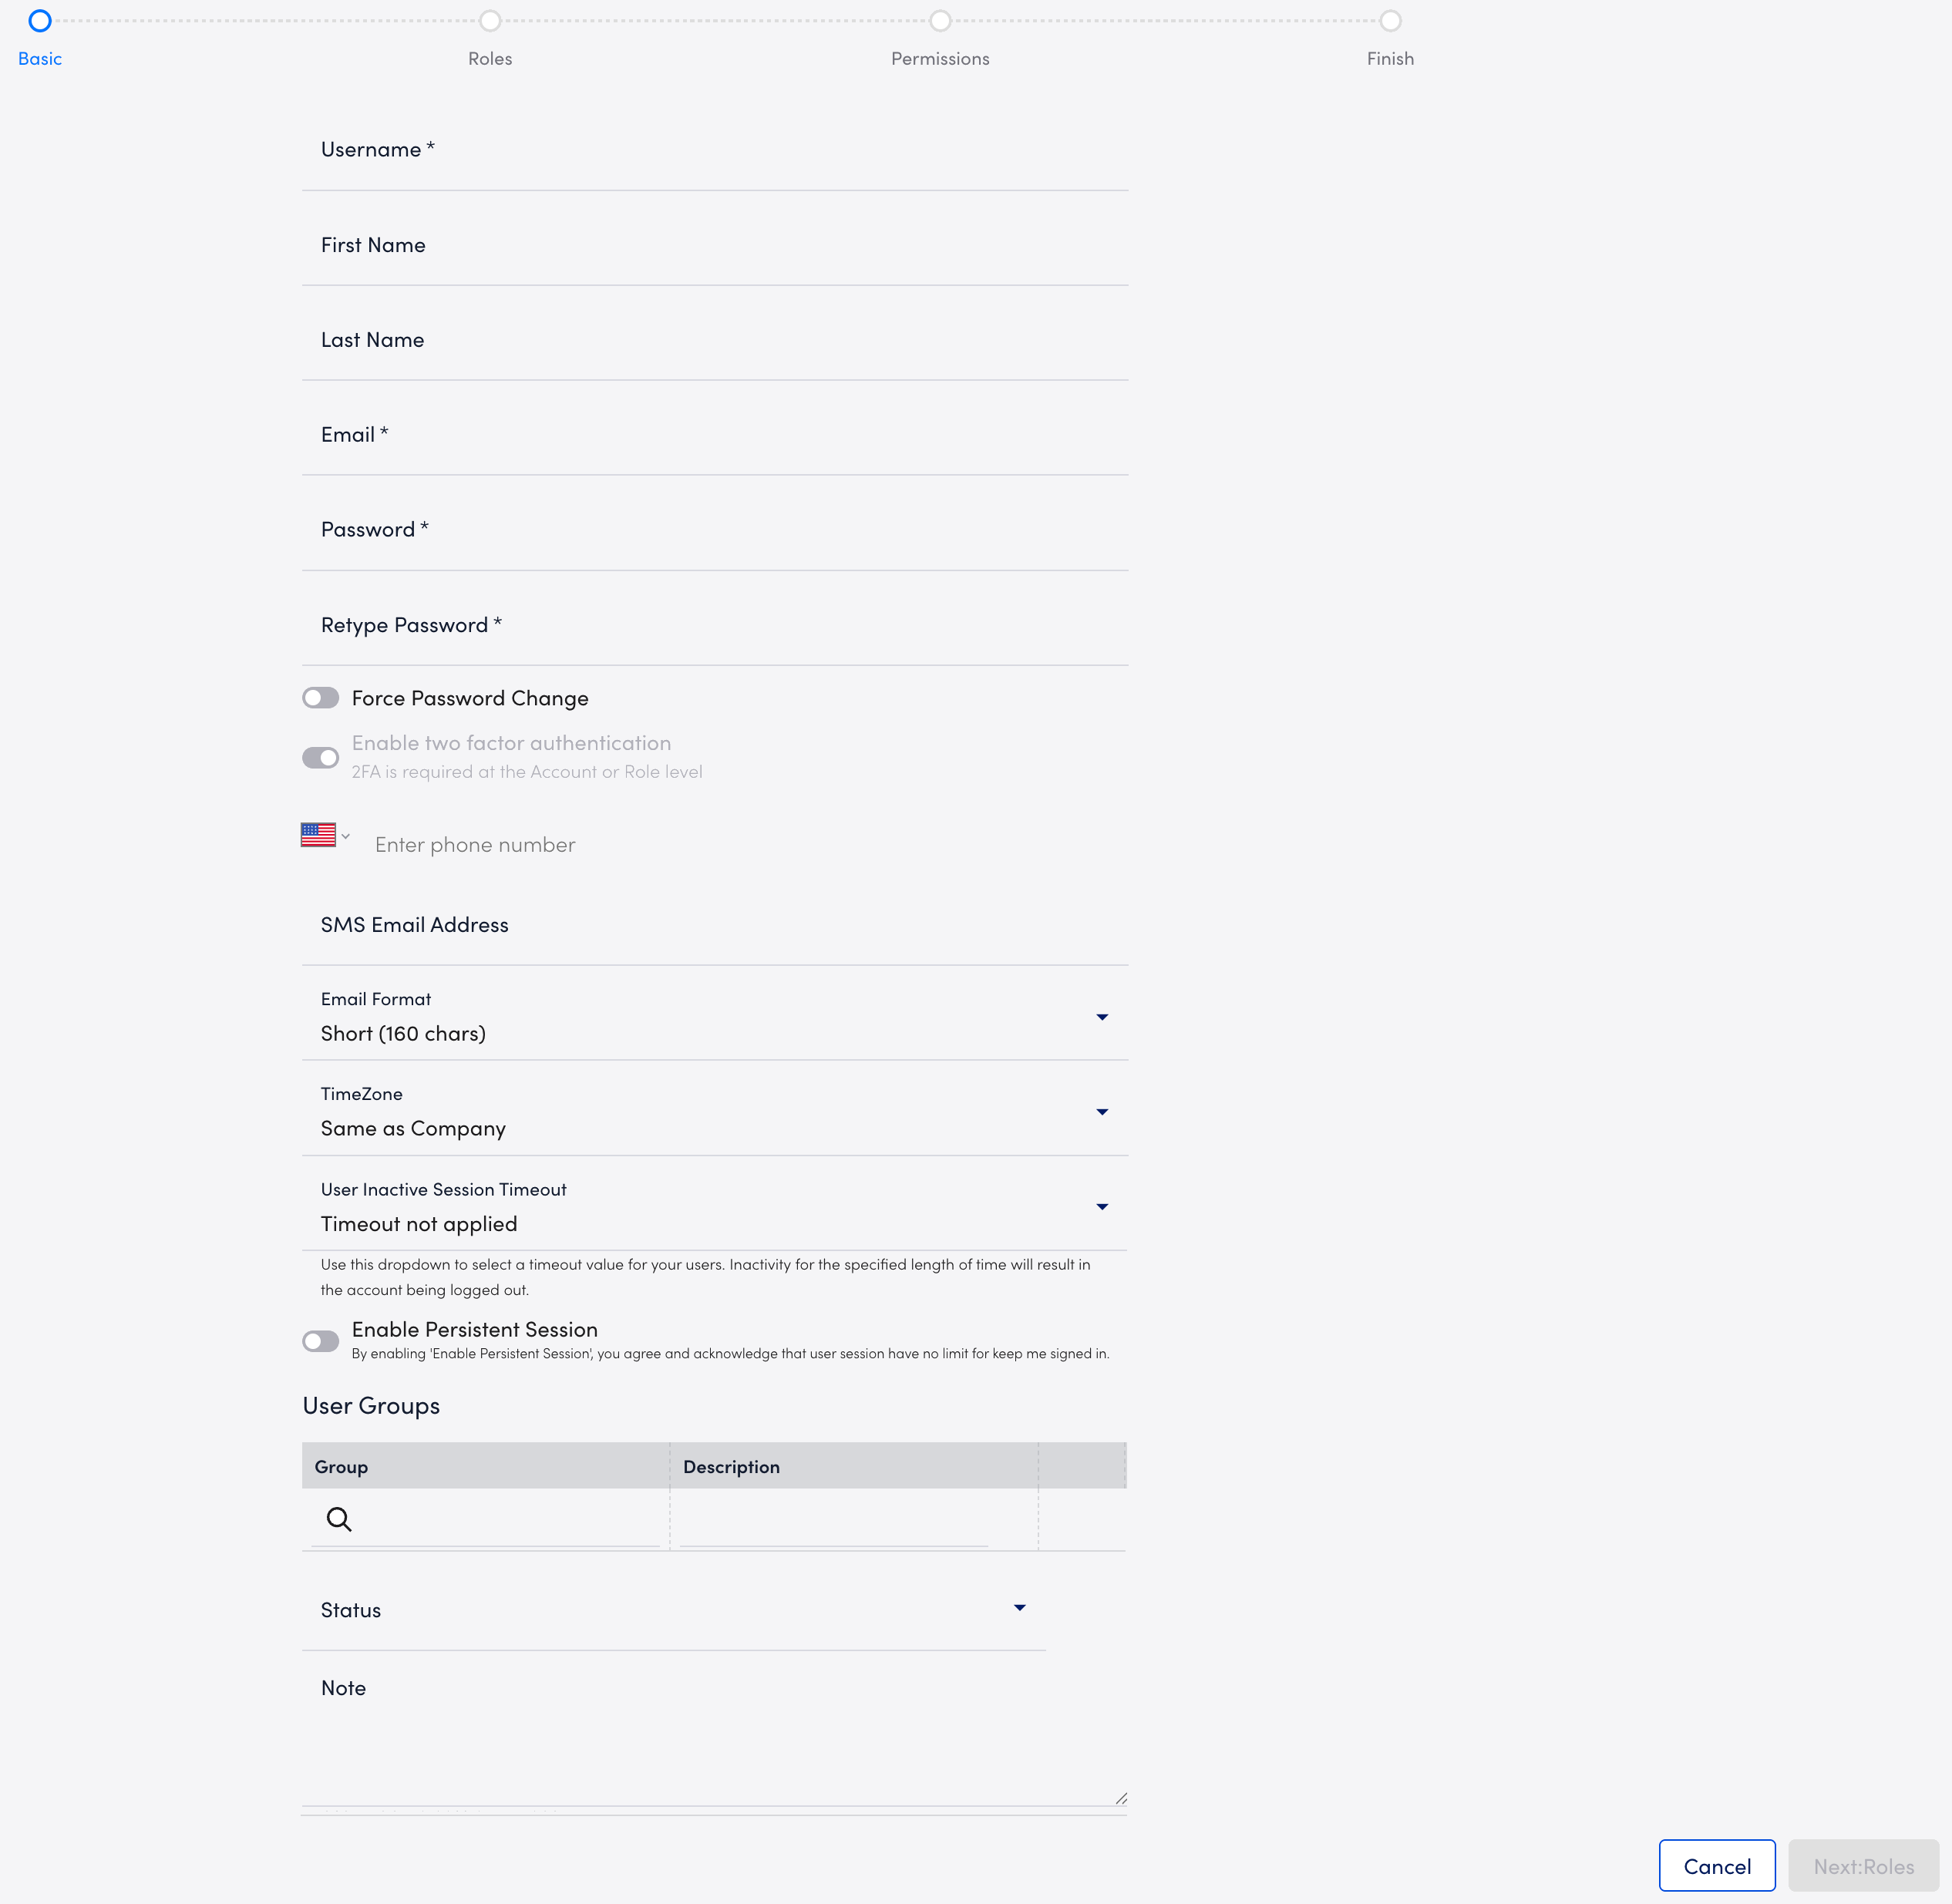
- Select Next: Roles.
- At the Roles step of the wizard, select the roles you want to assign to the user.
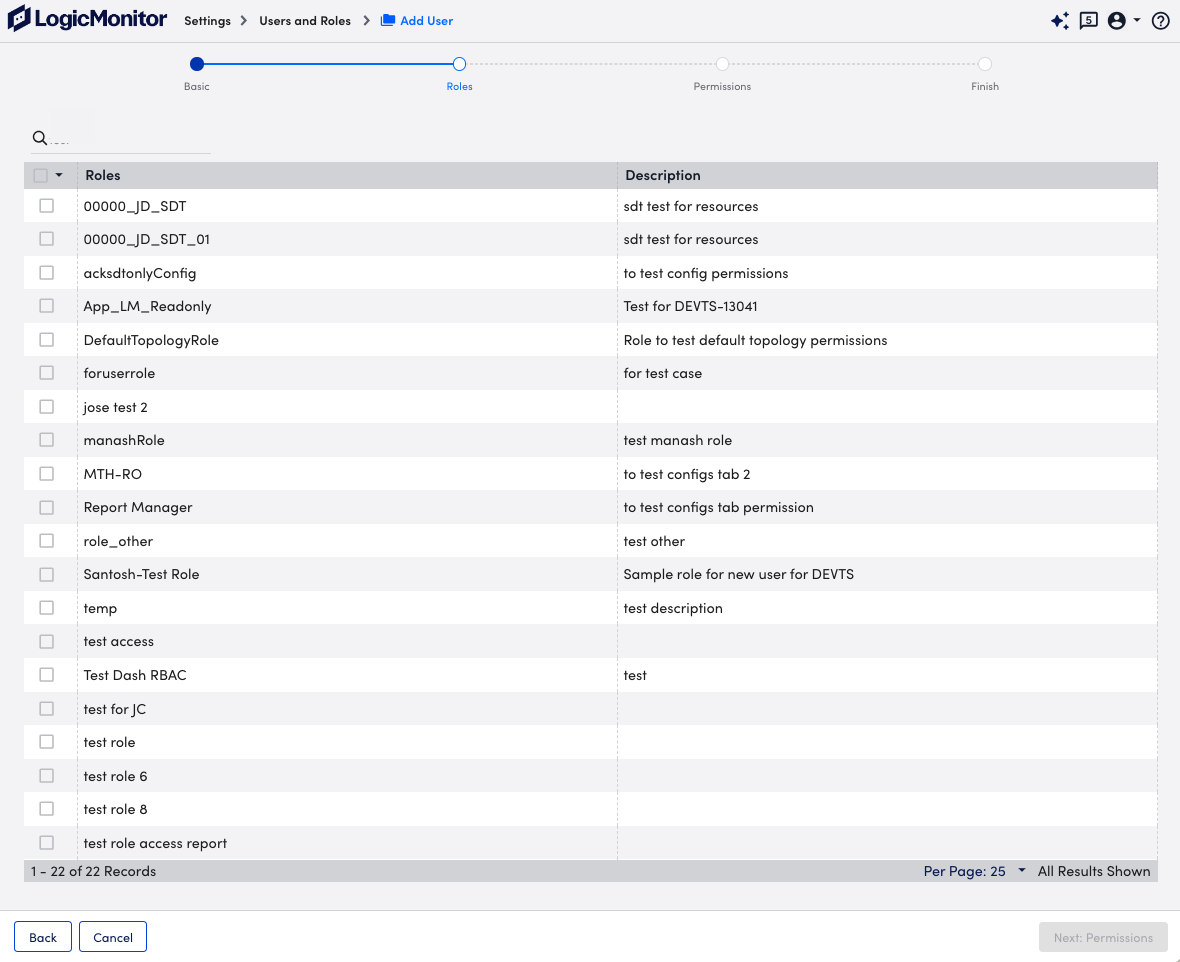
You can assign as many roles as needed to a user.
If a user is assigned multiple roles, the effective permissions for that user are the sum of the privileges of each role. For example, if one assigned role provides view only permissions to all resources, but another assigned role provides manage permissions to all resources, the user will have view and manage permissions for all resources. If yet another assigned role provides view permissions for all dashboards, but no permissions for resources, the user will maintain manage permissions for all resources and additionally gain view permissions for all dashboards. - Select Next: Permissions.
- At the Permissions step of the wizard, select the View Permissions you want the user to have.

If a toggle for a page is not selected, the user does not have access to that page in the portal regardless of the permission levels provided to the user by the assigned role. - Select Finish.
