Microsoft Teams Integration Setup
Last updated - 28 June, 2023
You can set up a Microsoft Teams integration by configuring the Microsoft Teams Integration setting in your LogicMonitor portal. Configuring the settings creates one instance of a Microsoft Teams integration in your LogicMonitor portal, and each instance integrates with one Microsoft Teams channel. You can configure as many instances as your environment needs.
After an integration is set up, you can use the Microsoft Teams Integration settings to test the alert delivery between LogicMonitor and your Microsoft Teams channel.
You can also use the Microsoft Teams Integration settings to prevent Teams from managing alerts in a Channel. For example, you may configure the integration to enable more than one Team to manage alerts. If your environment changes and you need to prevent a Team from managing alerts, you can modify the integration settings to remove that Team. In addition, you can prevent all Teams in your environment from managing alerts using a single setting.
The Microsoft Teams integration leverages Workflow to route alerts. After you add Workflow information in your LogicMonitor portal, you can do the following:
- Establish communication—Establishing communication between LogicMonitor and a Microsoft Teams channel is accomplished using Workflow that you create in your Microsoft Teams channels. These Workflows contain information that you enter into the Microsoft Teams Integration settings in your LogicMonitor portal.
- Manage alerts—You can enable a Team to manage alerts between LogicMonitor and a Microsoft Teams channel. You can use the following commands to manage, acknowledge (ACK) or put alerts in scheduled downtime (SDT) directly in a Microsoft Teams channel.
| To do | Use this command | Example |
| Acknowledge | @outogoing-webhook-name ack [alertId] [ackComment-optional] | @webhookname LMA12345 OptionalComment |
| Set schedule downtime (SDT) | @outogoing-webhook sdt [alertId] [sdtType] [sdtDuration] [sdtCcomment-optional] | @webhookname sdt LMA12345 device 30 minutes comment-Optional |
| Escalate | @outogoing-webhook-name escalate [alertId] | @webhookname escalate LMA12345 |
Note: You must be logged in to your LogicMonitor portal to acknowledge alerts from within Microsoft Teams.
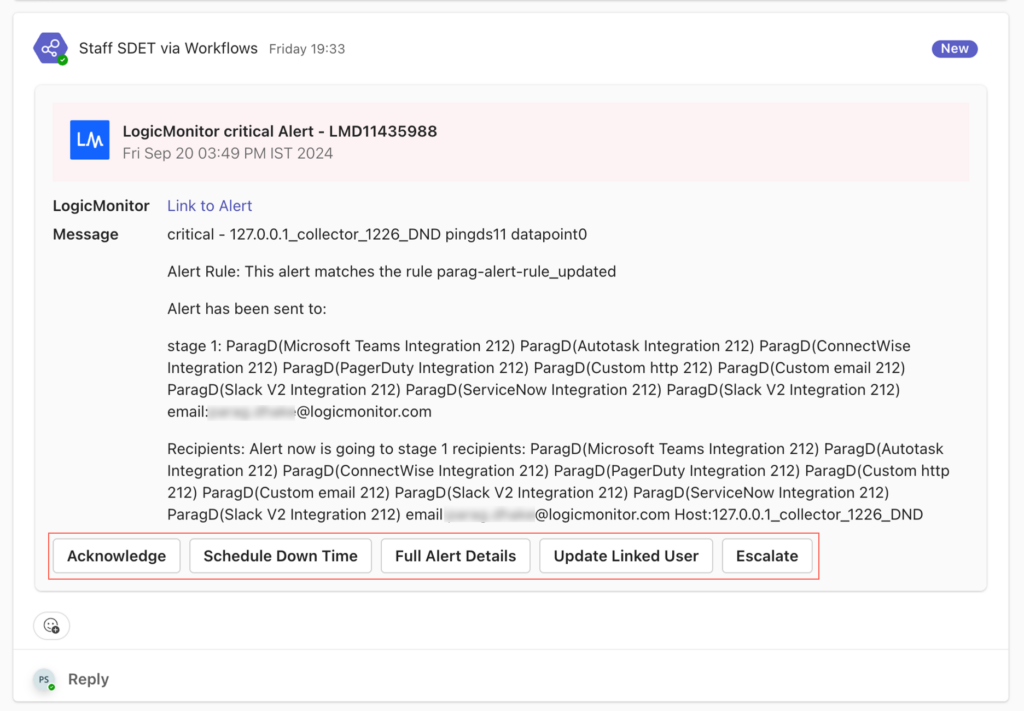
Alternatively, you can also select the following buttons provided in MS Teams integration to manage alerts:
- Acknowledge—Acknowledges the alert.
- Schedule Down Time—Sets a scheduled downtime (SDT) for the alert.
- Full Alert Details—Allows to view the complete alert details.
- Update Linked User—Updates a user for MS Teams. This updated user can manage the alert from Teams.
- Escalate—Escalate the alert to the next level. Before escalating an alert, make sure that the escalation chain with stages is already setup for your environment. For more information, see Escalation Chains.
In the following example, you can see the buttons to manage alerts from a MS Teams channel.
Requirements for Integrating with Microsoft Teams
To set up the Microsoft Teams Integration for LogicMonitor, do the following:
- Create Microsoft Teams Workflows
Creating a Worflow using MS Teams webhook template generates an URL that establishes communication between LogicMonitor and a Microsoft Teams channel. For more information, see Creating Microsoft Teams Workflows for Integration. - Create an Outgoing Webhook in MS Teams
Creating an Outgoing Webhook generates an Outgoing Webhook Token (also called a Hash-based Authentication Code (HMAC) security token) used to manage LogicMonitor alerts for a single Microsoft Teams channel. For more information, see Create Outgoing Webhook from Microsoft’s documentation.
Important: When creating the Outgoing Webhook in Microsoft Teams, you must use the following for the Callback URL:
https://integrationcenter.integrations.logicmonitor.com/rest/msTeams/outgoingWebhook
To enable or prevent a Team from managing alerts, you need to create a link for your team. For more information, see Create a link or a code for joining a team from the Microsoft’s documentation. To prevent all teams from managing alerts, you need the Tenant ID. You can obtain this from the team link.
- Set up Microsoft Teams Integration in the LogicMonitor portal
After creating a Workflow and an outgoing webhook in MS teams, you can integration MS Teams in LogicMonitor portal. For more information, see Setting up Microsoft Teams Integration in LogicMonitor.
Creating Microsoft Teams Workflows for Integration
Note: Posting message in a private channel is not supported by Microsoft Teams, hence use public channels in Workflows.
To create MS Teams integration using Workflows, do the following:
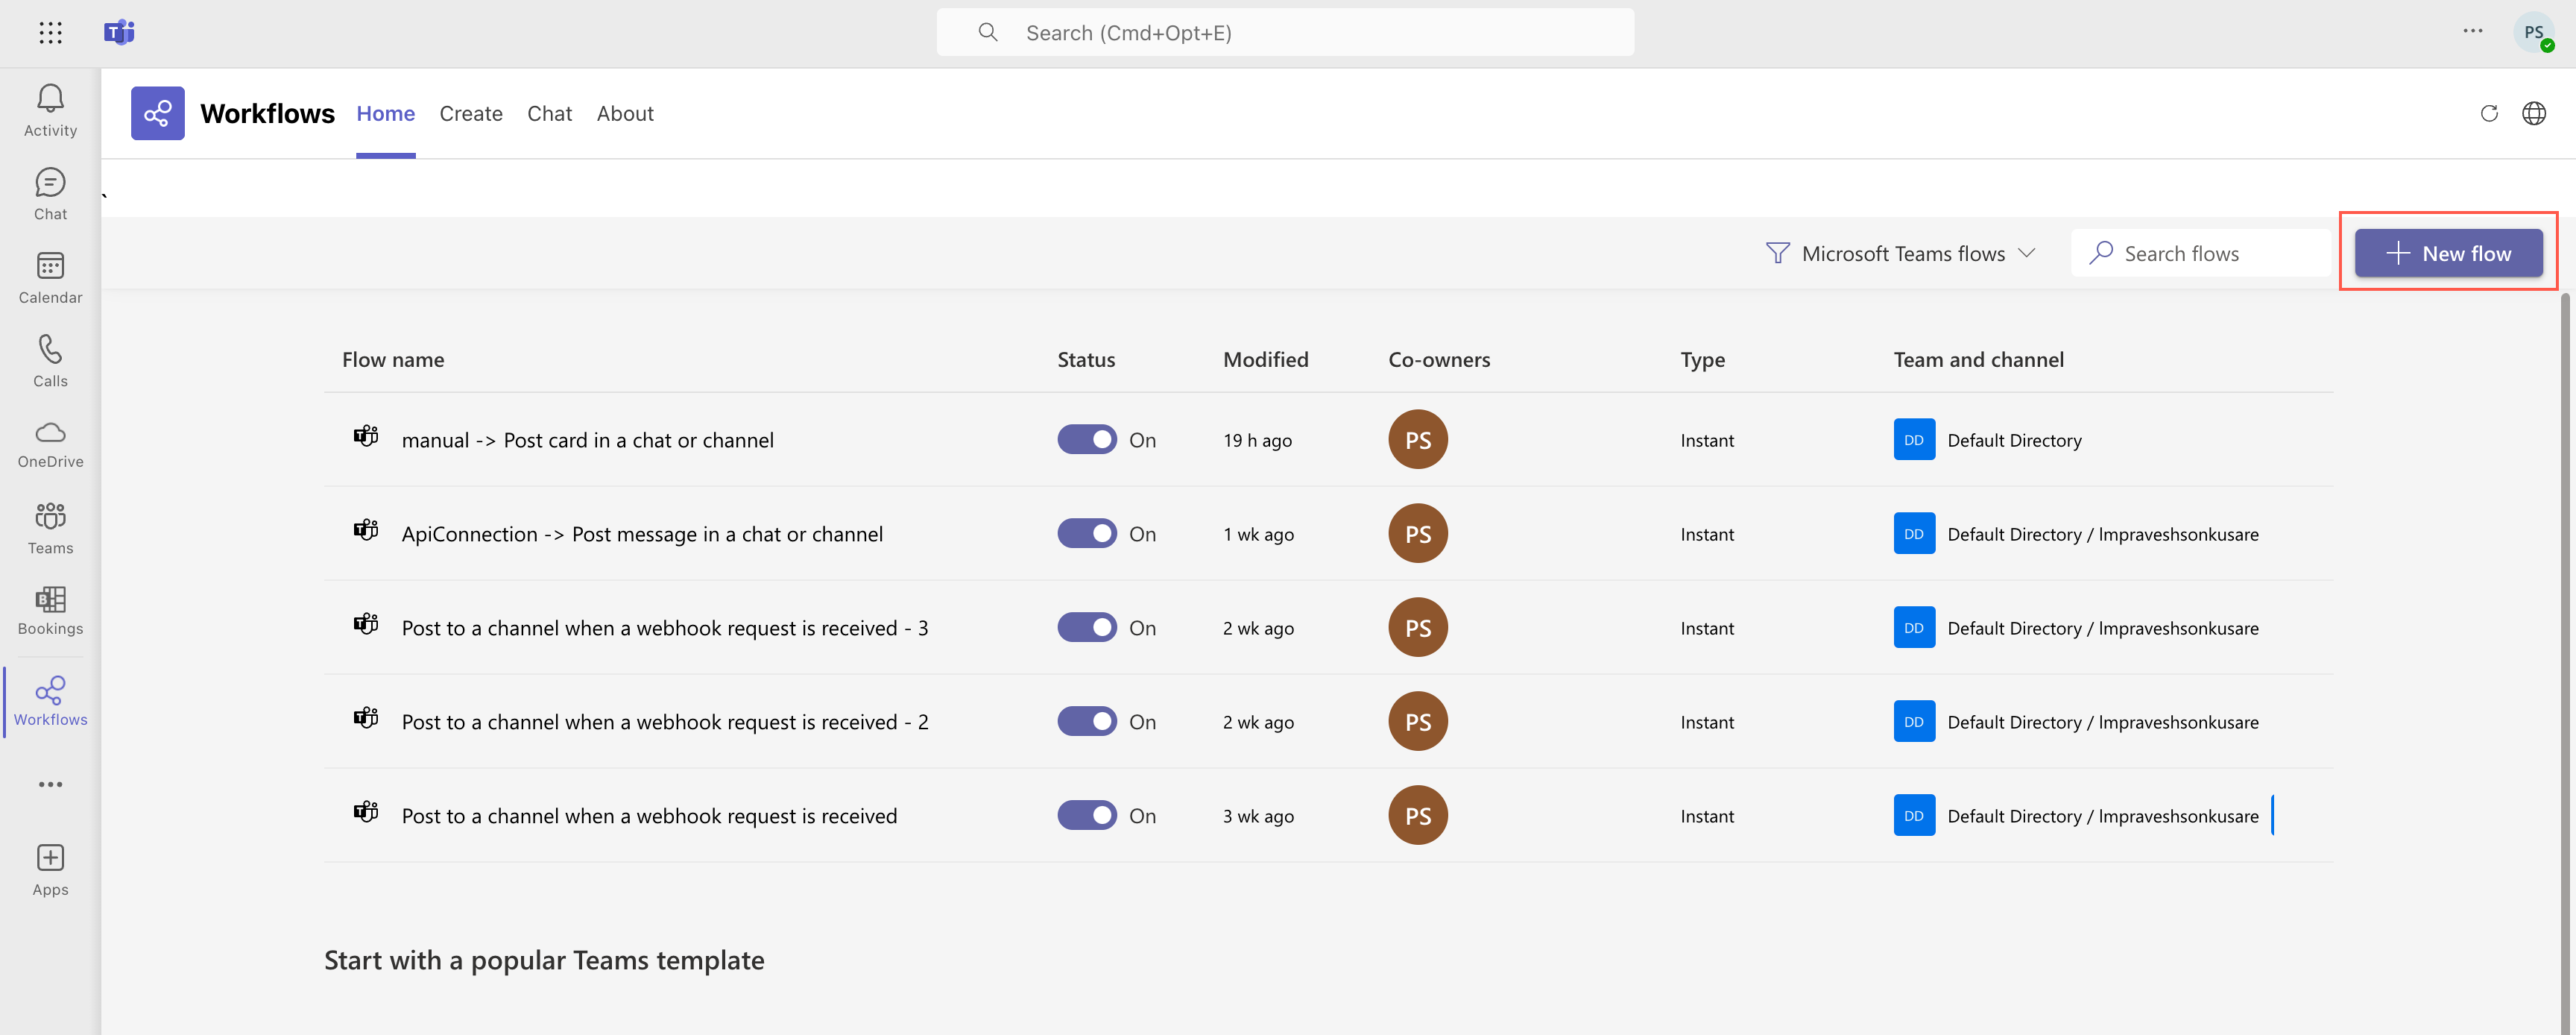
- In MS Teams, go to Workflows app, and then select + New flow.
- On the Create tab, select + Create from blank.

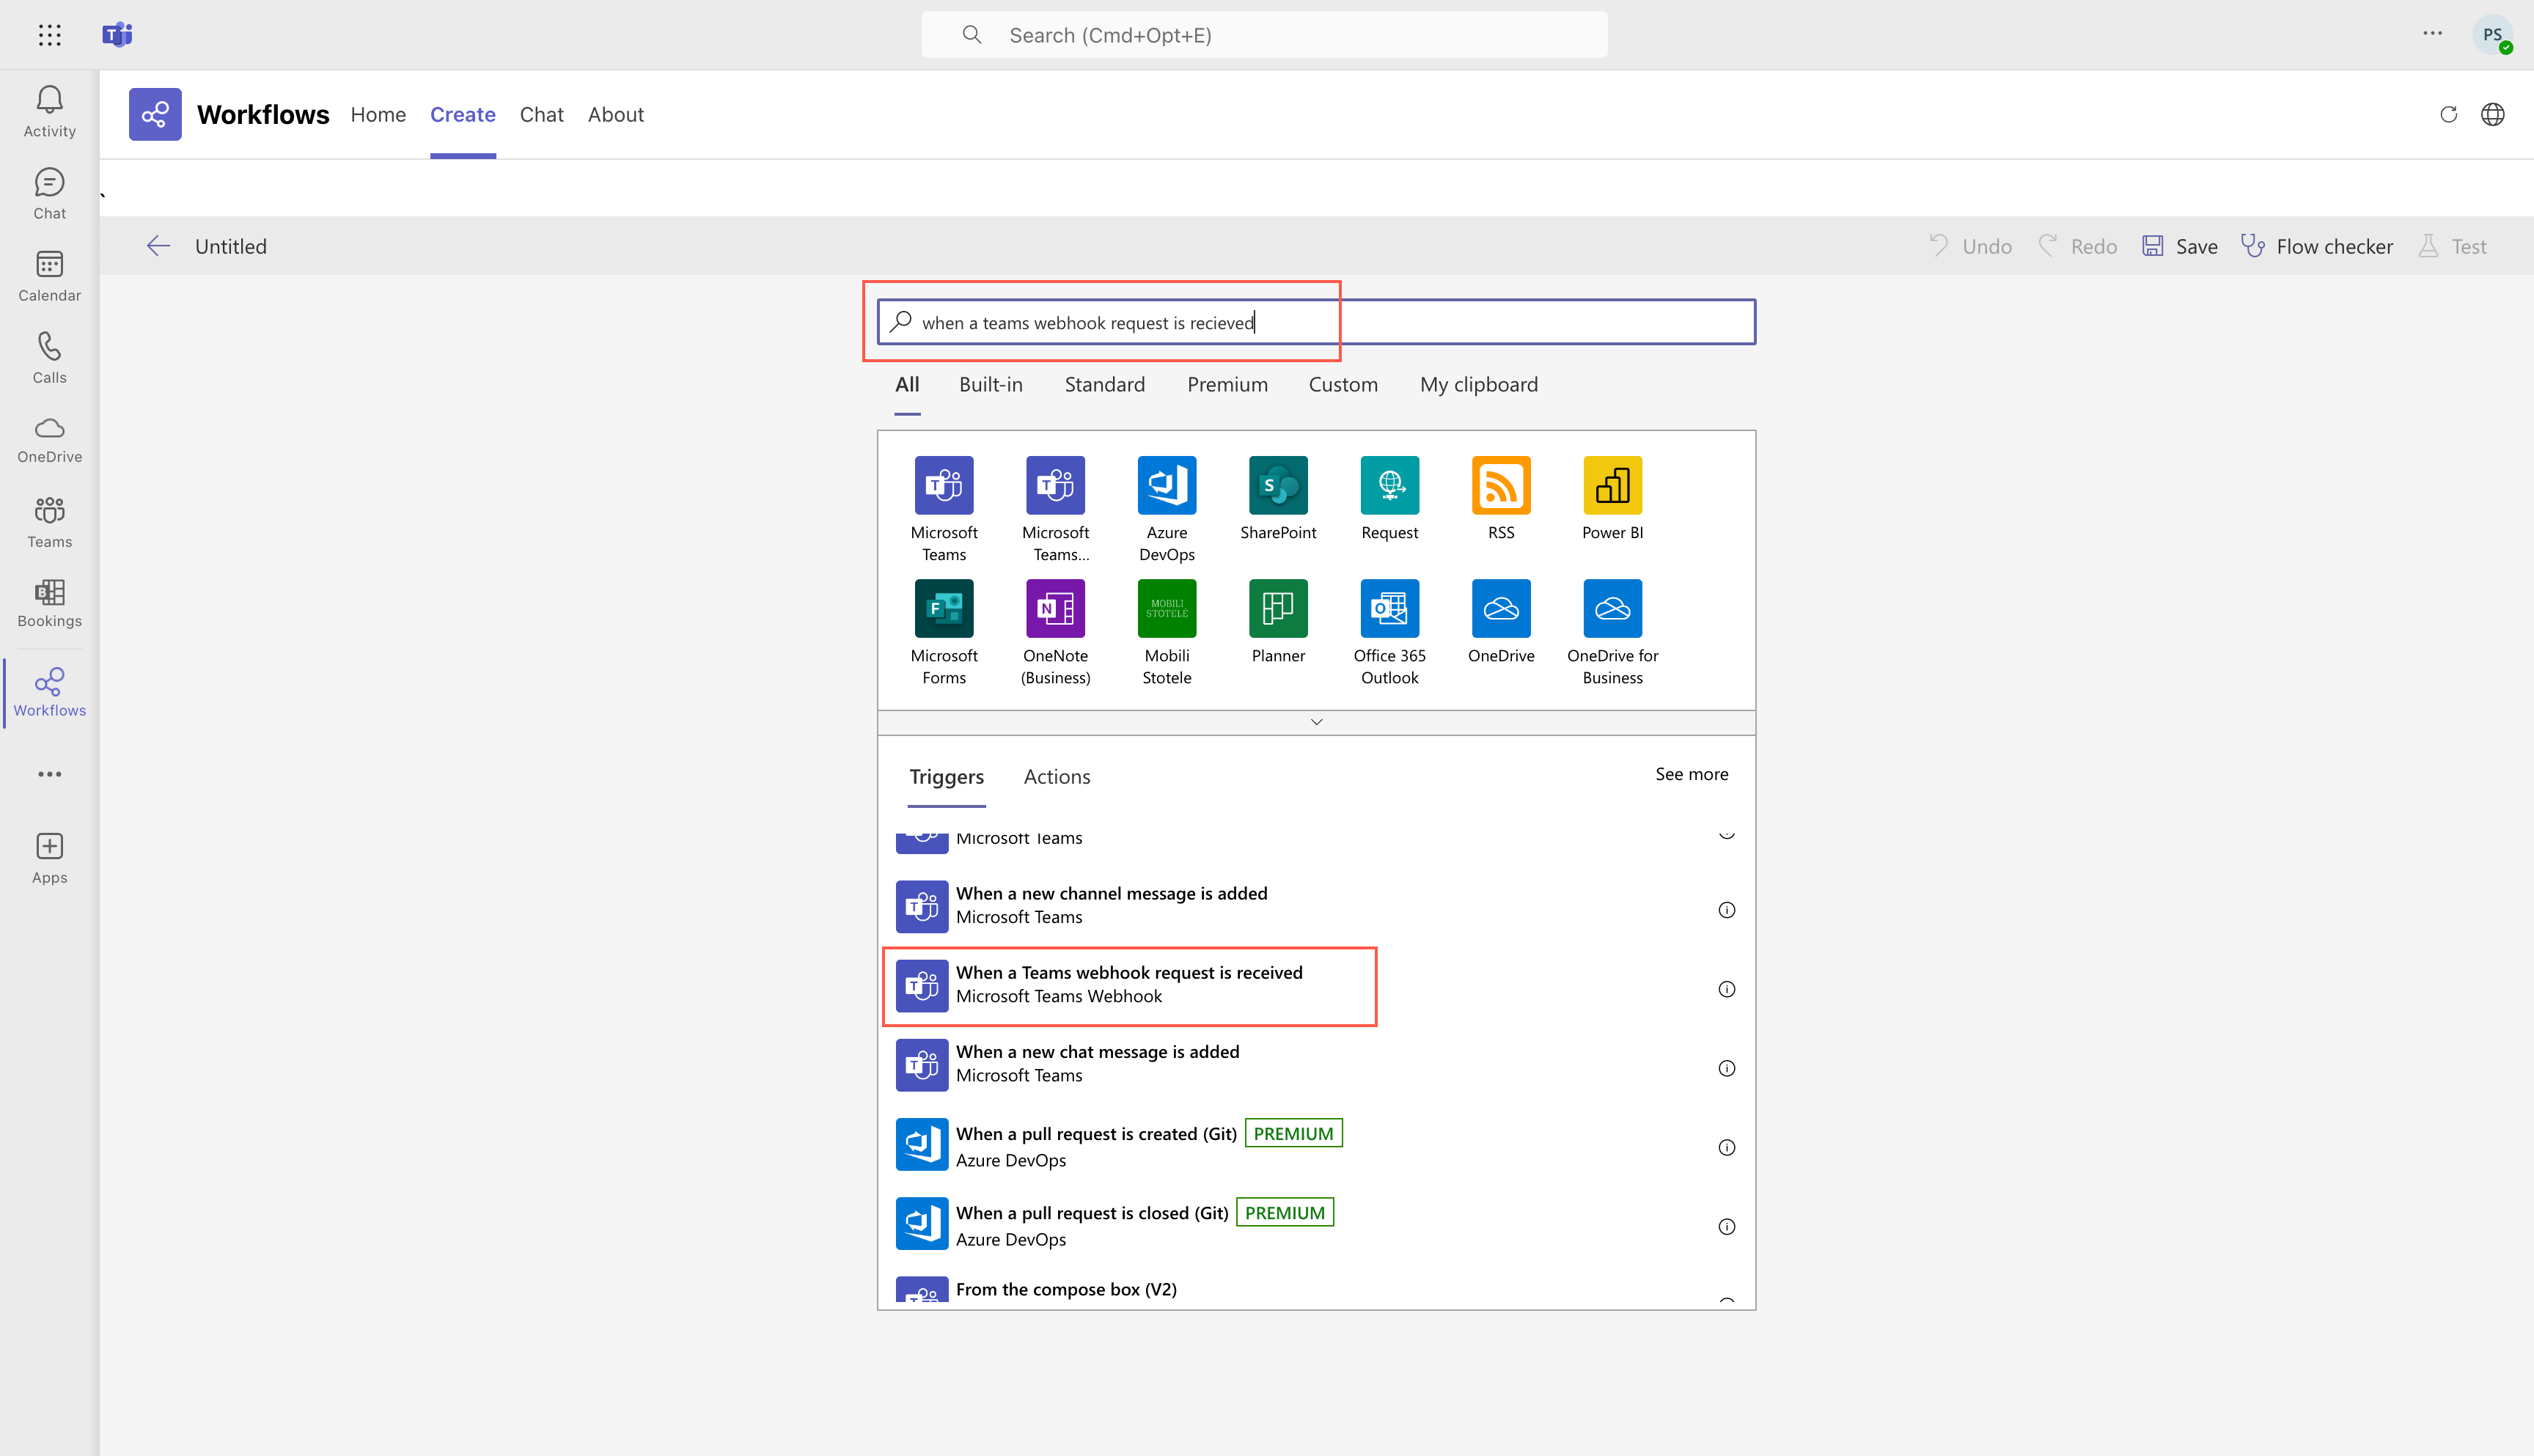
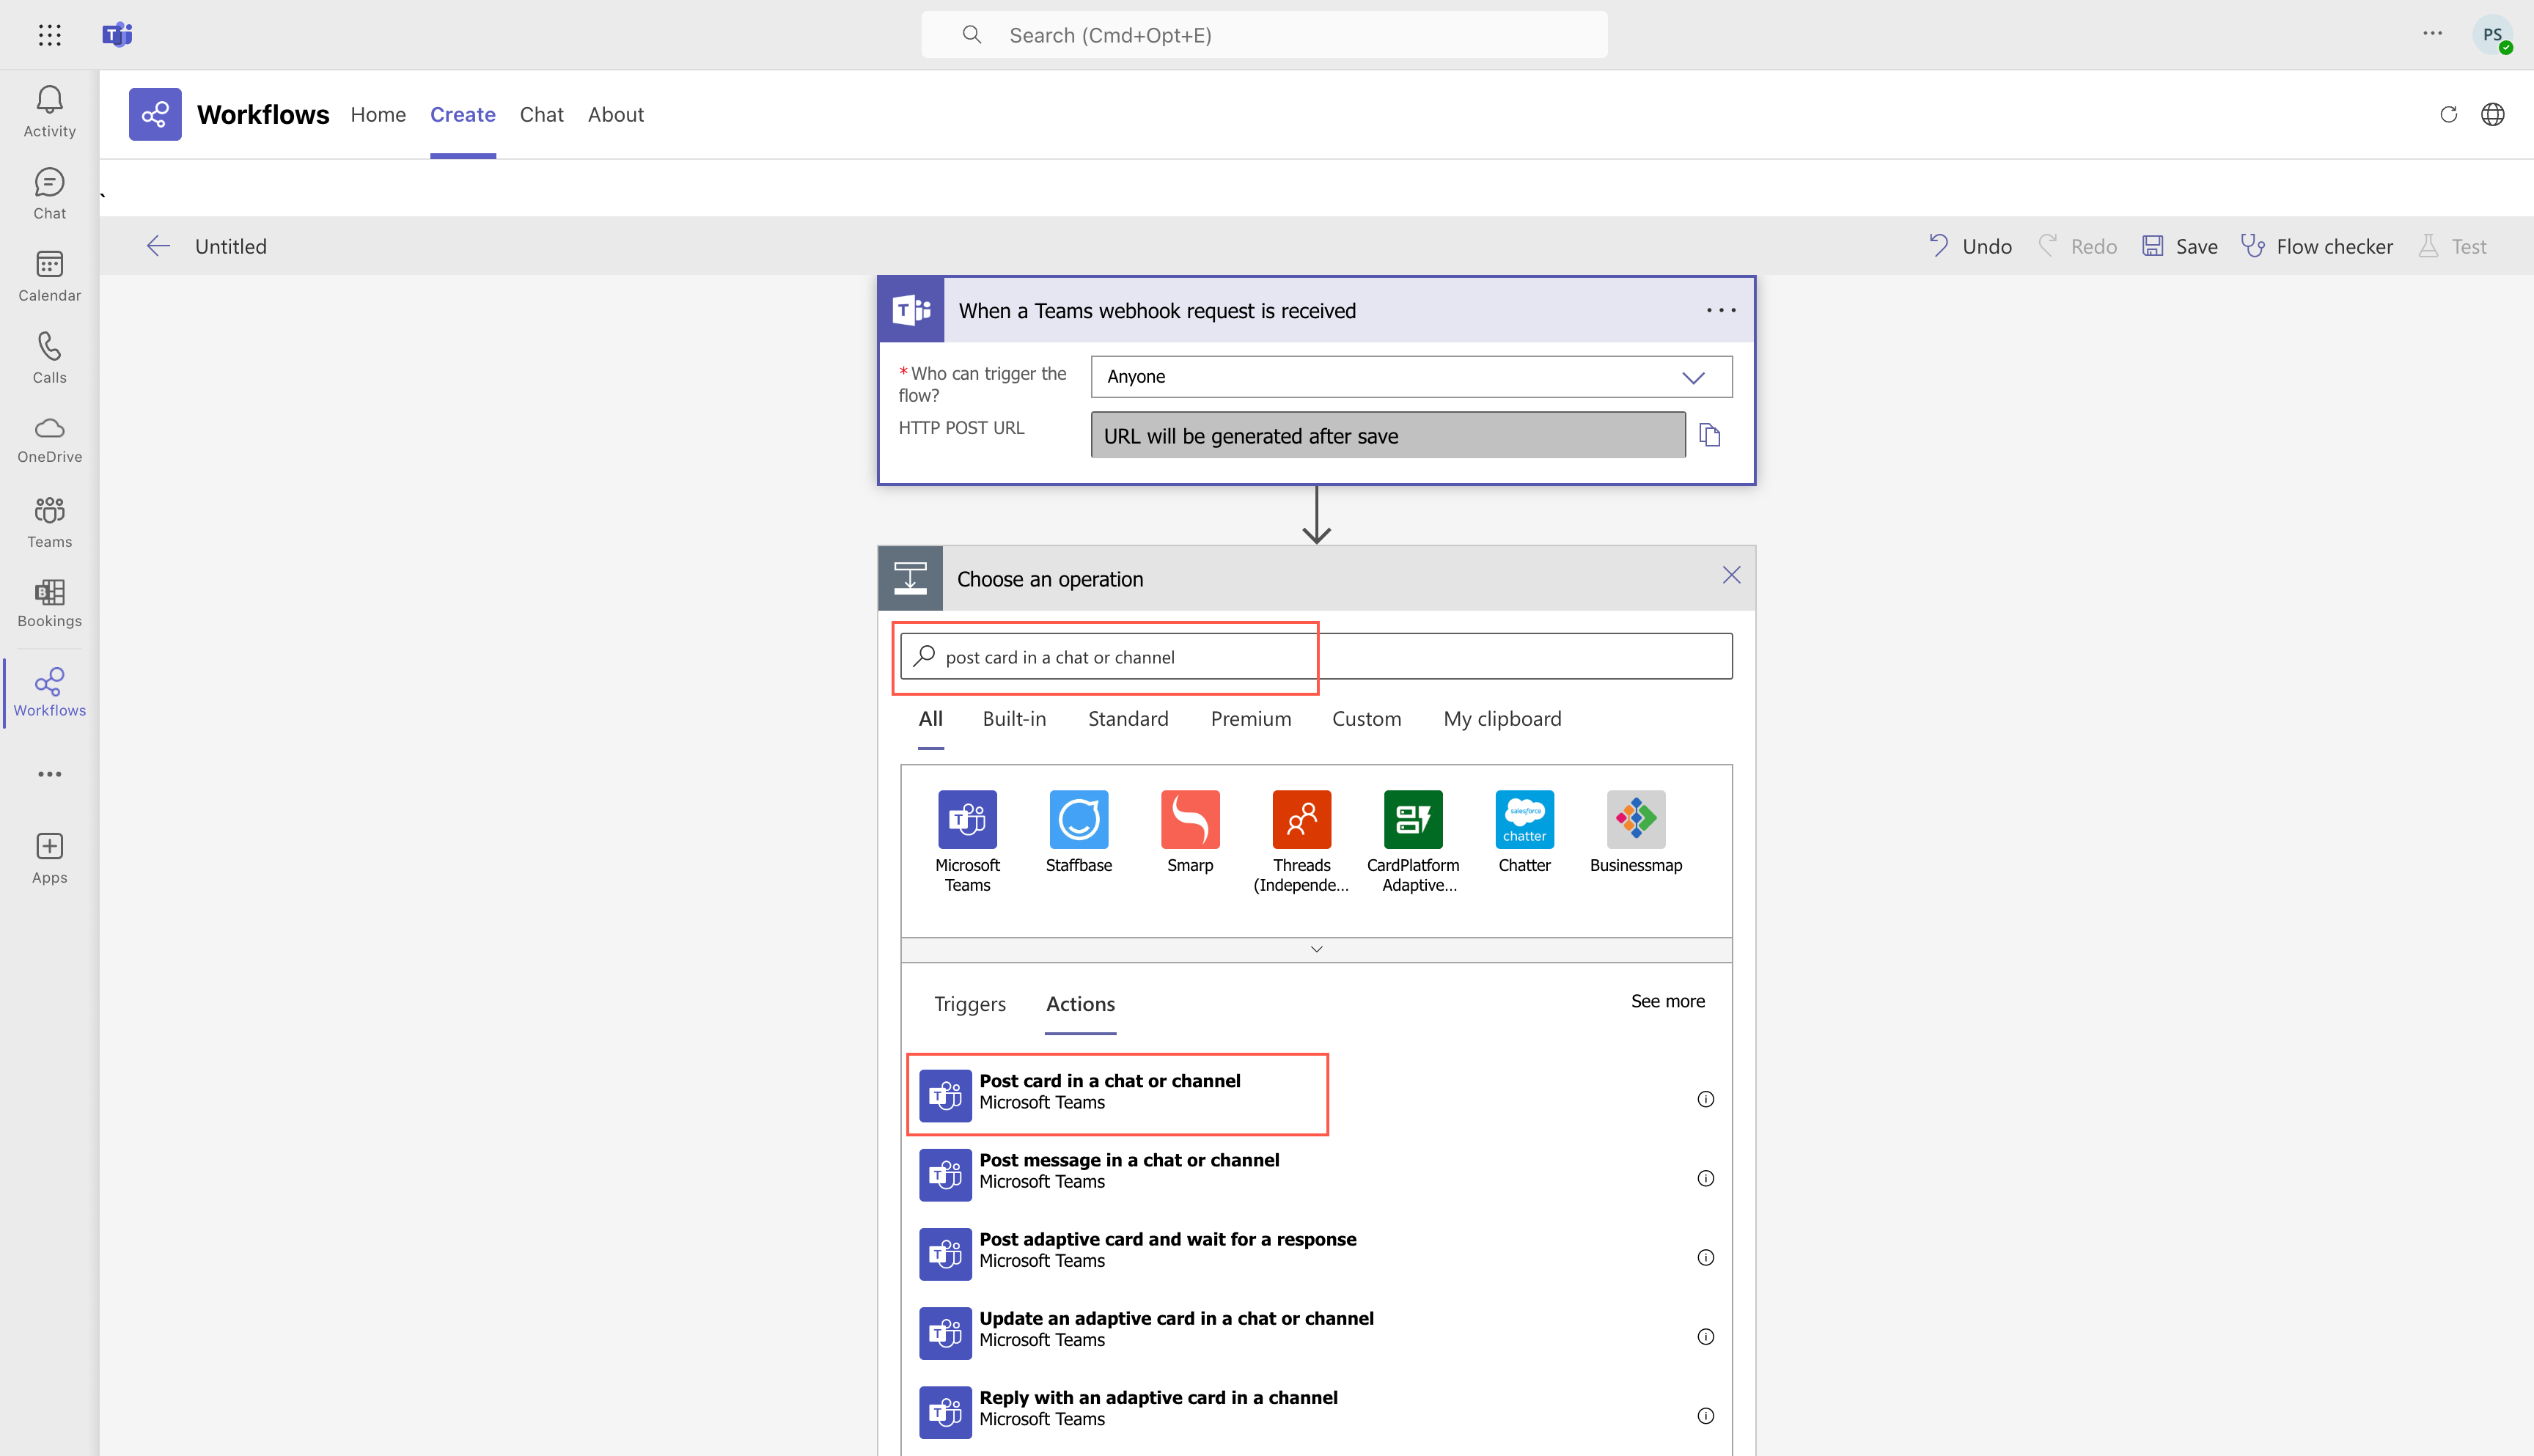
- Search for When a Teams webhook request is received, and then under Triggers, select When a Teams webhook request is received.
- In Who can trigger the flow?, select Anyone.
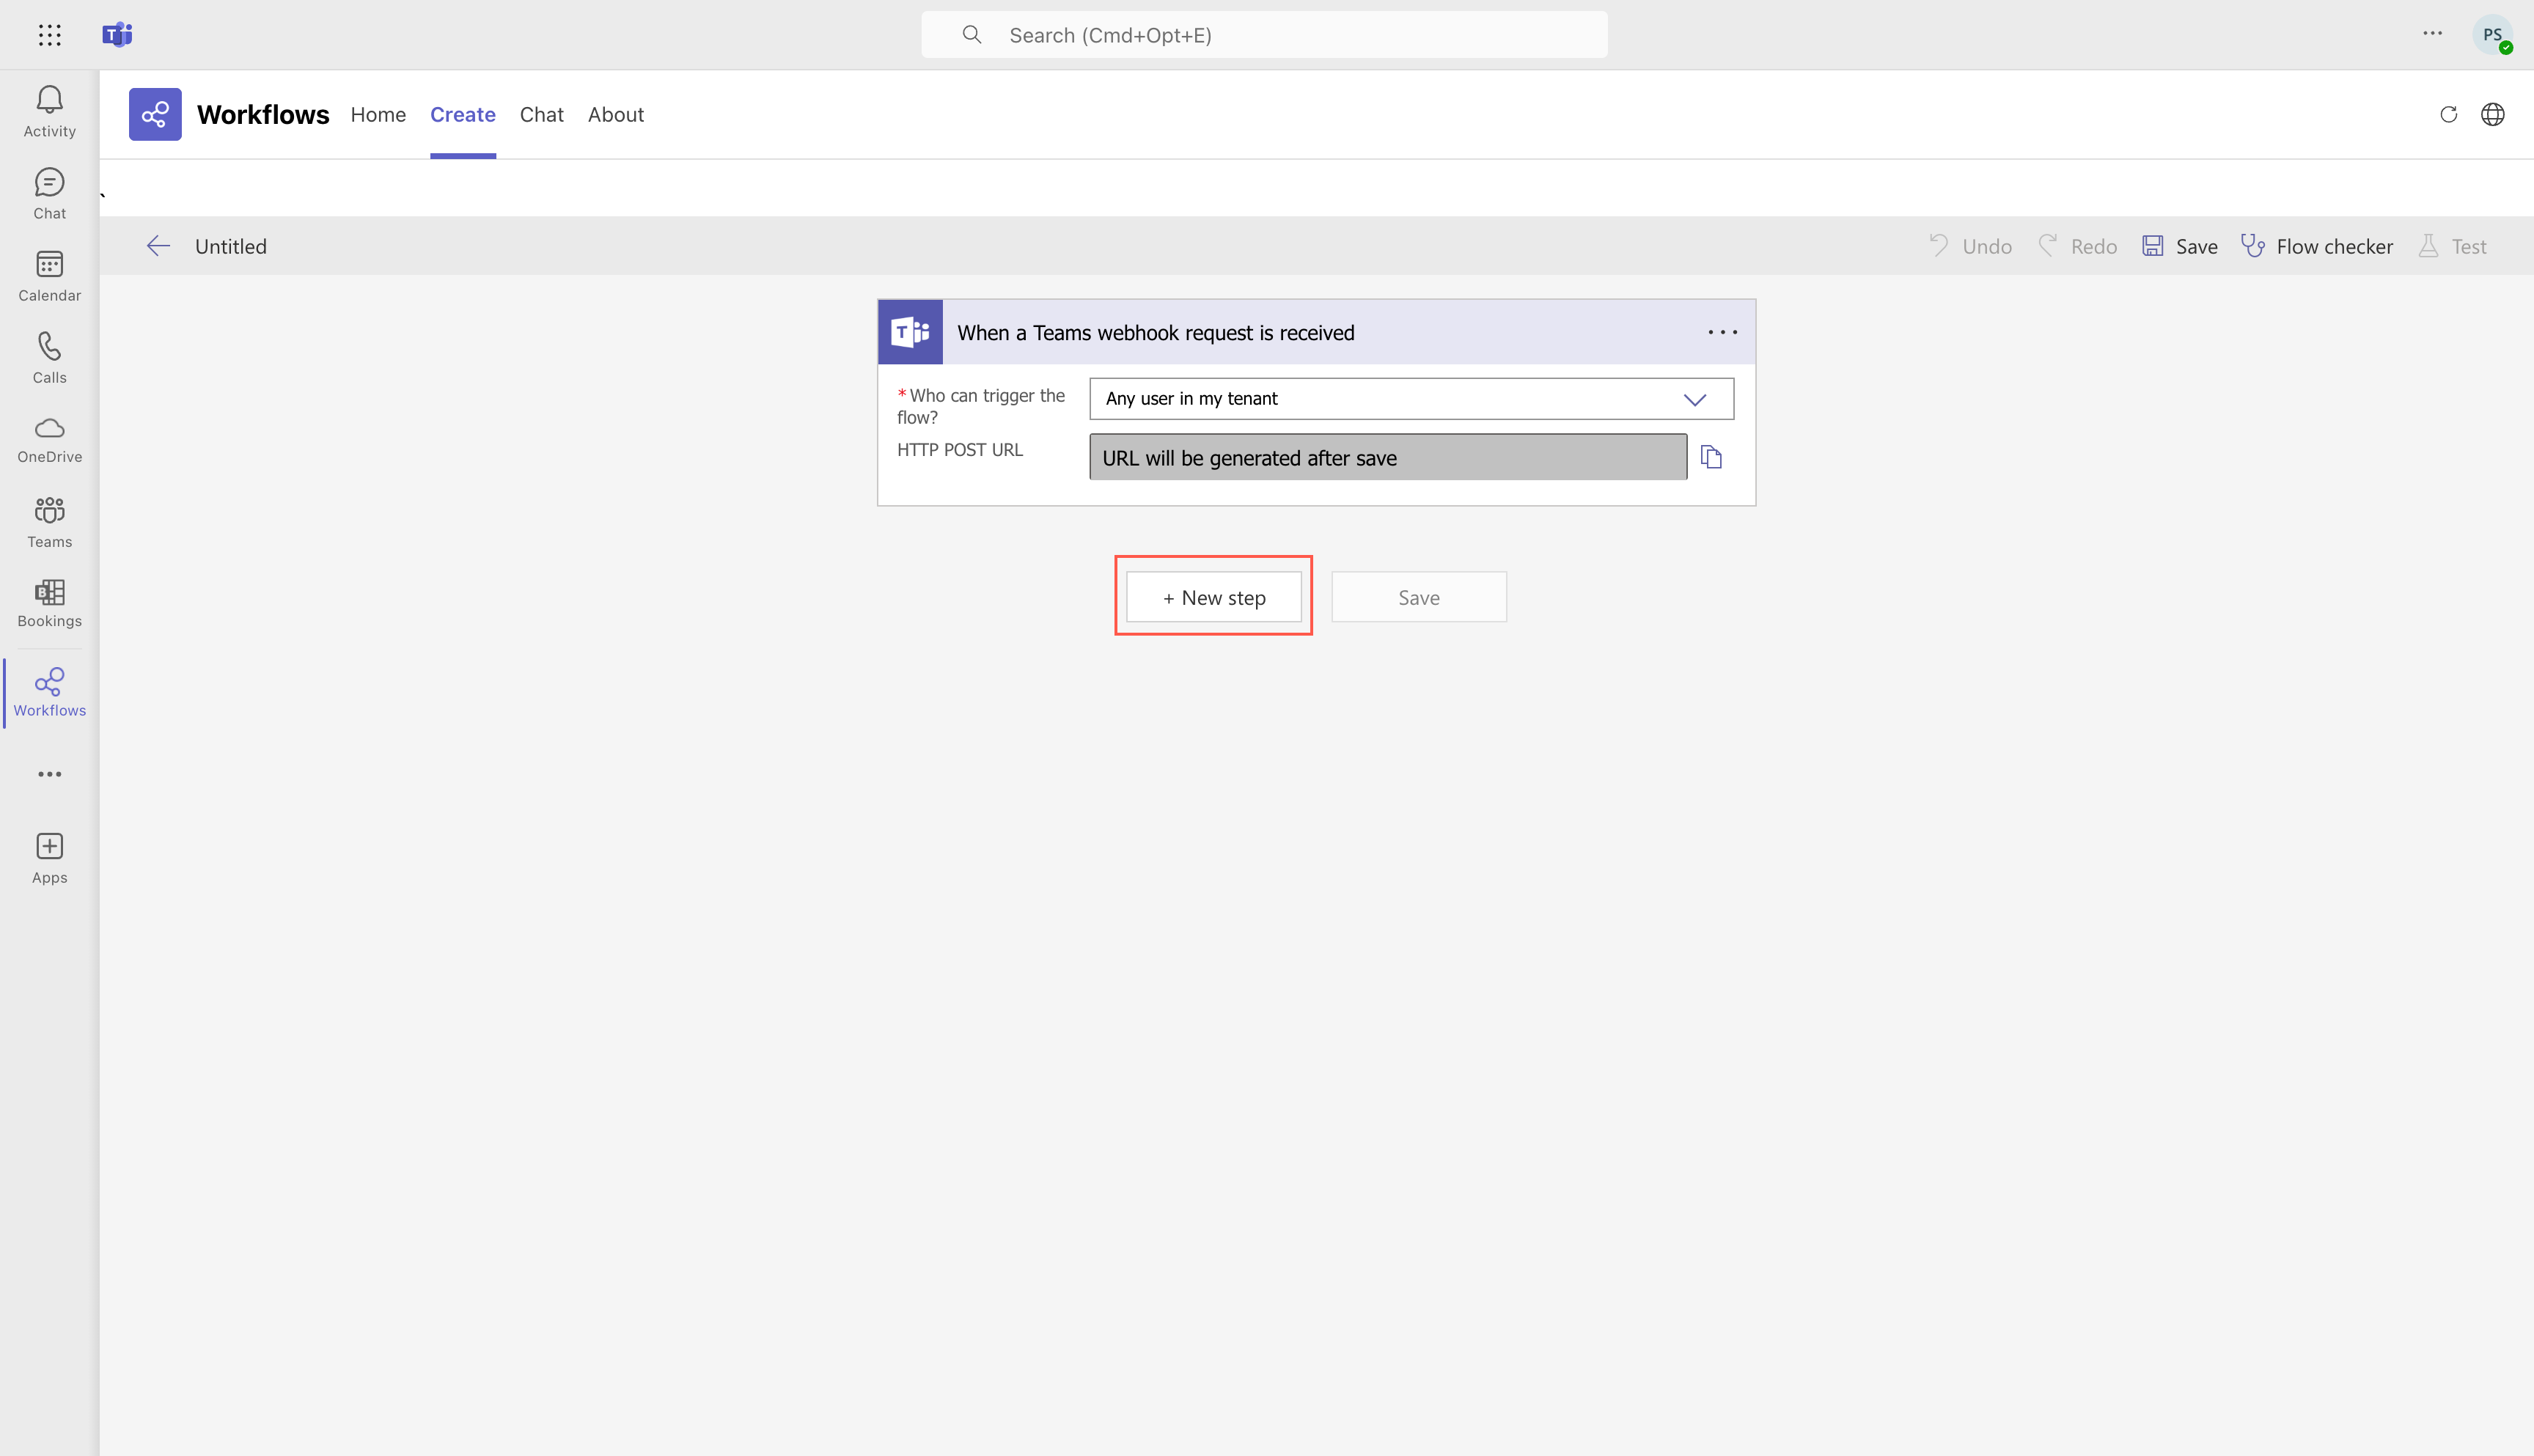
- Select + New step.
- Under Choose an operation, search for post card in a chat or channel, and then select it from Actions.
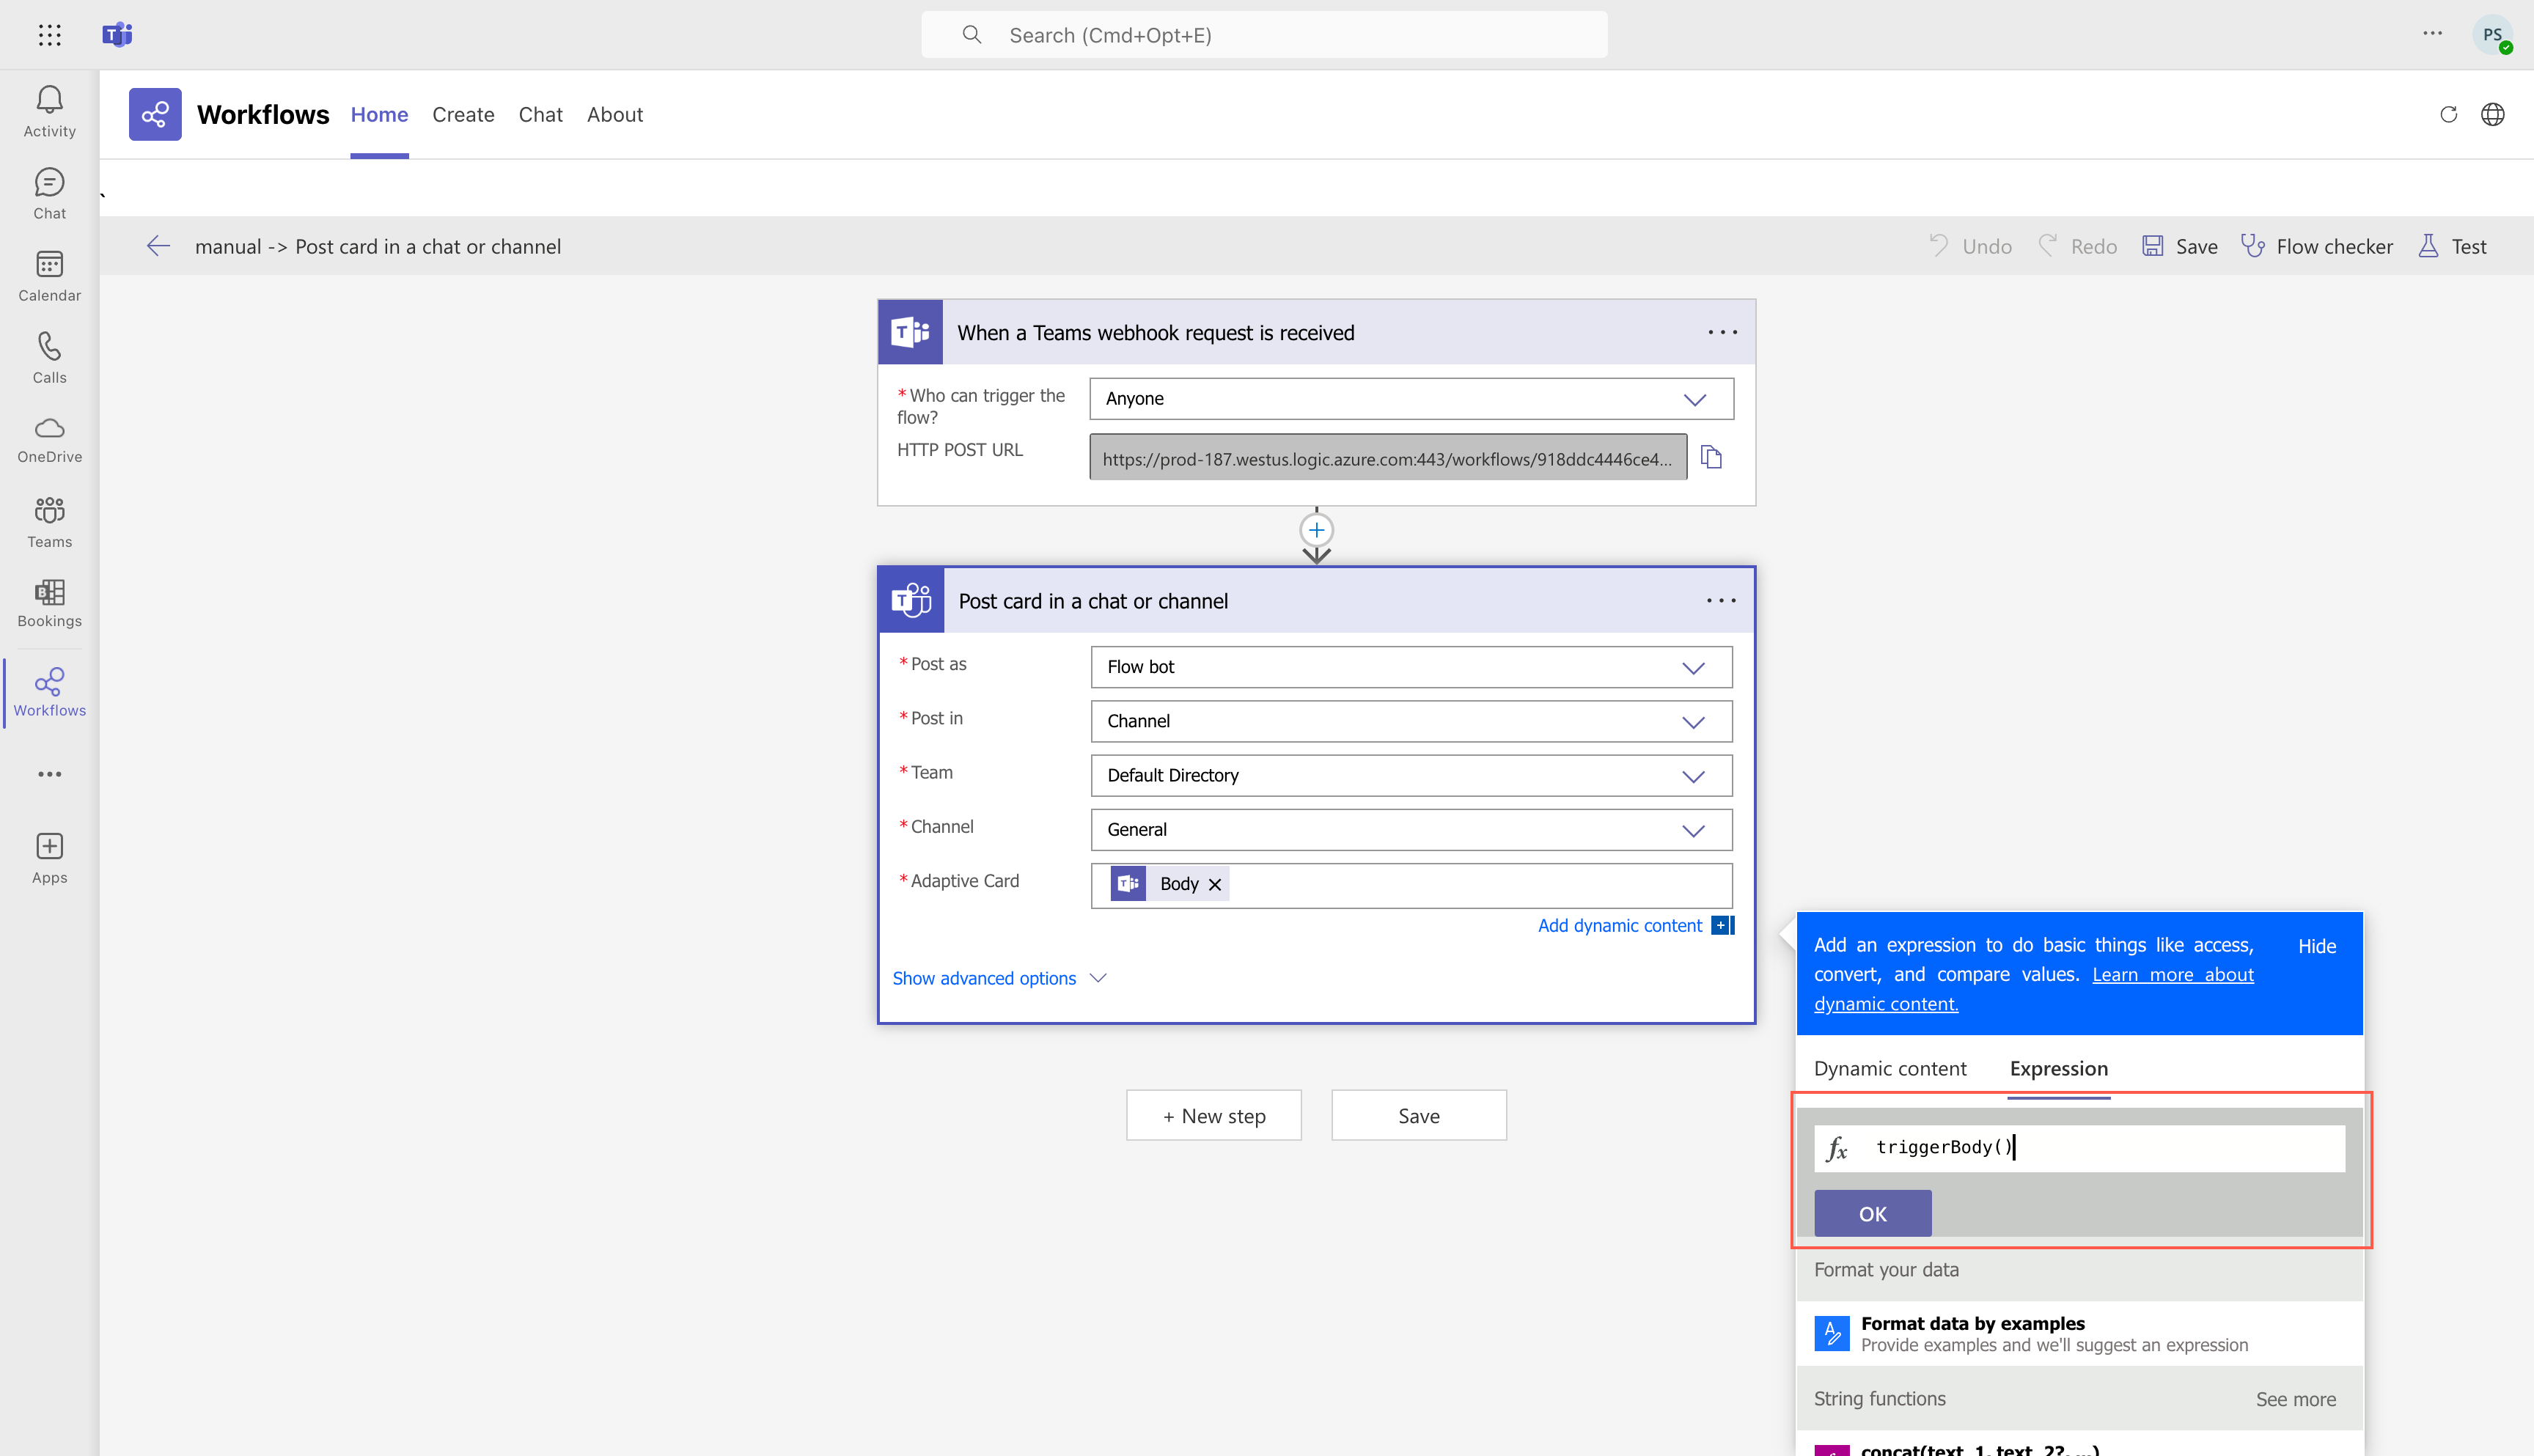
- Enter the details for the Post as, Post in, Team, and the Channel fields.
- Select the Adaptive card field, and then in the Expression, enter triggerBody(), and select OK.
- Select Show advance option and enter cardID. You can add any random number.
Note: You need to provide this number for card ID while creating Workflow for an adaptive card posted in a channel.
- Select Save.
- From HTTP POST URL, copy the generated URL.
This flow will allow you to automatically post adaptive cards in Teams channels or chats whenever a webhook is triggered.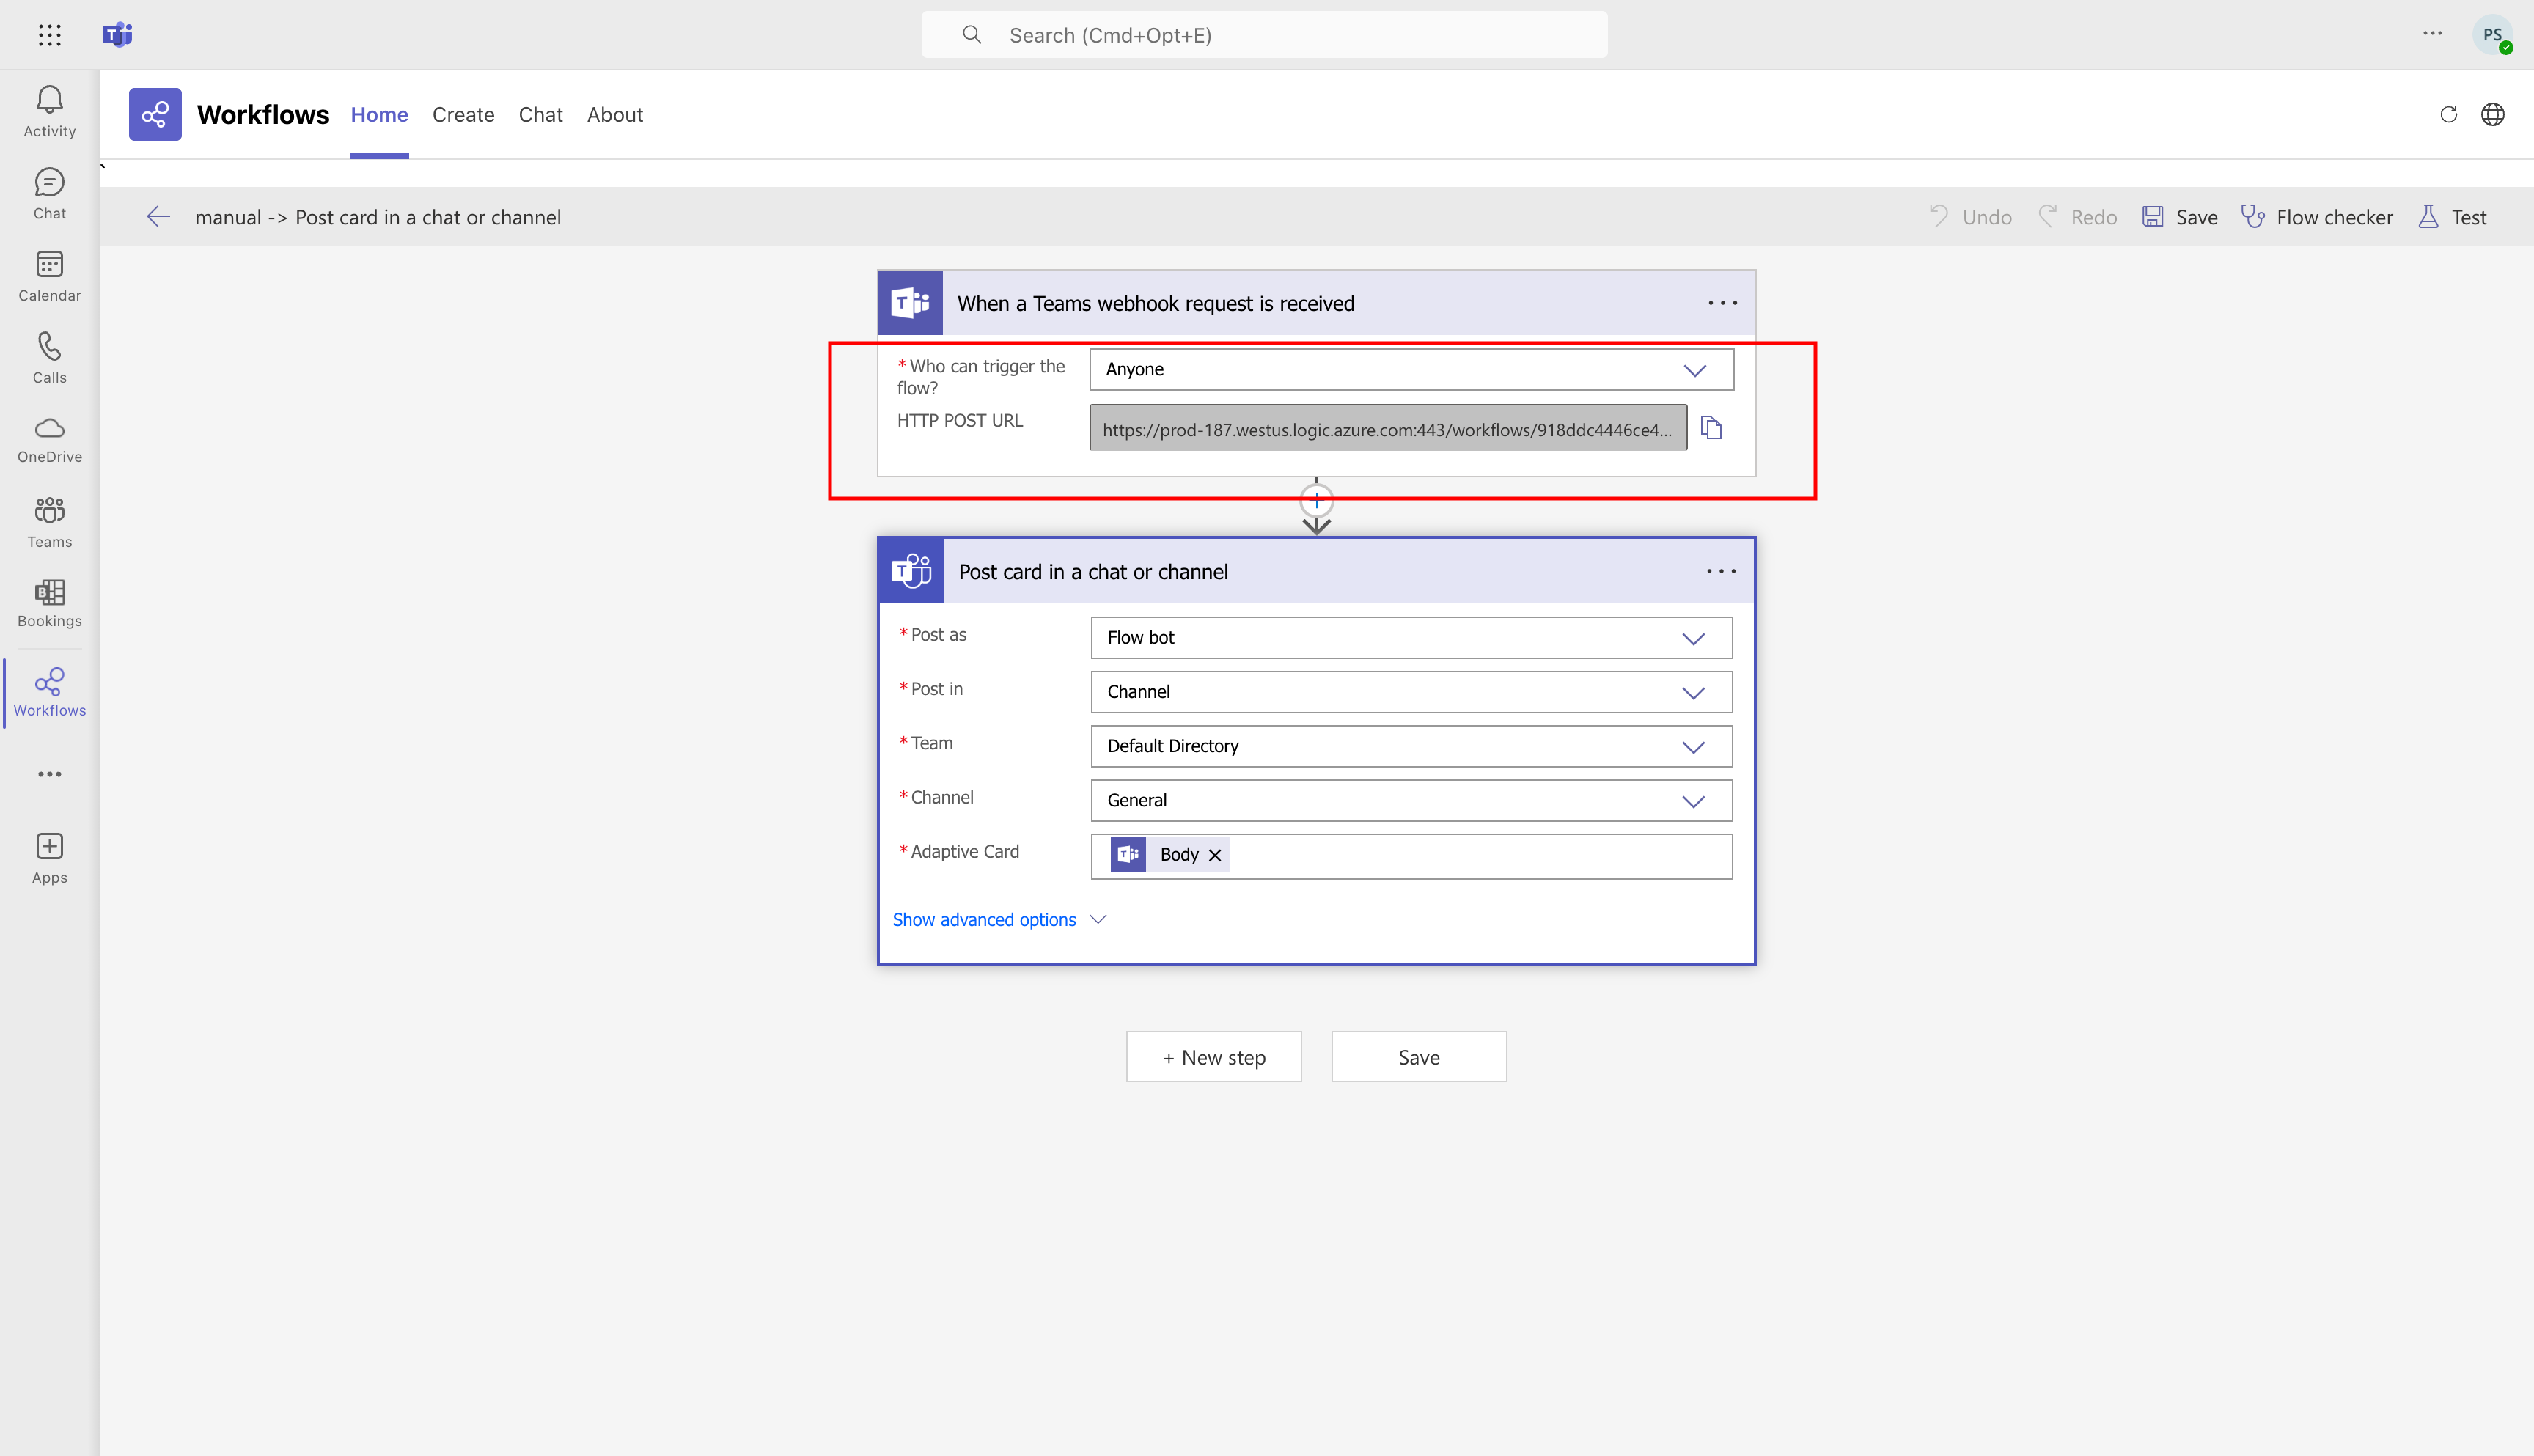
- Select Save.
Creating Workflow for an Adaptive Card Posted in a Channel
- In MS Teams, go to Workflows app, and then select + New flow.
- On the Create tab, select + Create from blank.
- Search for When someone responds to an adaptive card, and then under Triggers, select When someone responds to an adaptive card.
- Add the following in the adaptive card:
{"$schema": "http://adaptivecards.io/schemas/adaptive-card.json","msteams": {"width": "Full"},"type": "AdaptiveCard","body": []} - Provide an ID number for the Card ID. Use the ID of the adaptive card you’re expecting a response from, that is, the card ID number you provided while creating the Workflow.
- To add an HTTP Action, select +New Step, search for HTTP, and then select HTTP.
Note: The HTTP connector is a premium connector, which is available with some of the Office 365 plans or pay per use plan. For more information the licensing information, see Deep dive on specific licenses from Microsoft.
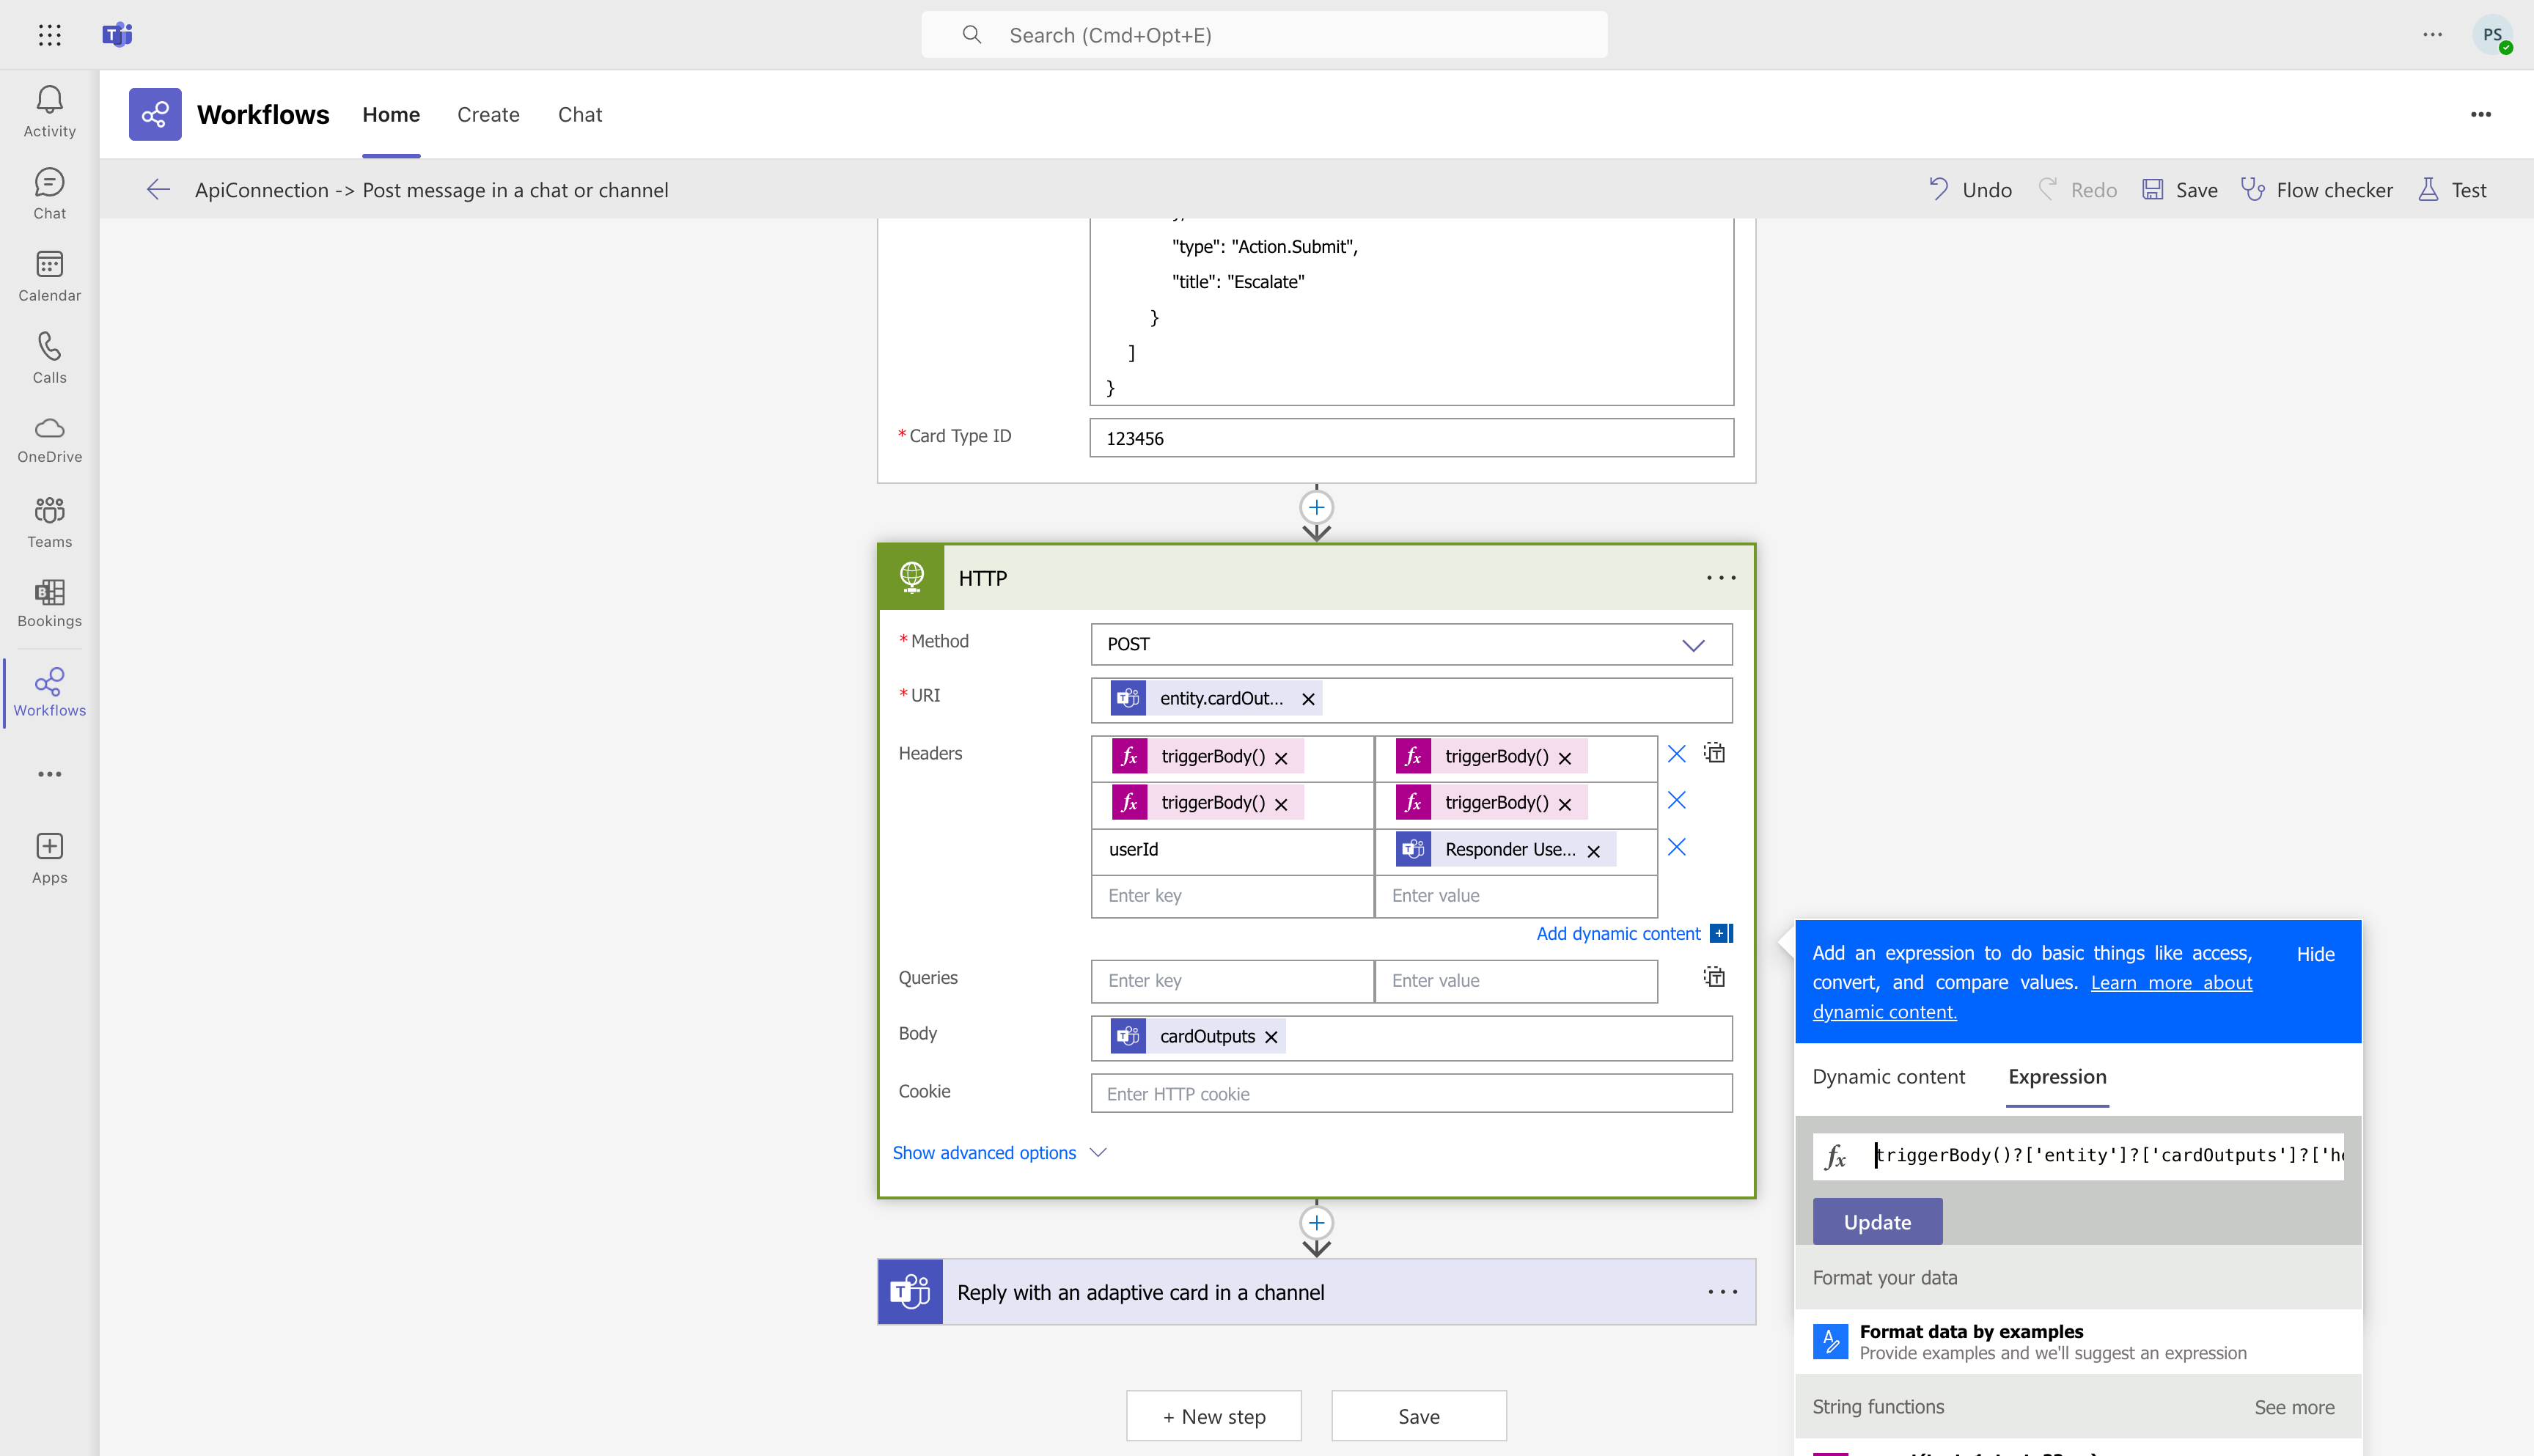
- For HTTP, provide the following information:
- Method: Select POST.
- URI
- Select the URI field, and then from Add dynamic content, select the Expression tab.
- Add the expression: triggerBody()?[‘entity’]?[‘cardOutputs’]?[‘target’] and then select Update.
- Headers:
- Select the Headers field, and then from Add dynamic content, select the Expression tab.
- Add the following expressions for the key and value, and then select Update.
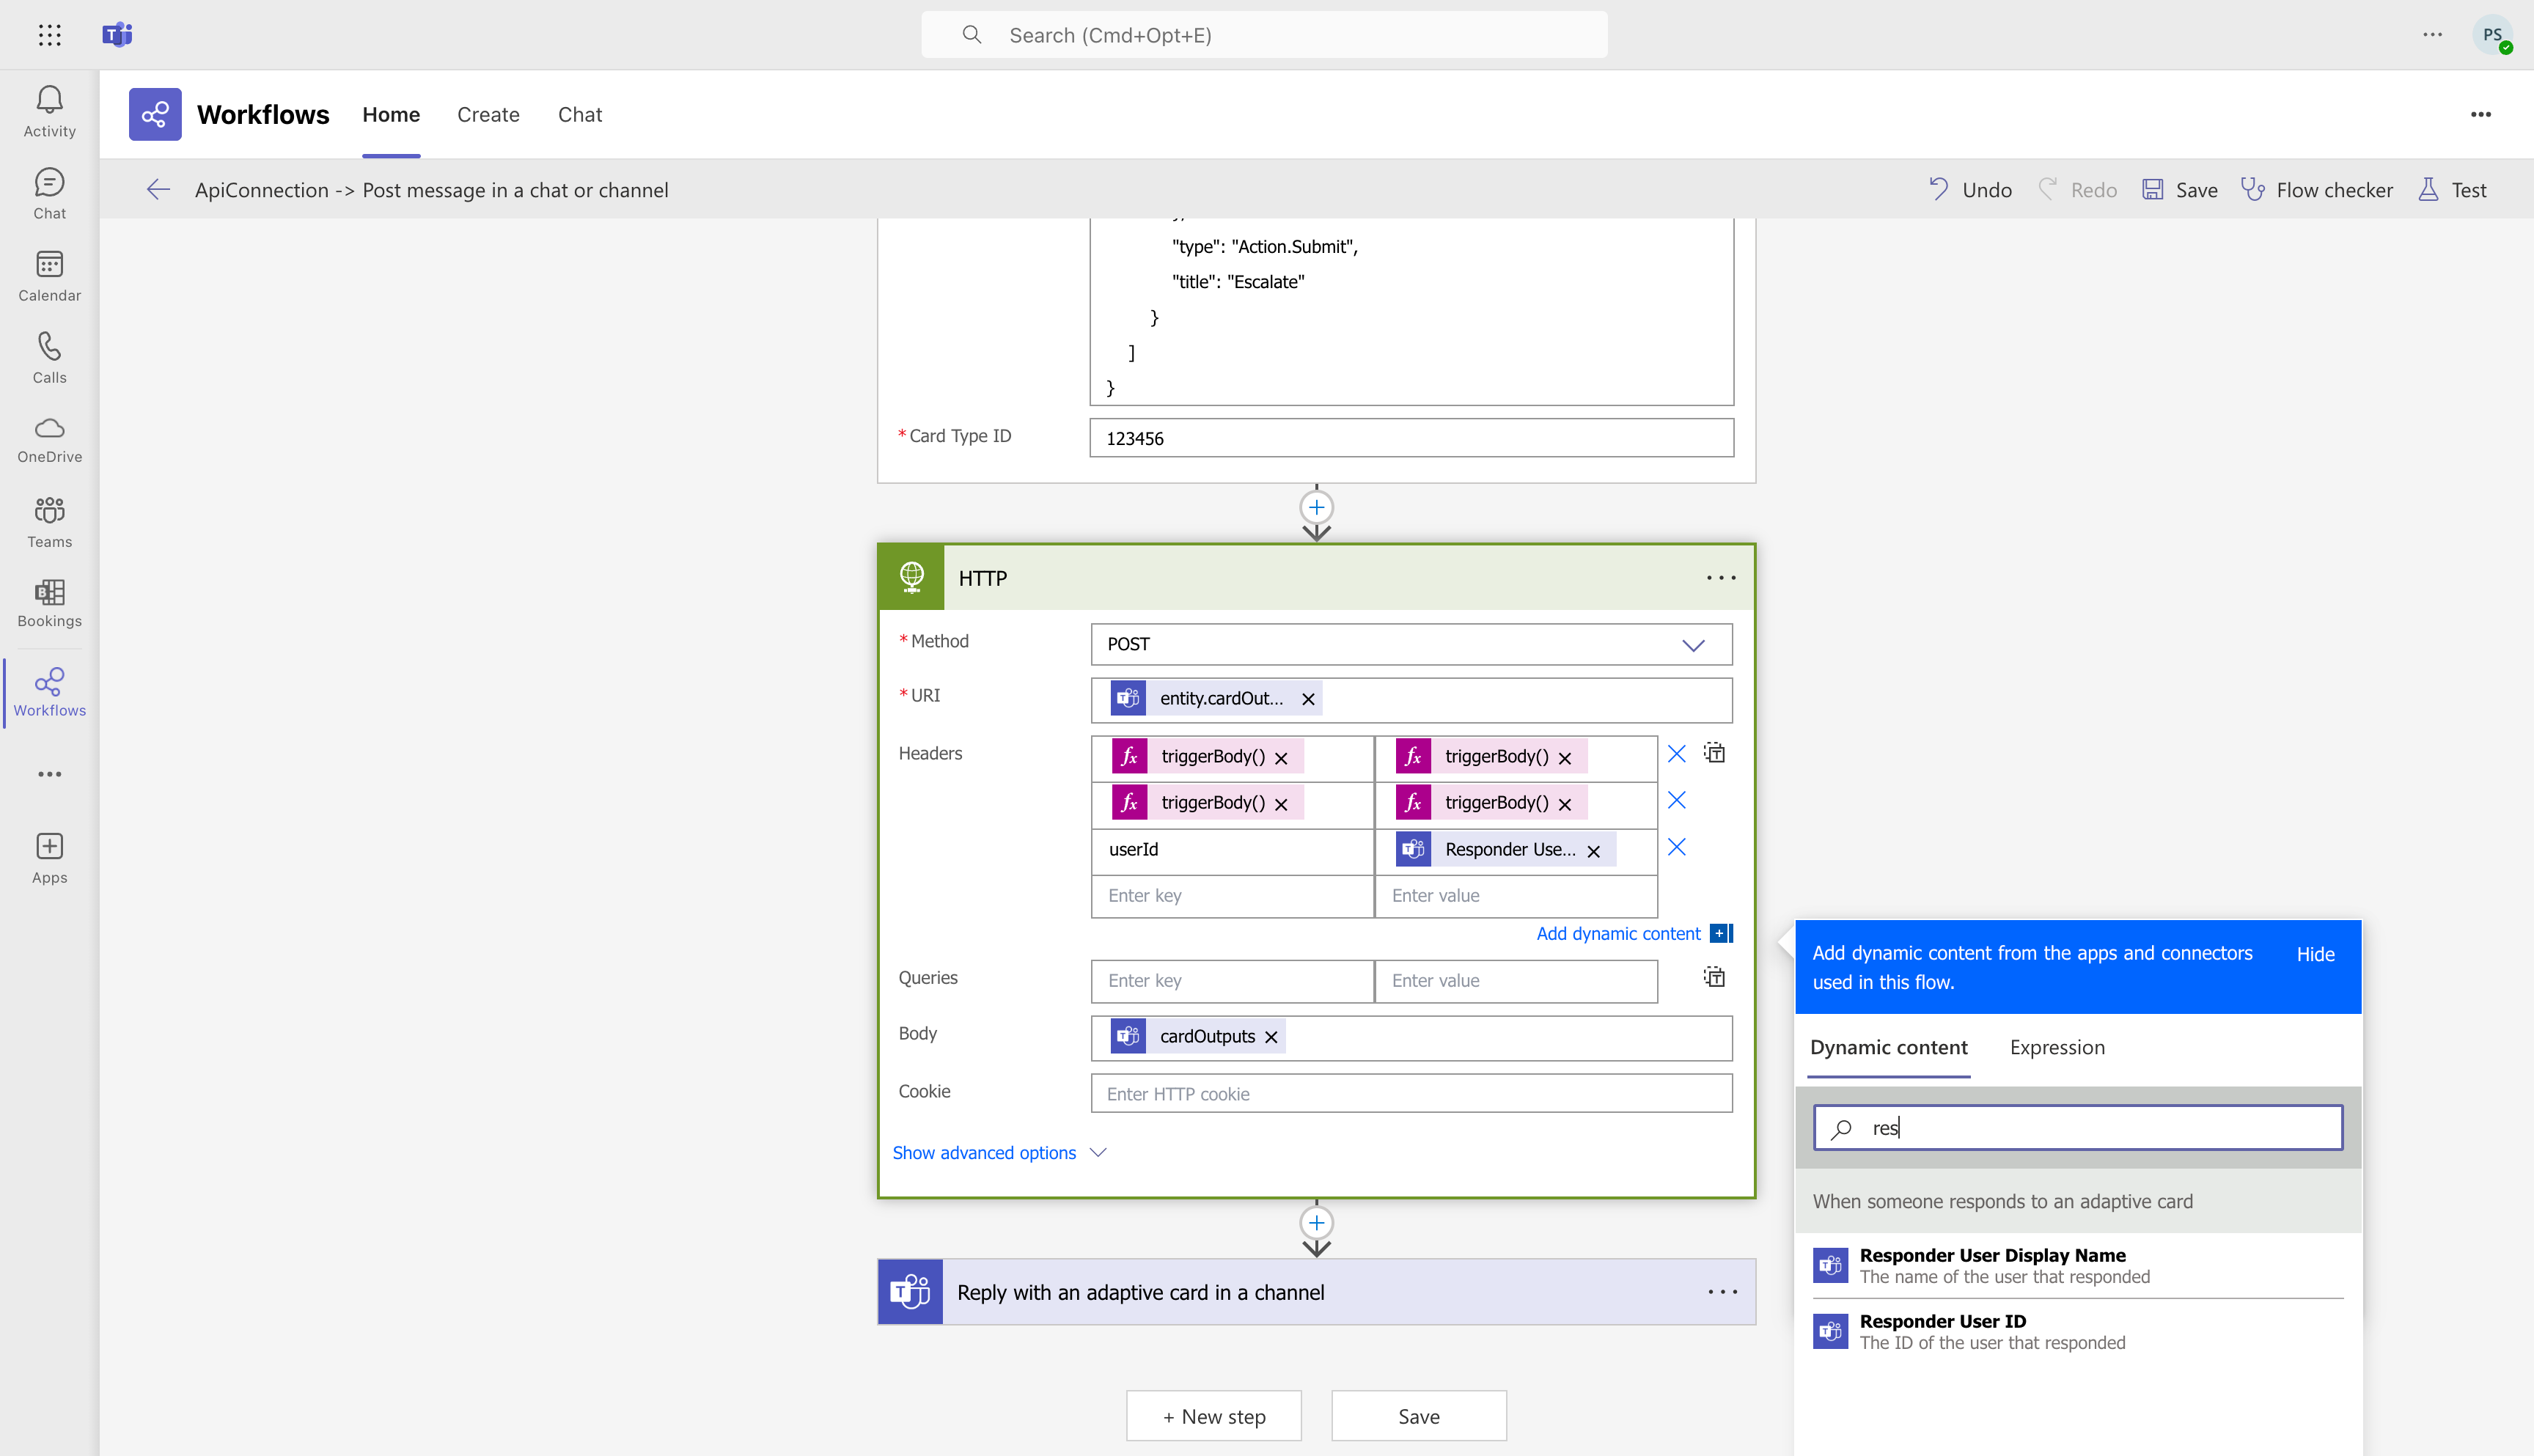
| Enter key | Enter value |
| triggerBody()?[‘entity’]?[‘cardOutputs’]?[‘headers’][0]?[‘name’] | triggerBody()?[‘entity’]?[‘cardOutputs’]?[‘headers’][0]?[‘value’] |
| triggerBody()?[‘entity’]?[‘cardOutputs’]?[‘headers’][1]?[‘name’] | triggerBody()?[‘entity’]?[‘cardOutputs’]?[‘headers’][1]?[‘value’] |
| userId | Responder user ID |
d. Body: Select cardOutputs from Add dynamic content.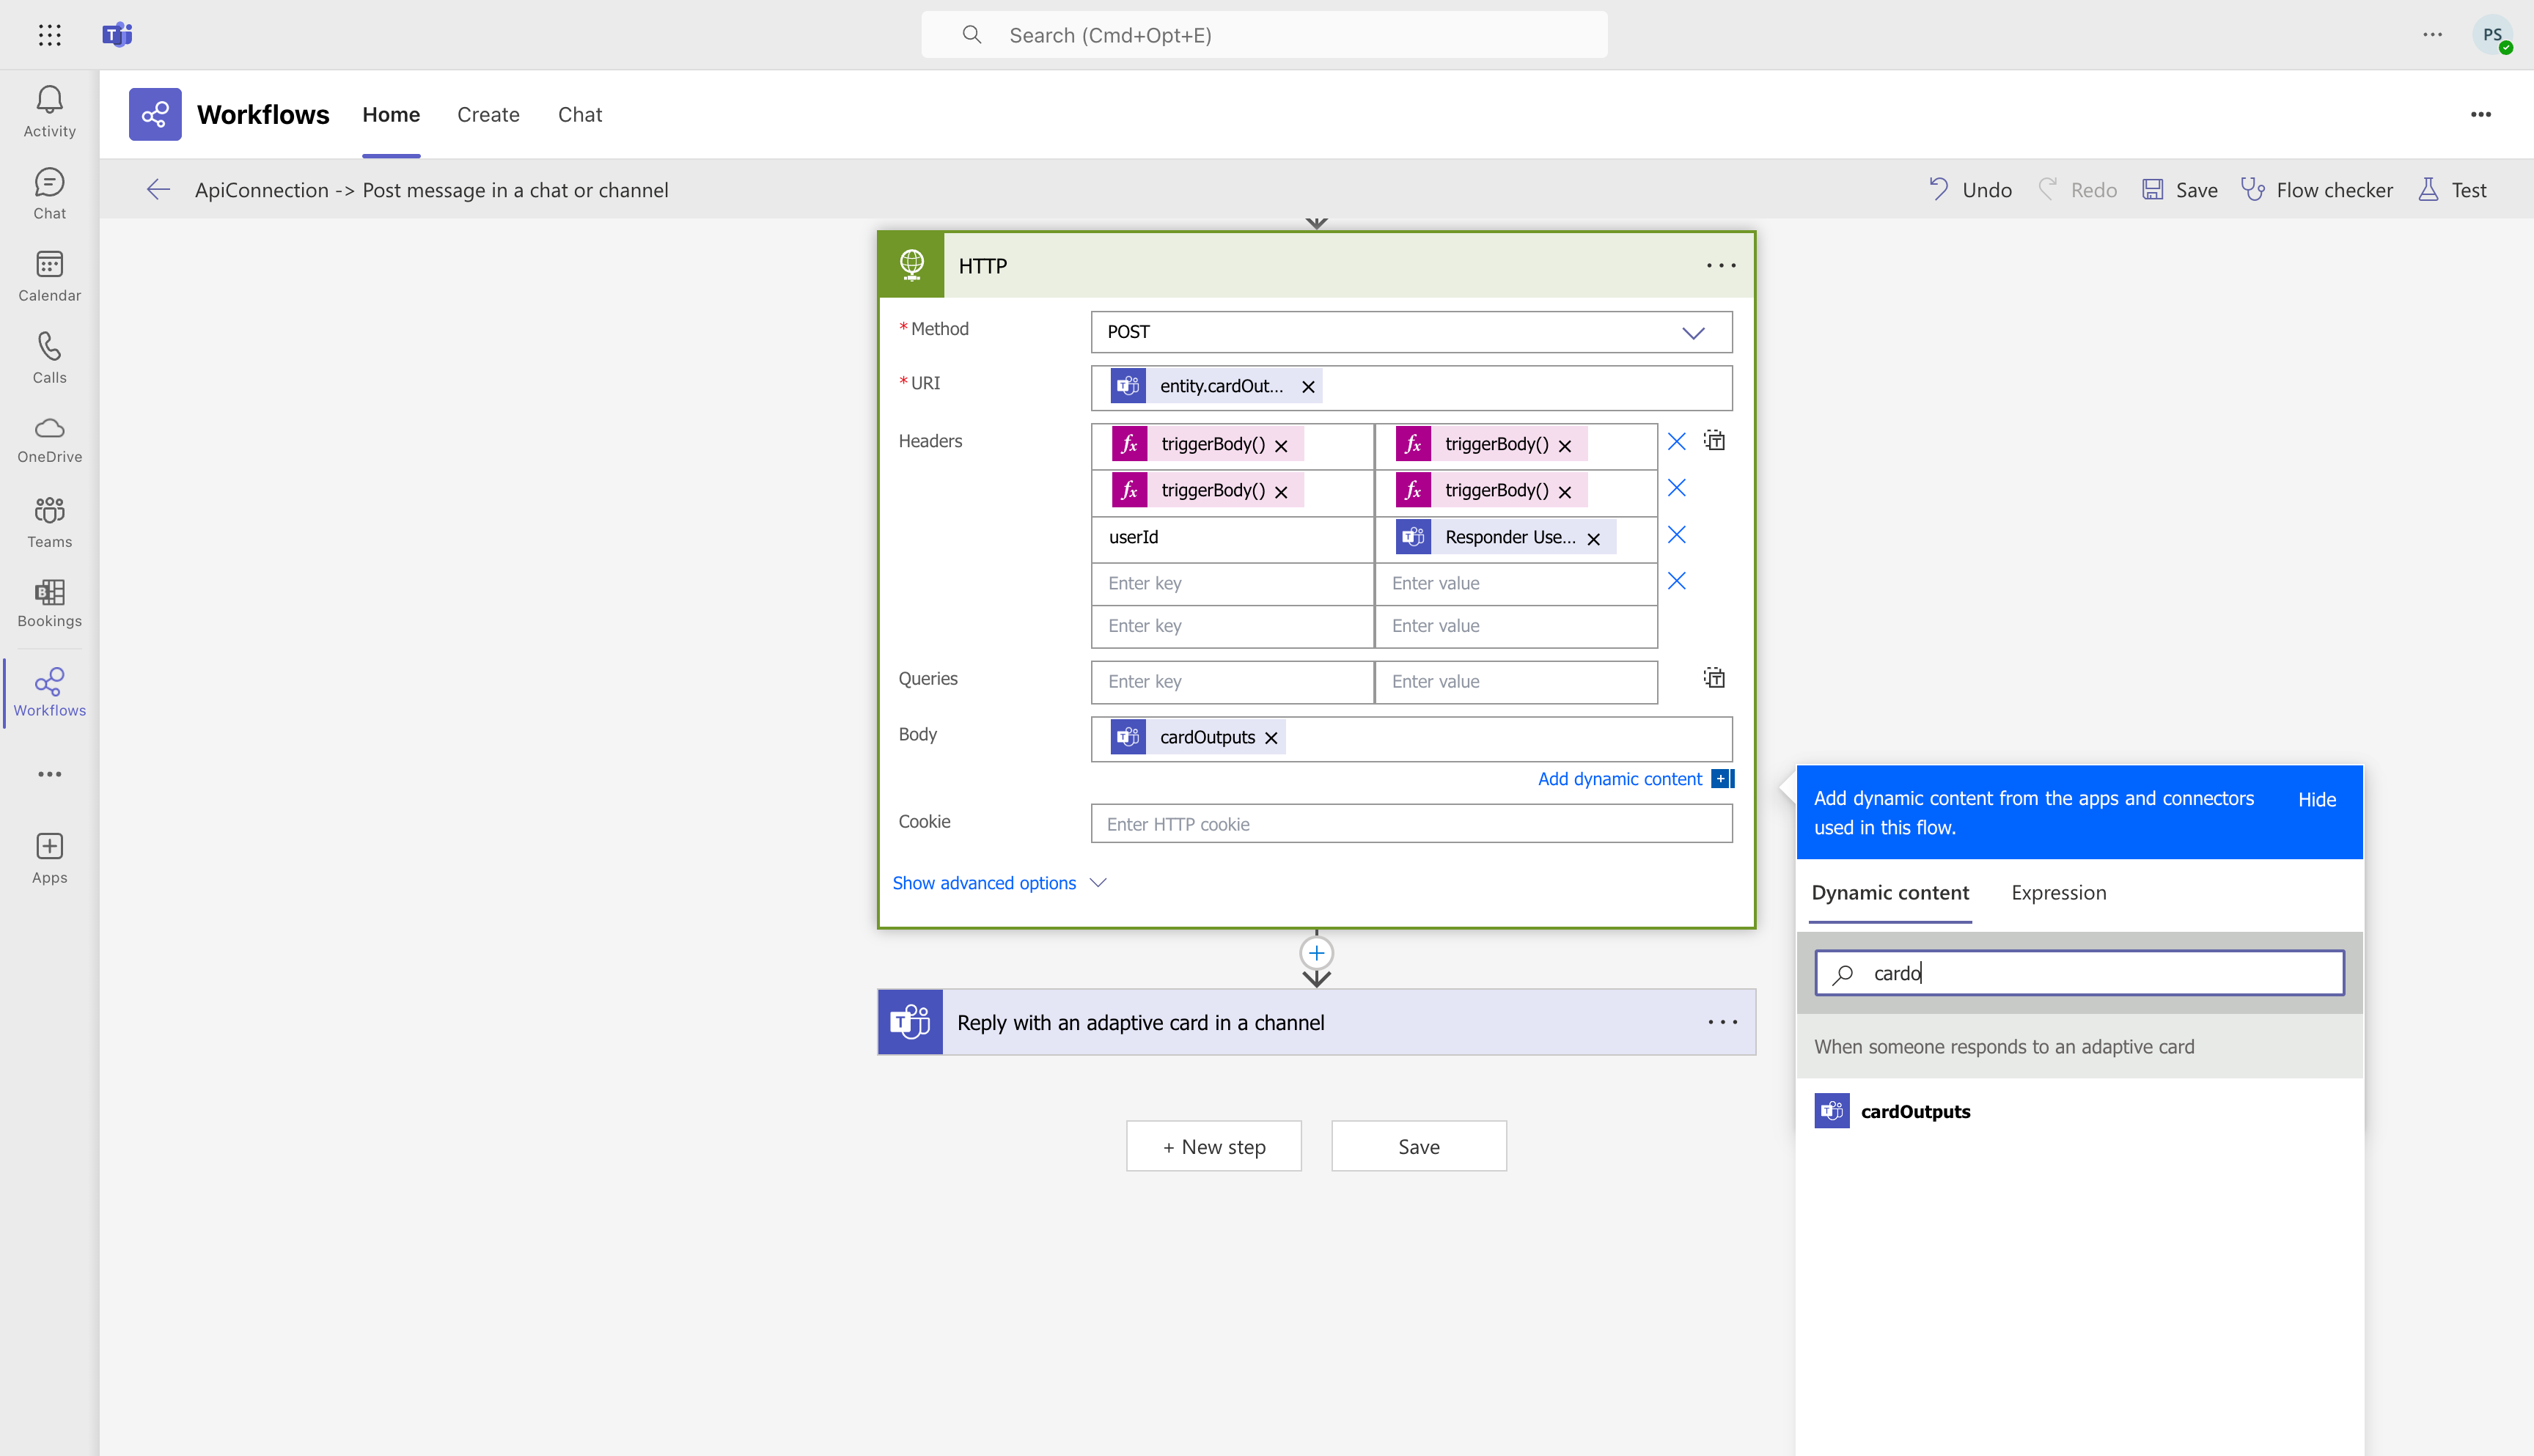
- To add Reply Action, select +New Step.
- Search and select Reply with an adaptive card in a channel.
- In the Reply with an adaptive card in a channel dialog box, provide the following information:
- Post As – Flow bot
- Post in – Channel
- Team – Select a team to post the message.
- Channel – Choose an appropriate public channel.
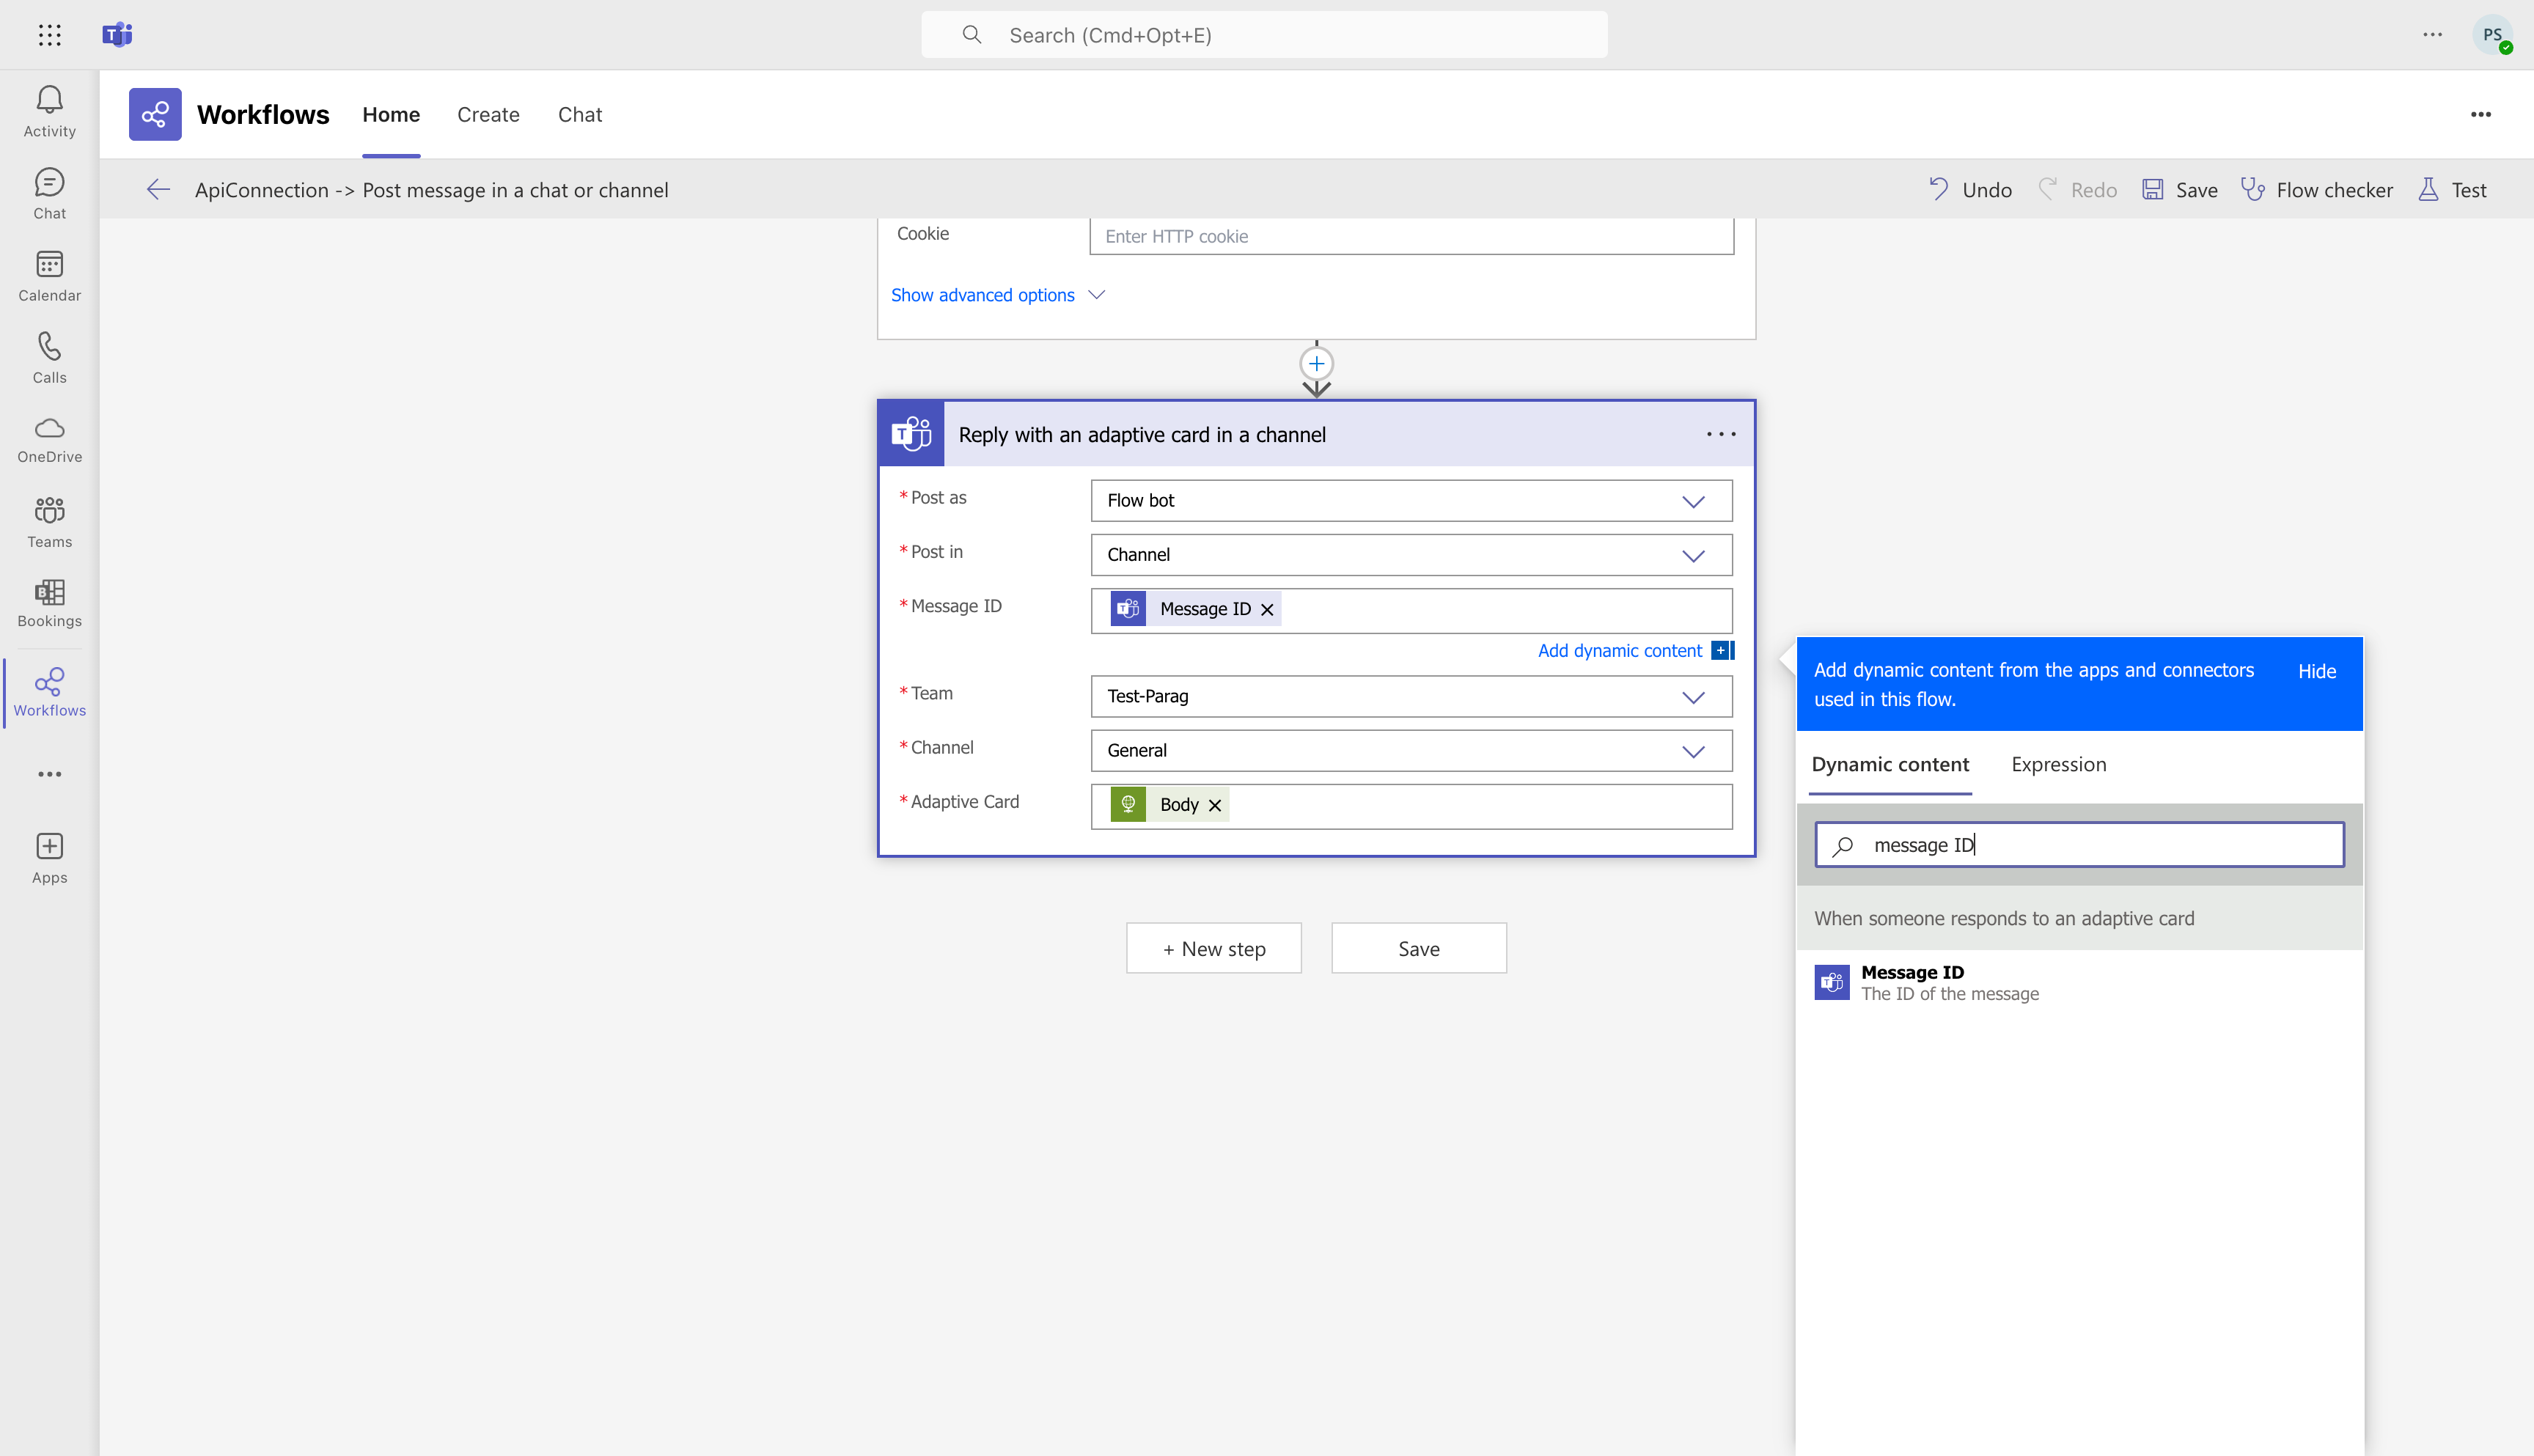
- MessageID – Select MessageID under Dynamic content
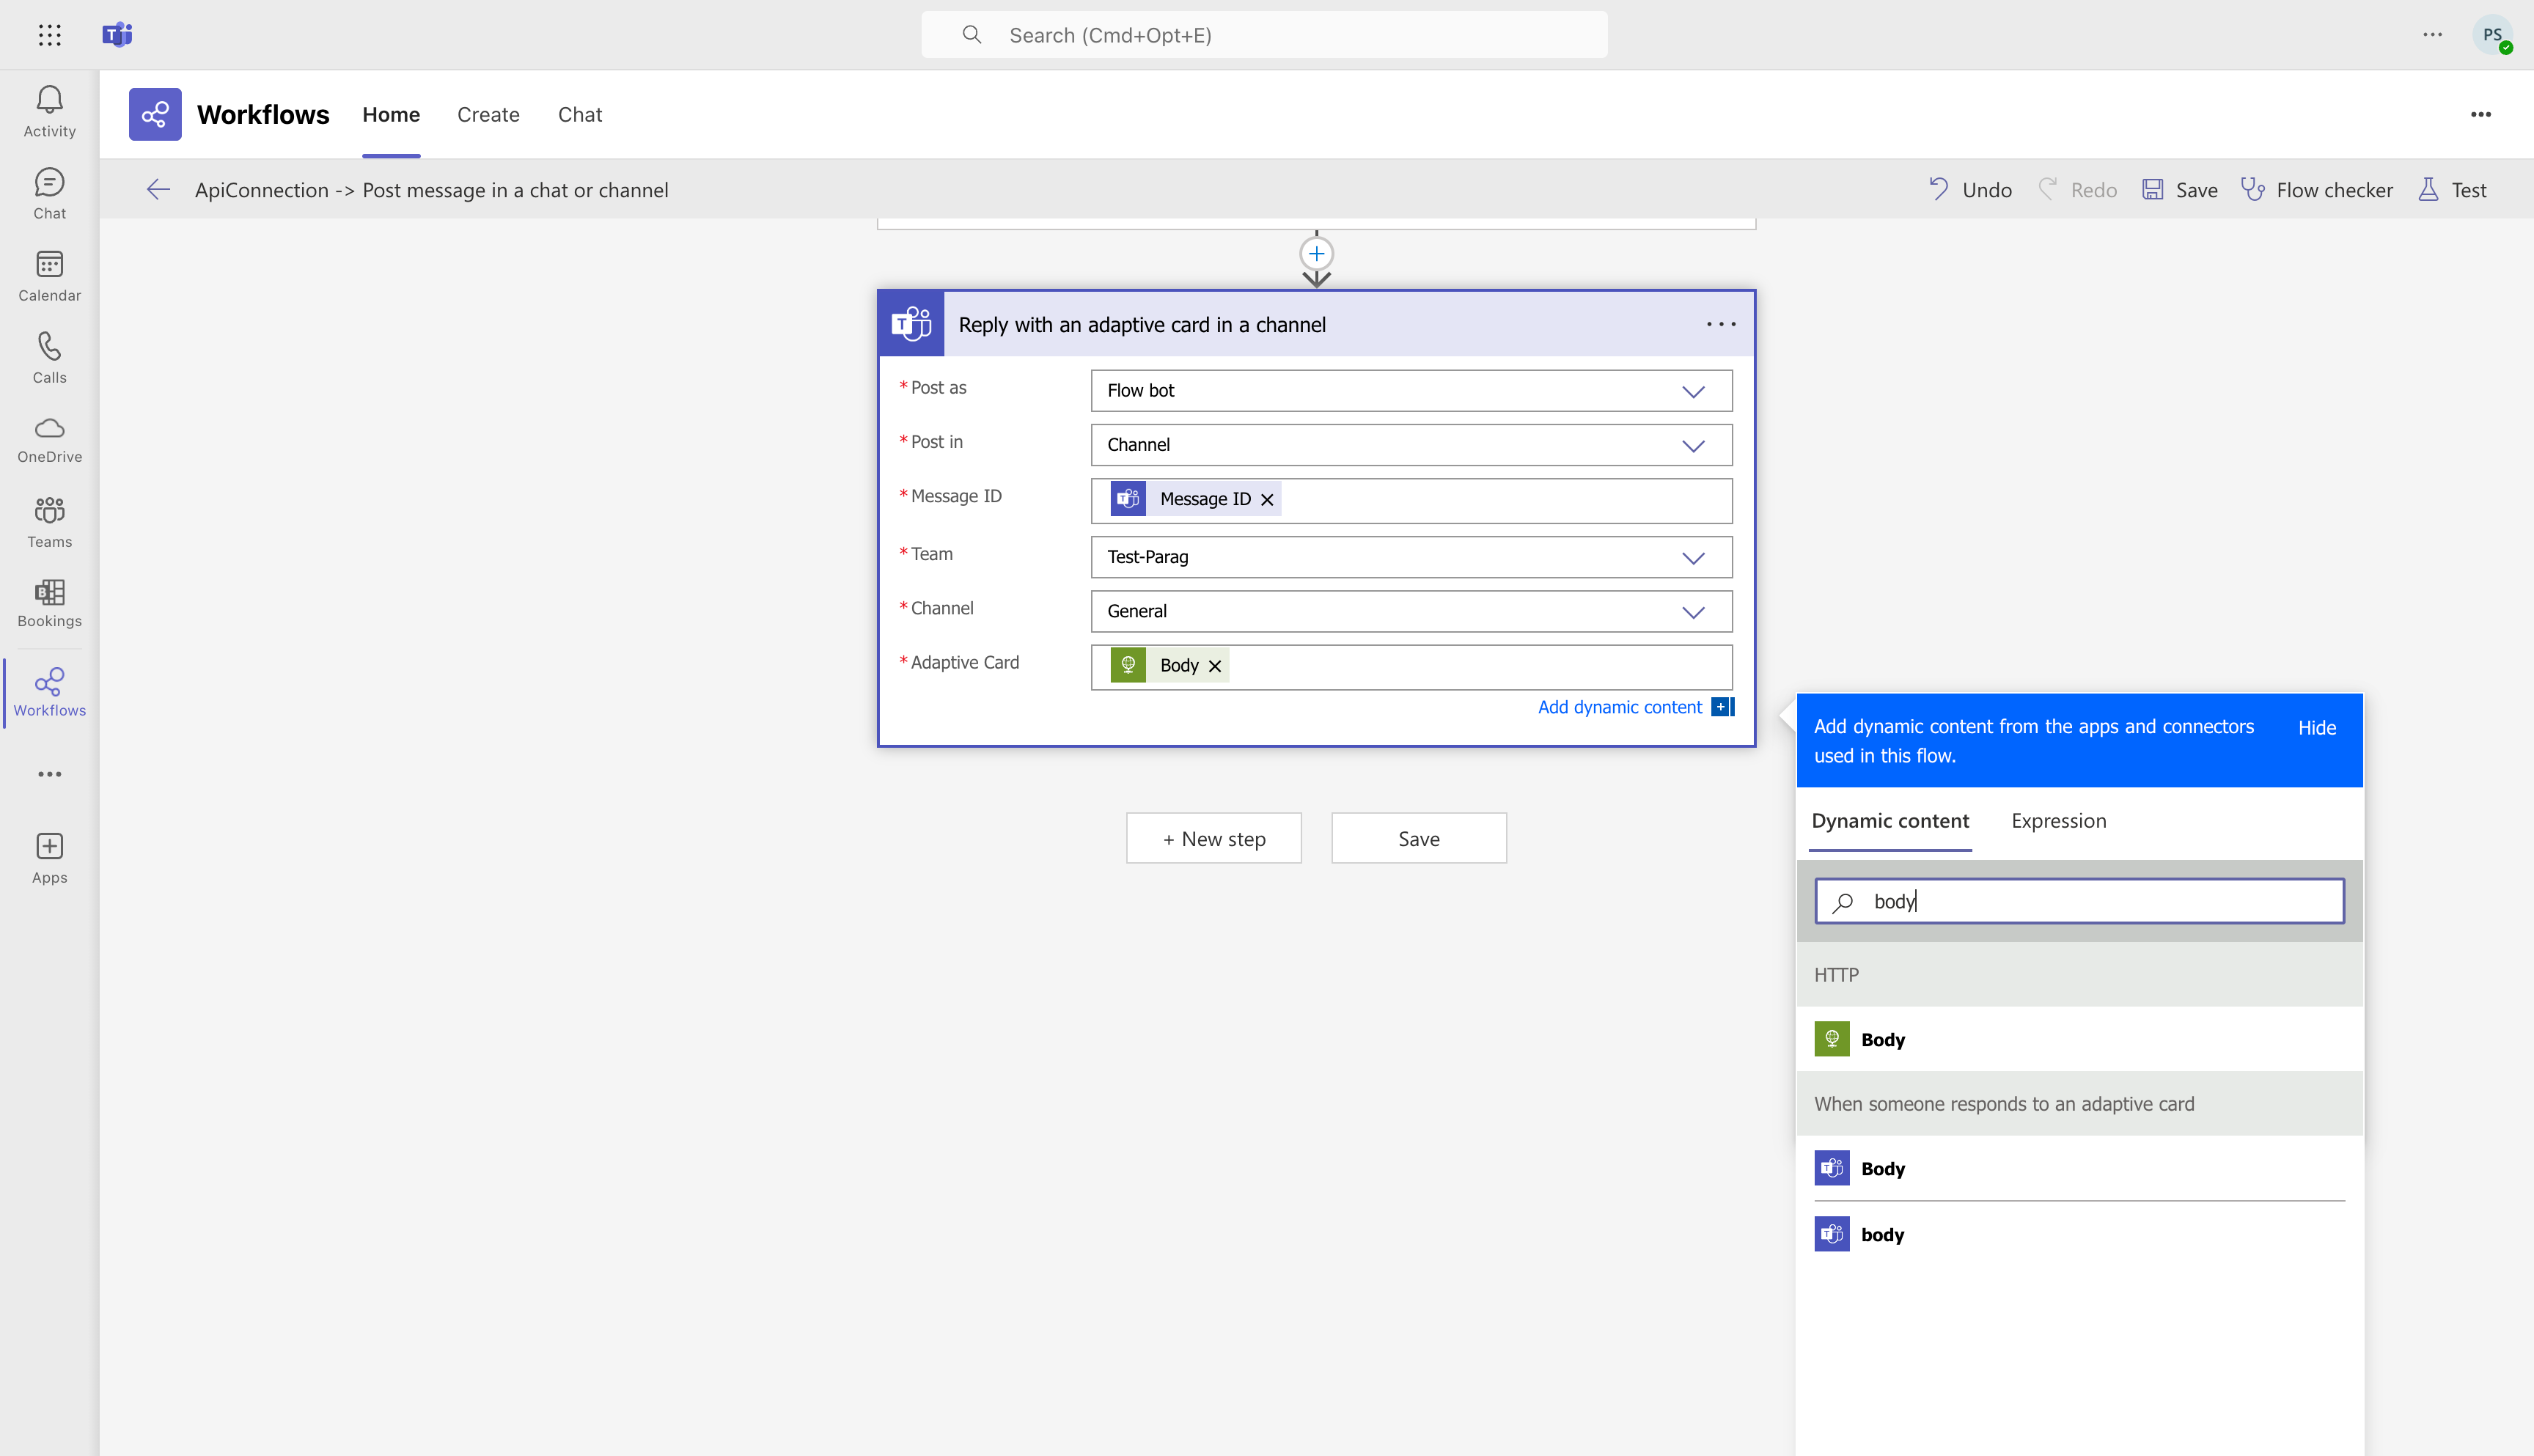
- Adaptive Card – Select Body from dynamic content.
Note: This workflow enables you to:
- Trigger an action when a response is received from an adaptive card.
- Send an HTTP request to an endpoint based on the response.
- Automatically post a reply in the same chat or channel to acknowledge or follow up the response.
Setting up the Microsoft Teams Integration in LogicMonitor
- In LogicMonitor, navigate to Settings > Integrations.
- Select Add Integration.
- From the Add Integration pane, under Communication Integrations, select Microsoft Teams.
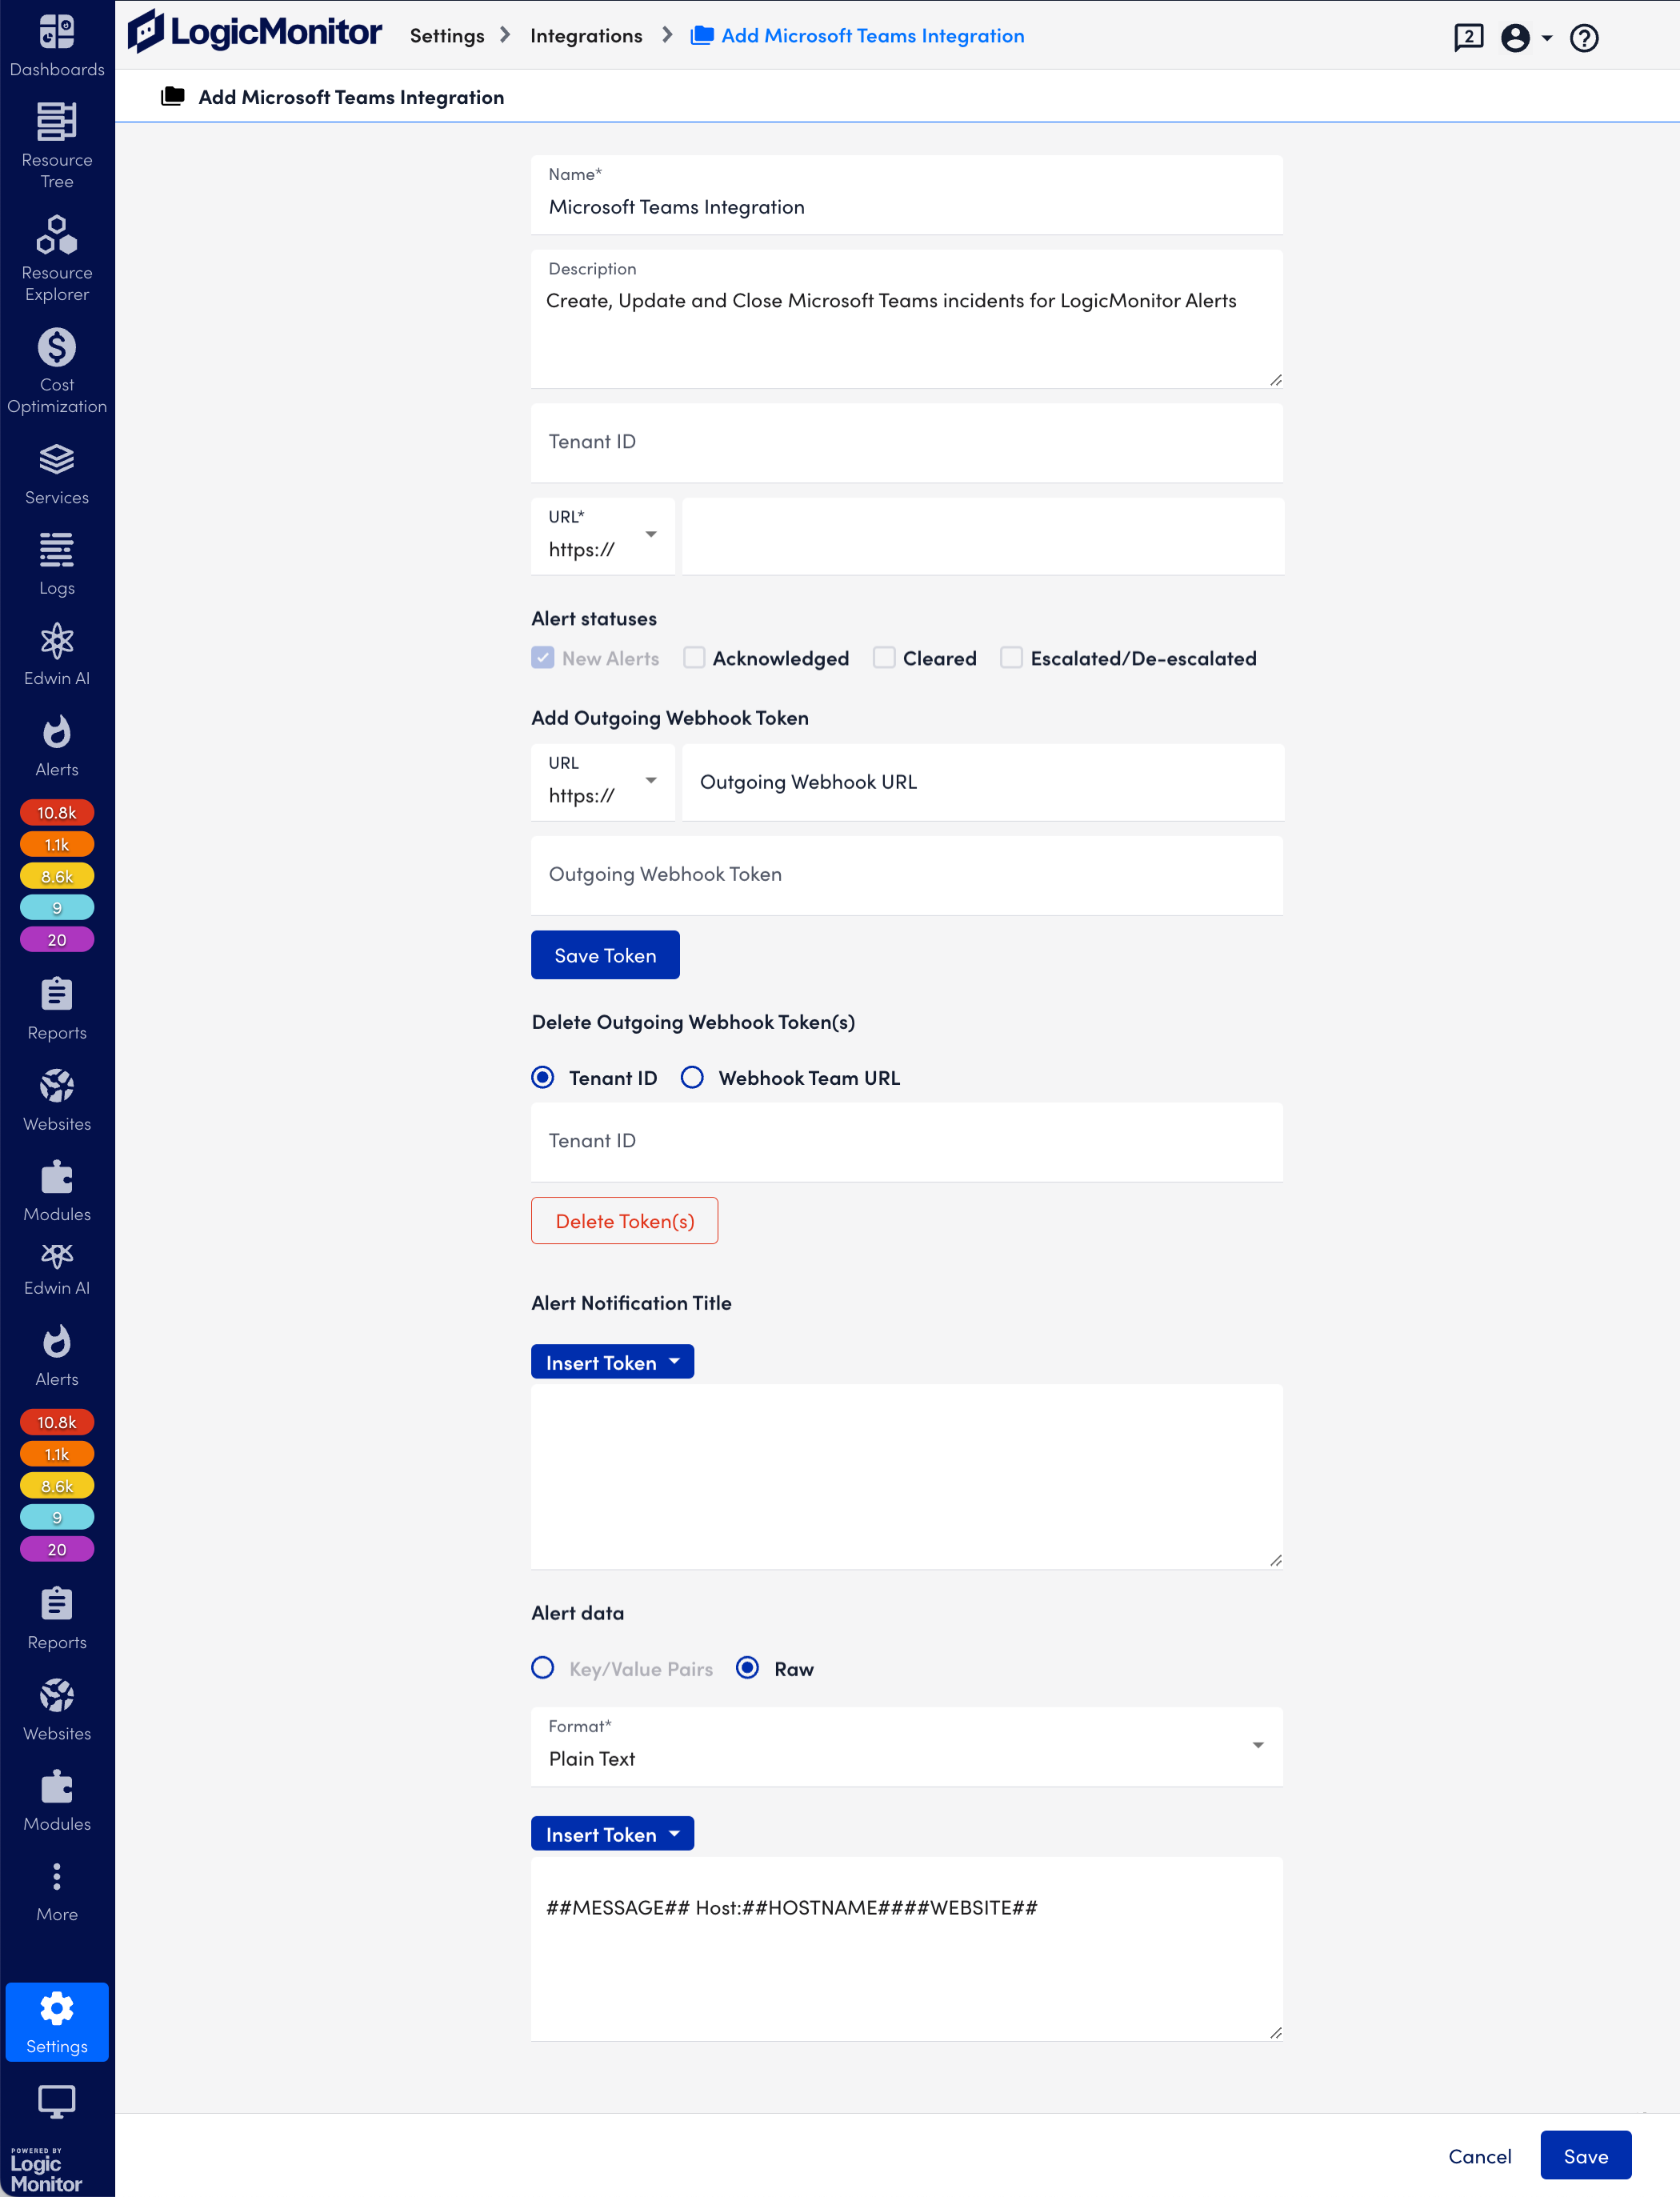
- Enter a name and description for the Microsoft Teams integration.
- In the Incoming Webhook URL field, enter the Incoming Webhook URL you created in Microsoft Teams.
Warning: Ensure you select https:// from the drop-down menu and remove “https://” when entering the Webhook URL in the Incoming Webhook URL field.
- Select the Alert Statuses you want to send to your Microsoft Teams channel.
Note: The New Alerts status is enabled by default, but updates on the current alert status are optional (Acknowledged, Cleared, Escalated/De-escalated).
- To enable a Team to manage alerts from a Microsoft Teams channel, provide the following information for Add Outgoing Webhook Token:
- In the Outgoing Webhook URL field, enter the link to the Microsoft Team you want to manage alerts from.
- In the Outgoing Webhook Token field, enter the HMAC security token you generated when creating the Outgoing Webhook in Microsoft Teams.
- Select Save Token.
Note: Clicking Save Token stores the information, and then removes it from the settings. You can add as many Outgoing Webhook Tokens as your environment needs.
- If you want to prevent a Team from managing alerts, from Remove Outgoing Webhook Token, do the following:
- In the Outgoing Webhook Team URL field, enter the URL for the Outgoing Webhook .
- Select Delete Token.
- To customize the alert title, under Alert Notification Title, select one or multiple tokens from the Insert Token dropdown menu. The customised title lets you quickly identify the error message without reading the whole content, saving time on mobile devices. If you do not customize the alert title, the default title is displayed as follows: “LogicMonitor error Alert – LMD<Alert number>.”
Note: While customizing the alert notification title, you must adhere to the character display limit of mobile notifications.
- If you want to customize alert message, from Alert Data, select Insert Token, and select the tokens you want for customizing the alert message. For more information, see Tokens in the product documentation.
Note: You can use only plain text format for the alert data message.The order of the tokens that you add in the Alert Data section determines how the alert message is displayed in MS Team.
- If you want to test alert delivery, select Test Alert Delivery.
- Select Save.
Testing the Microsoft Teams Alert Delivery
- In LogicMonitor, navigate to Settings > Integrations.
- Select Manage for the Microsoft Teams integration you want to test Alert Delivery for.
- Select Test Alert Delivery.
A dialog displays indicating whether the alert was successfully posted to your Microsoft Teams channel.
Preventing a Team from Managing Alerts
- In your LogicMonitor portal, navigate to Settings > Integrations.
- From Actions, select Manage for the Microsoft Teams integration you want to remove an Outgoing Webhook from.
- Do one of the followings:
- To prevent a single Team from managing alerts, do the following:
- Under Delete Outgoing Webhook Token(s), select the Webhook Team URL option.
- Enter the URL for the outgoing Webhook in the Outgoing Webhook Team URL field.
- Select Delete Token.
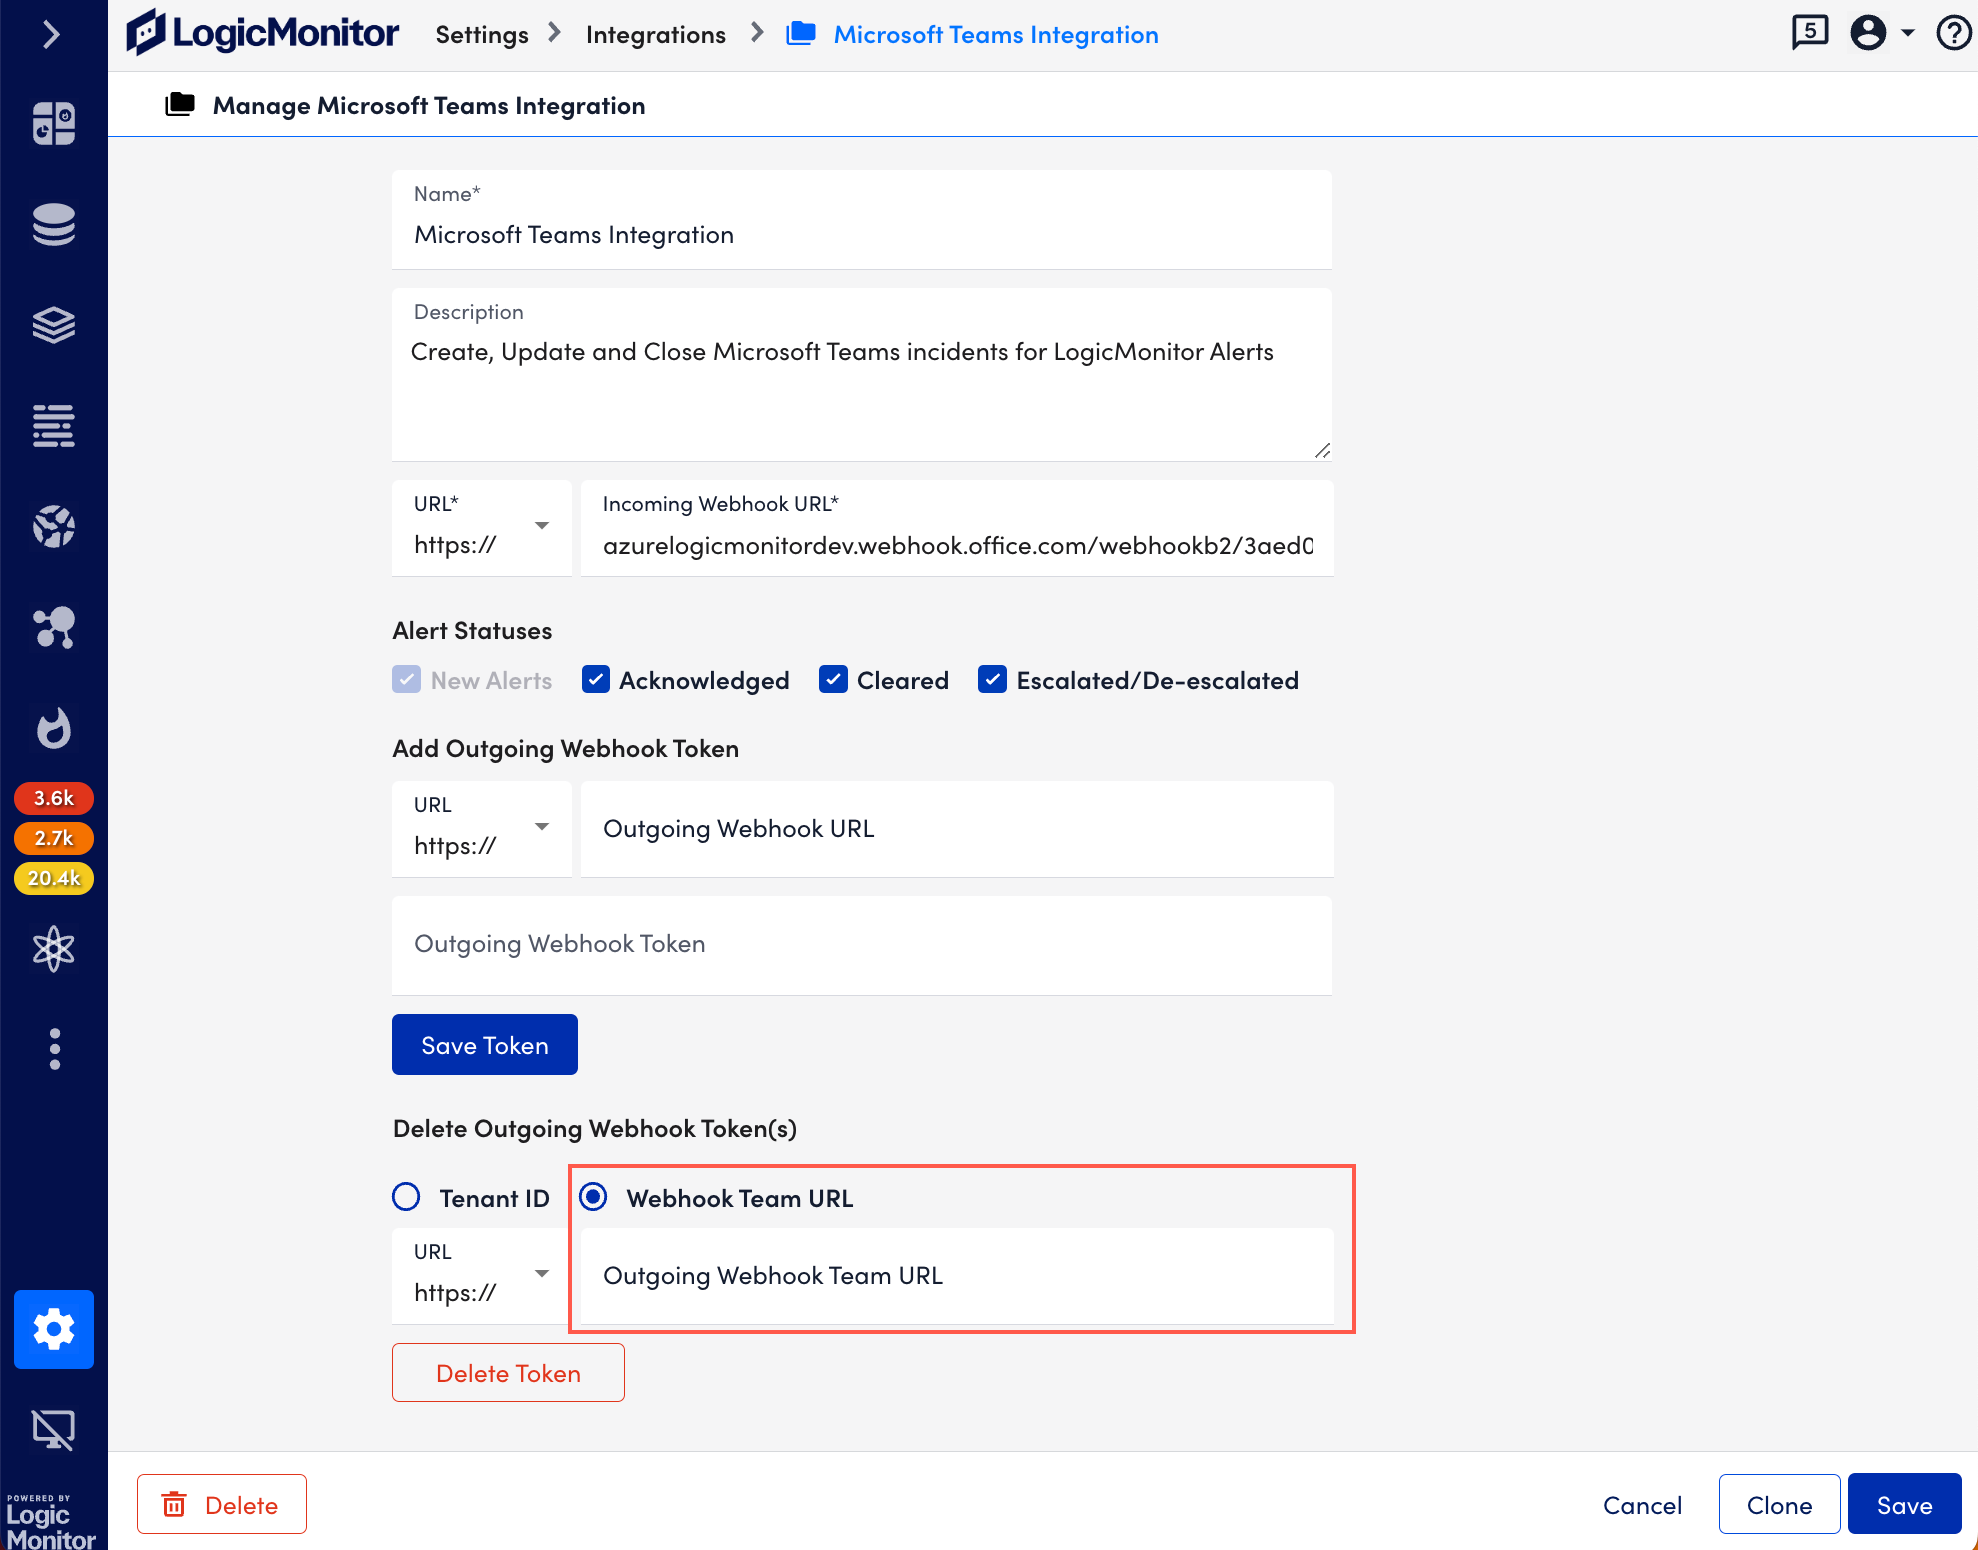
Important: Ensure you select “https://” from the drop-down menu and remove “https://” when entering the Webhook URL in the Outgoing Webhook Team URL field.
- To prevent all Teams from managing alerts, do the following:
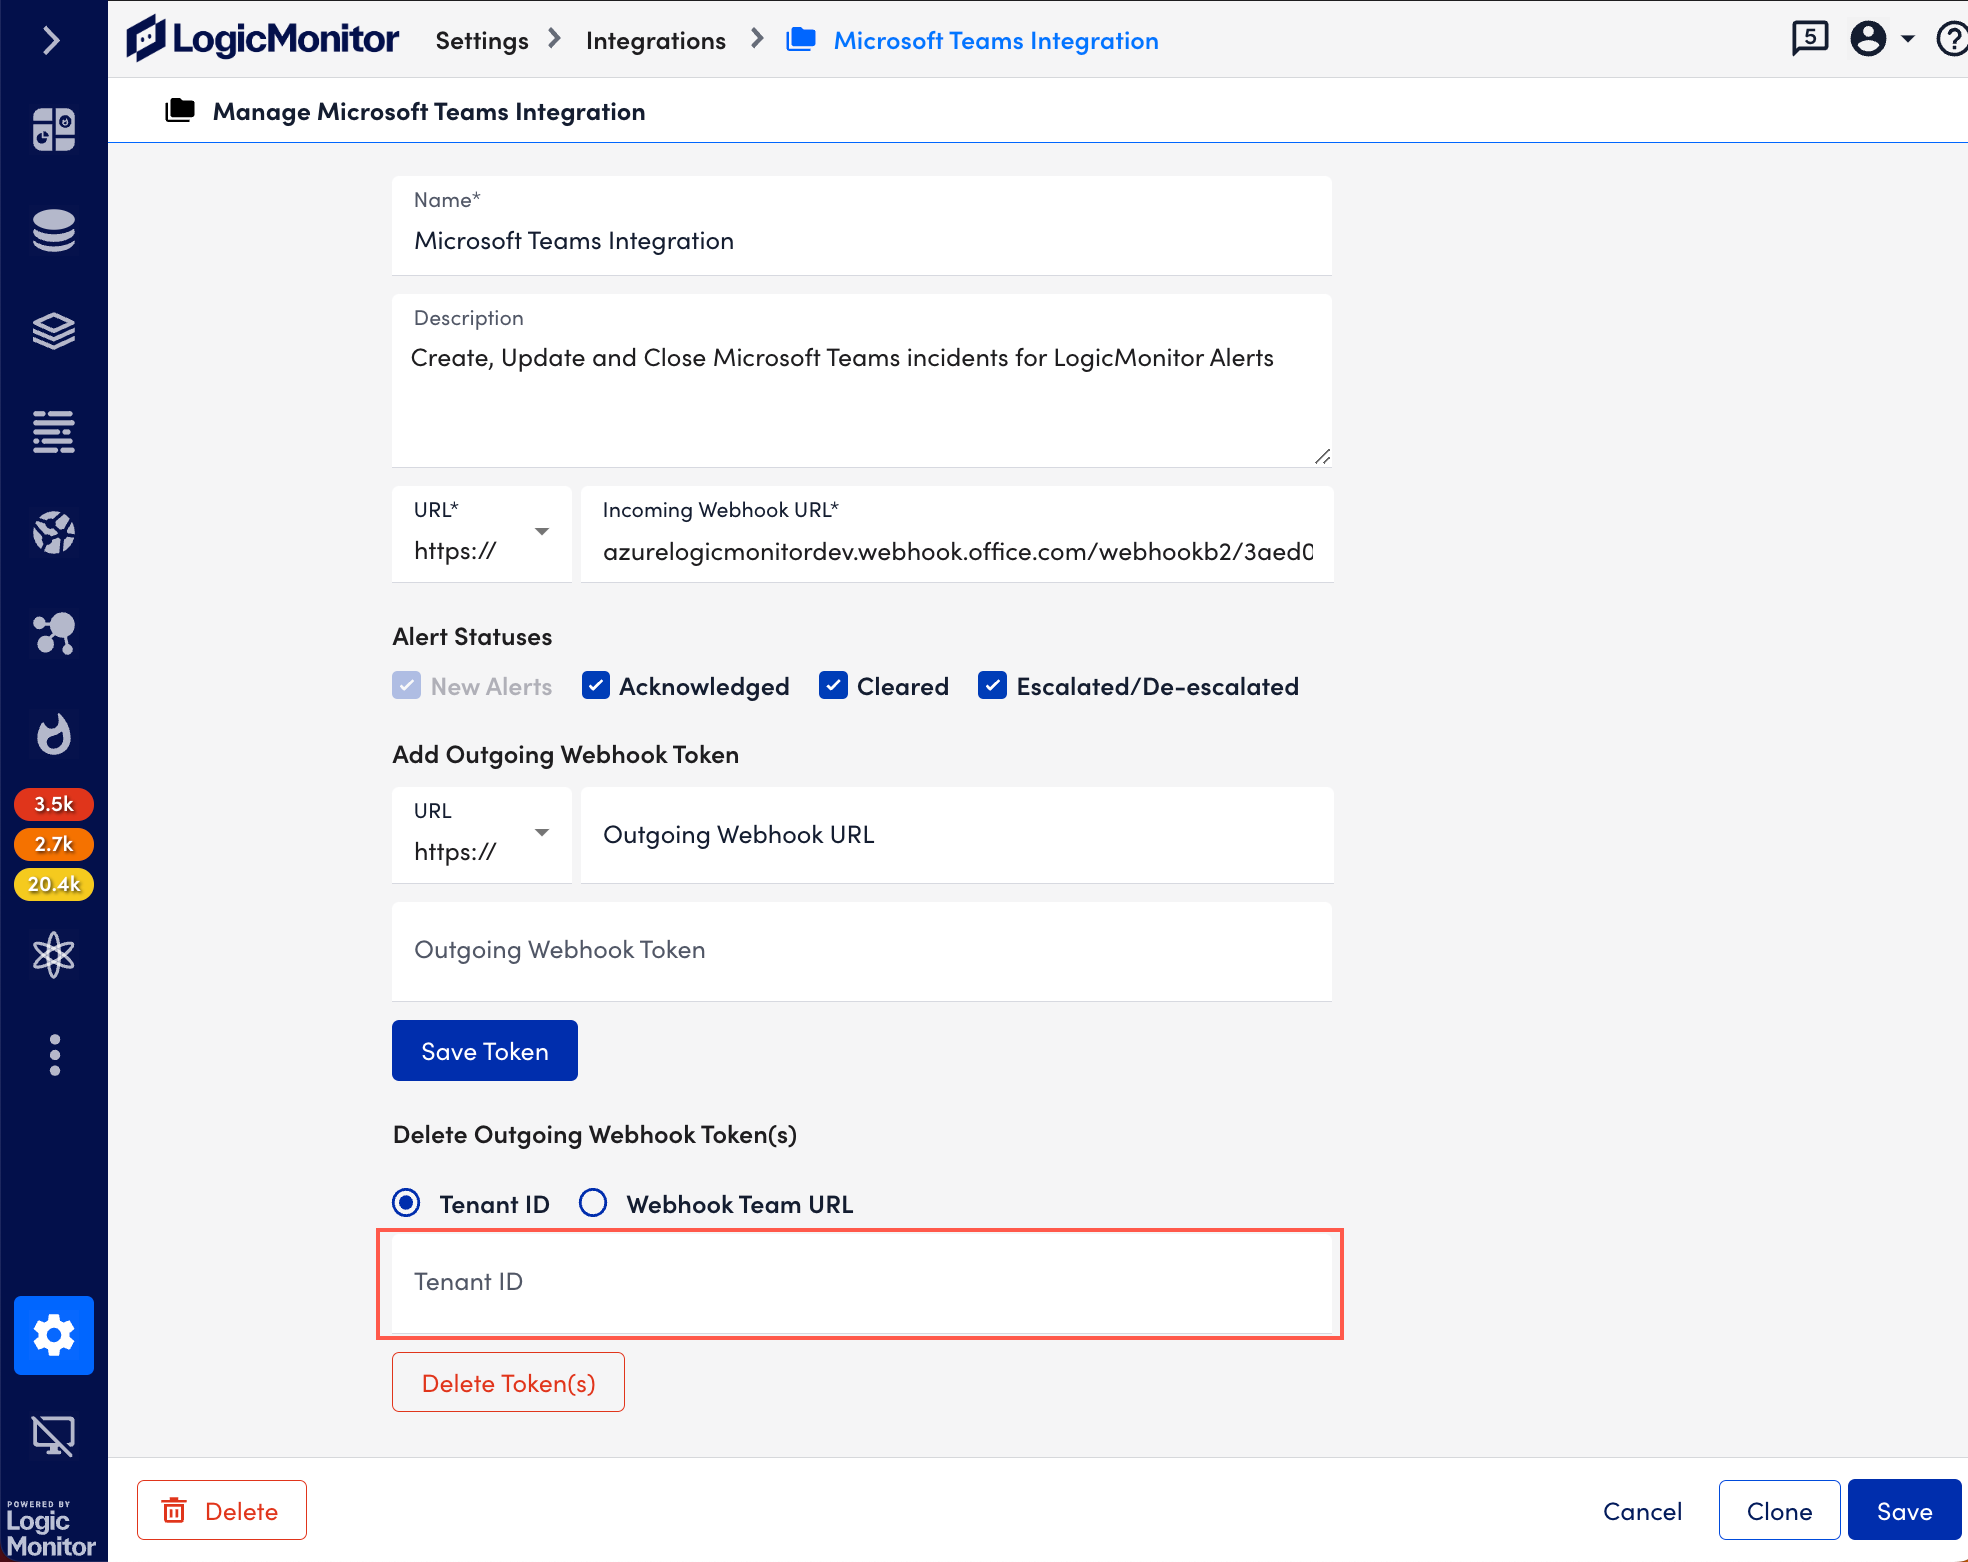
- Under Delete Outgoing Webhook Token(s), select the Tenant ID option.
- Enter the tenant ID in the Tenant ID field.
- Select Delete Token(s).
- To prevent a single Team from managing alerts, do the following:
- Click Save.
Managing an Existing Microsoft Integration which is Using Incoming Webhook
Important: If you are using incoming webhook for your existing MS Teams integration, you must update the URL in your customer portal as per the Microsoft guideline.
- Get the updated URL from Microsoft. For more information, see Update connectors URL from the Microsoft documentation.
- In LogicMonitor, navigate to Settings > Integrations.
- From Actions, select Manage for the Microsoft Teams integration that is still using an incoming webhook.
- In the URL field, delete the incoming webhook, and paste the updated URL you have copied using Update connectors URL.
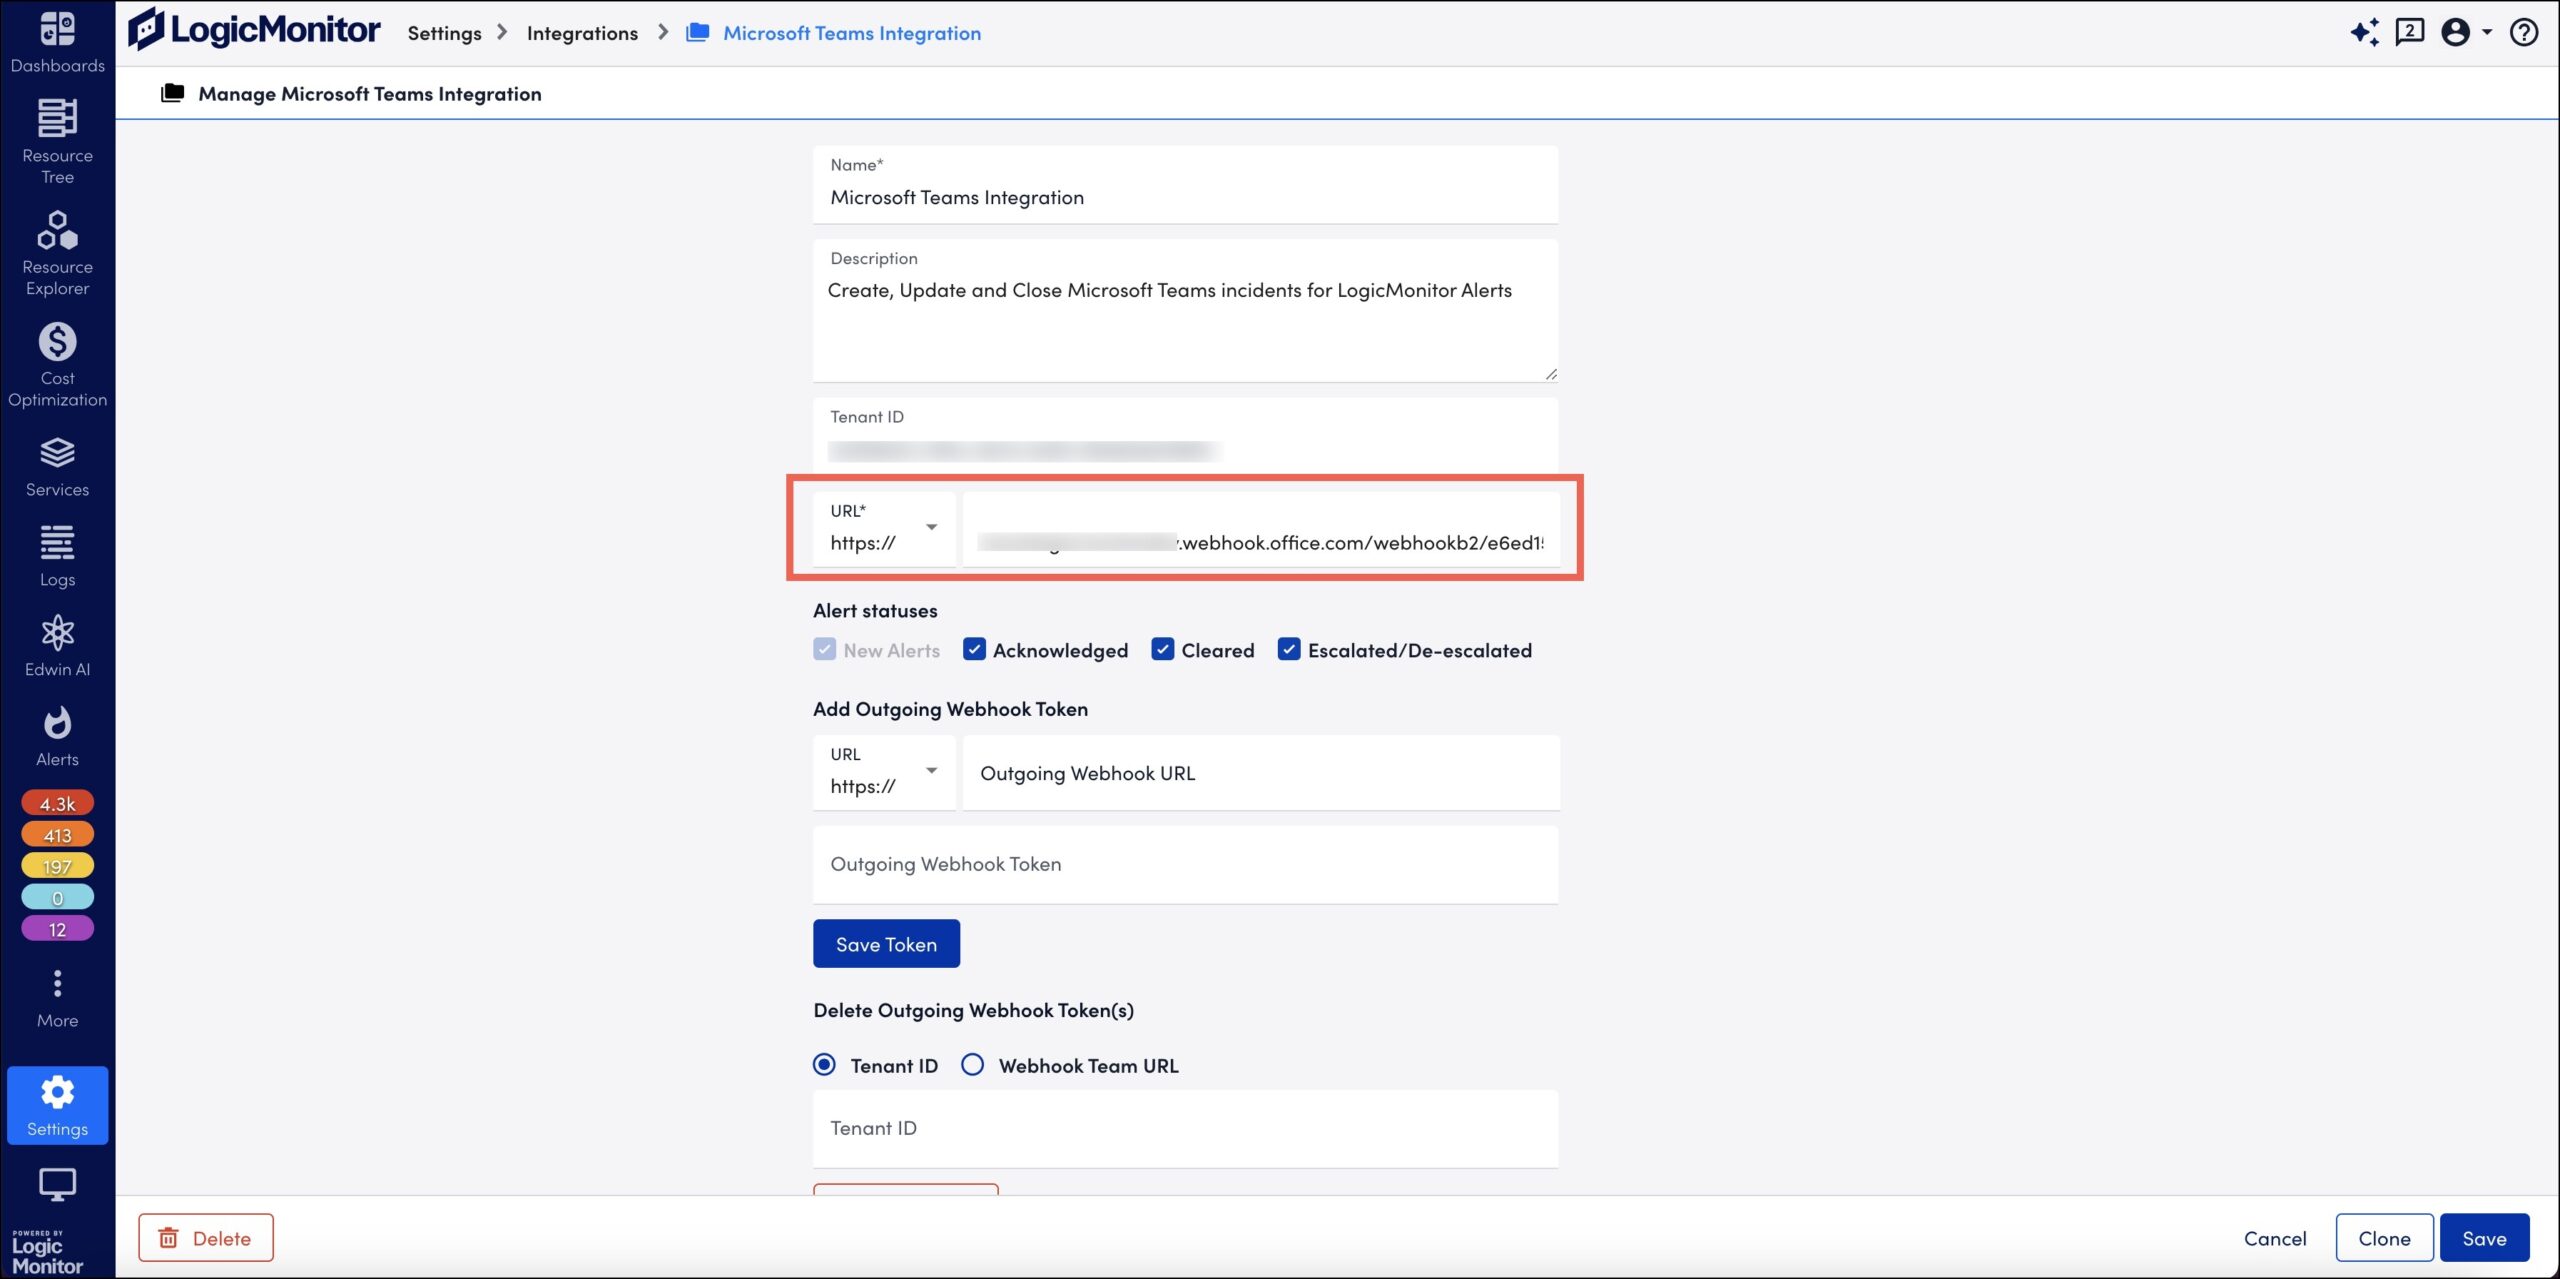
- Select Save.


