ServiceNow (Incident Management) Integration
Last updated on 07 October, 2024Your LogicMonitor account comes ready to integrate alert messages with your ServiceNow account. The bidirectional integration enables LogicMonitor to open, update and close ServiceNow incidents based on LogicMonitor alerts. By sending alerts from LogicMonitor into ServiceNow, you can take advantage of ServiceNow’s alerting platform features to increase uptime of your apps, servers, websites, and databases. ServiceNow users can also acknowledge an alert directly from an incident in ServiceNow.
As discussed in the following sections, setup of this integration requires:
- Installation of the LogicMonitor Incident Management Integration from the ServiceNow store.
- Configuration of the integration within LogicMonitor
- Configuration of alert rule/escalation chain to deliver alert data to the integration
- Configuration of ServiceNow (optional) to include acknowledge option on incident form
Installing and Configuring the LogicMonitor Incident Management Integration
- Click the GET button on the LogicMonitor Store page.
- Accept ServiceNow’s Notice by clicking Continue
- Note the Dependencies and Continue if they apply to your environment
- For the Entitlement Section choose to make the application available to all instances or just specific ones. (NOTE: This step does not install the application, it just makes it available for install later.)
- Accept the ServiceNow Terms
- Click GET
- Login to your ServiceNow instance
- Navigate to System Applications > Applications
- The LogicMonitor Incident Management application should be available in the Downloads section. Click Install to add the application to your instance.
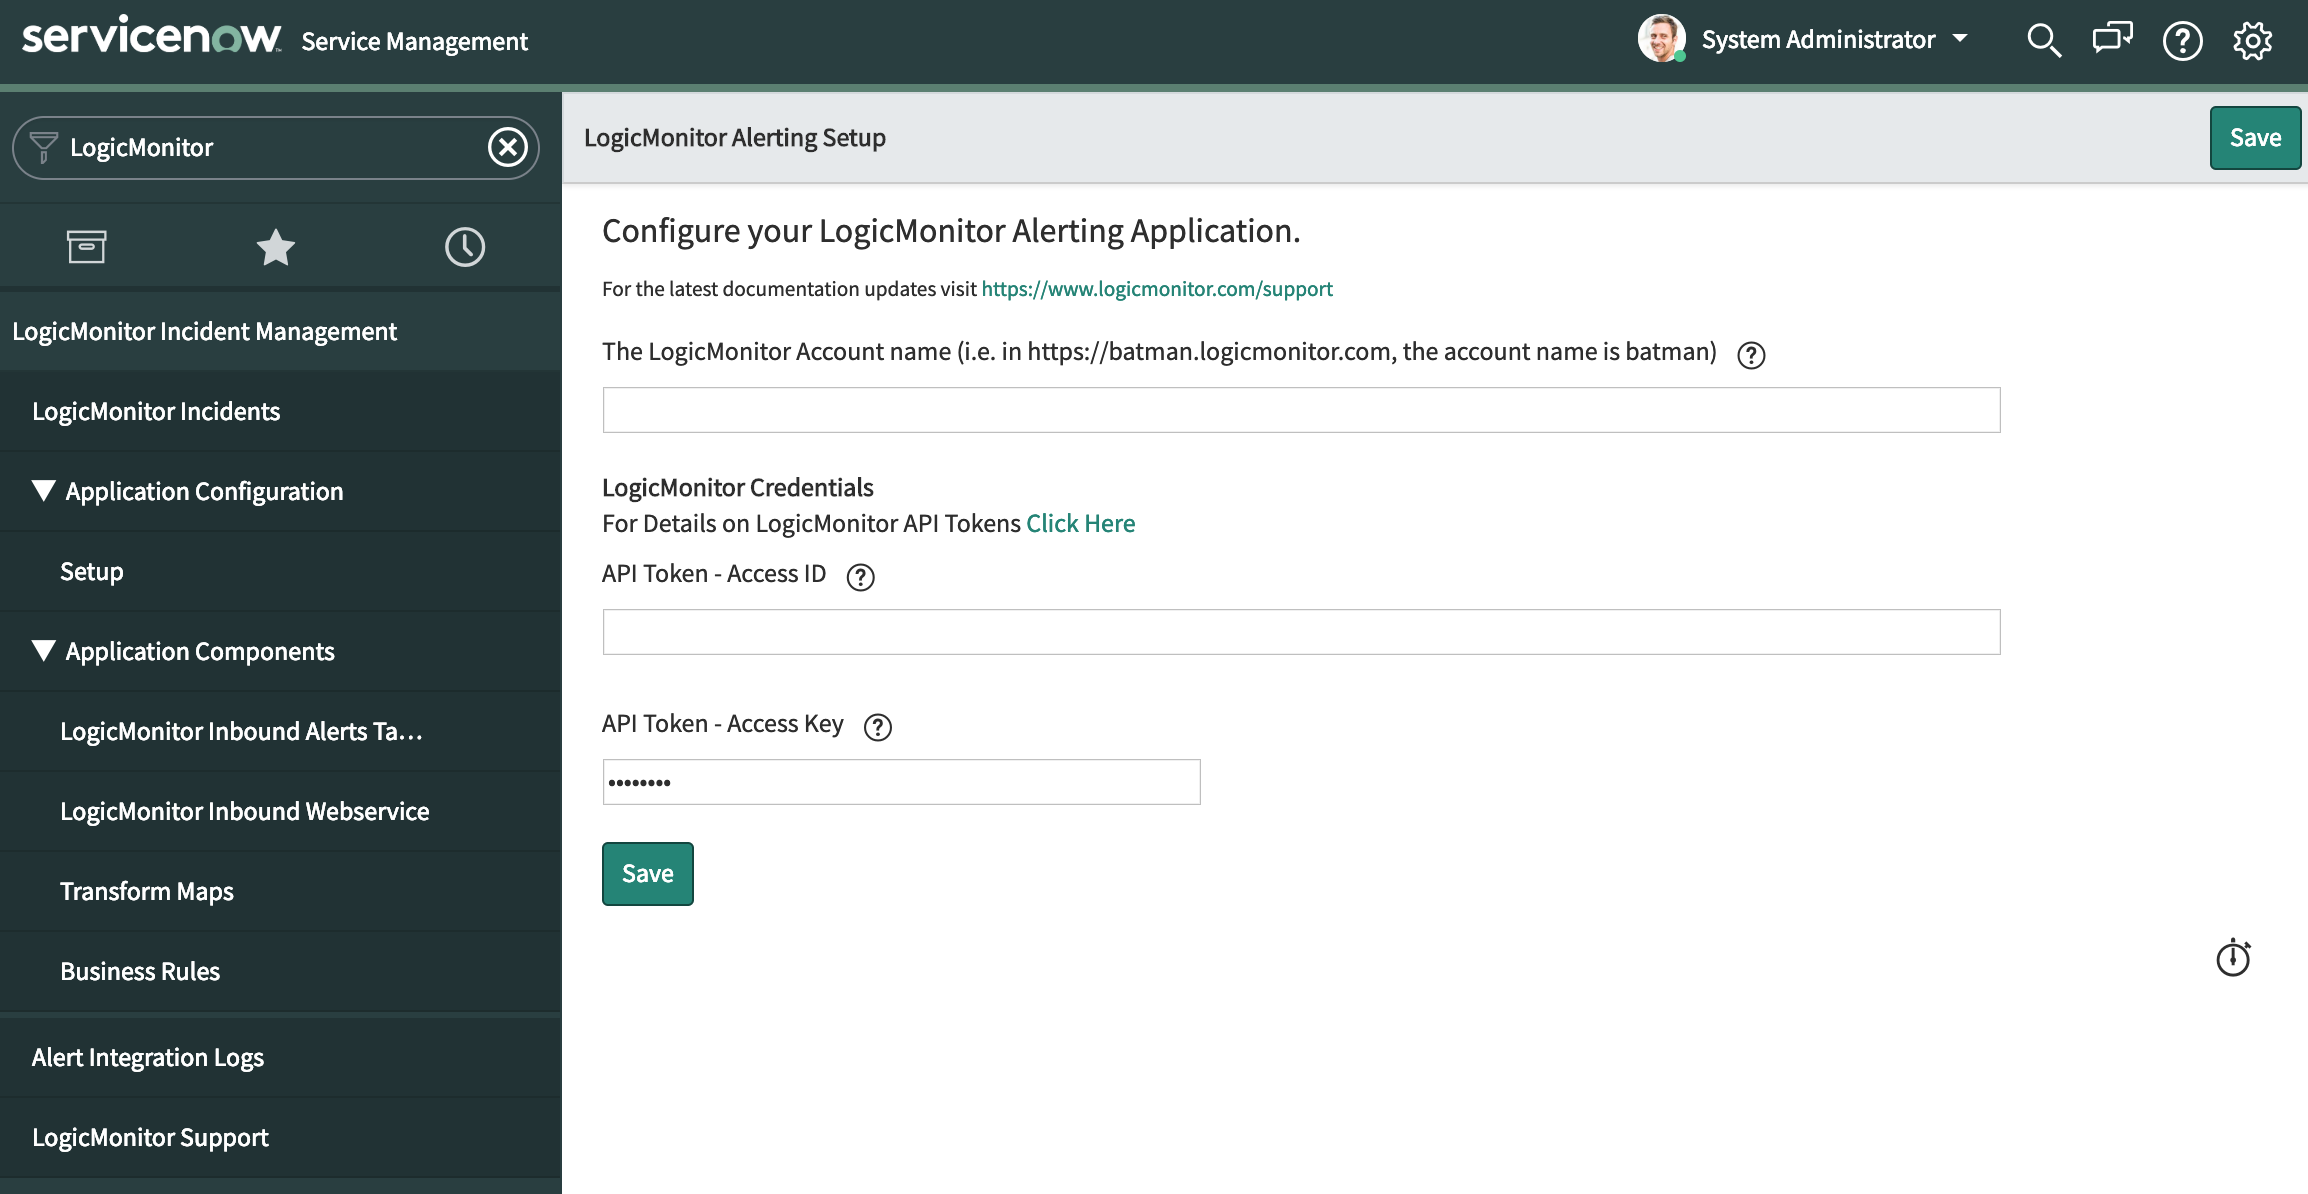
After the application is installed you will need to provide account details for ServiceNow to automatically acknowledge alerts:
- Navigate to LogicMonitor Incident Management > Setup > Properties
- Set values for:
- LogicMonitor Account Name
- API Access ID*
- API Access Key*
- Click Save
*As discussed in API Tokens, API tokens for LogicMonitor’s REST API are created and managed from the User Access page in the LogicMonitor platform.

Configuring the Integration in LogicMonitor
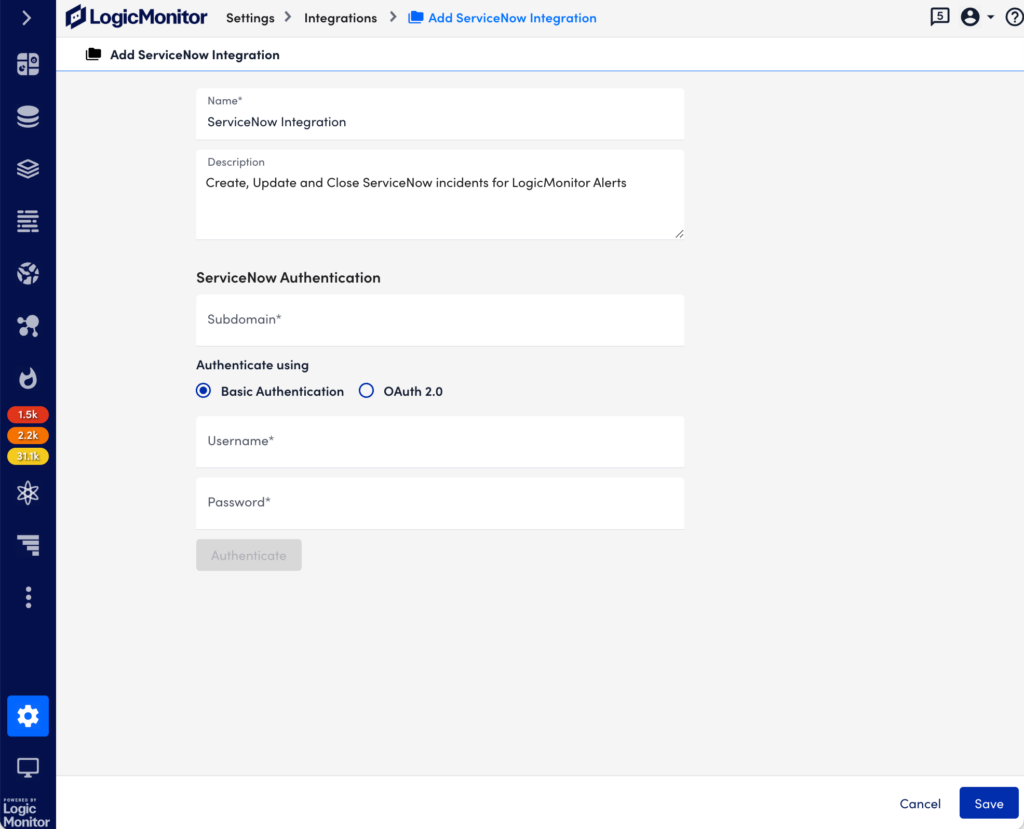
You can enable the ServiceNow Integration in your account from Settings > Integrations. Select Add and then ServiceNow:

SubDomain
Your ServiceNow subdomain. You can find this in your ServiceNow portal URL. For example, if your ServiceNow portal url is https://dev.service-now.com/, your subdomain would be dev.
Authenticate using
You can authenticate using the following authentication methods:
- Basic Authentication – It uses username and password. This option is selected by default.
- OAuth 2.0 – Uses OAuth 2.0 to authenticate
Basic Authentication
Provide the following information for the basic authentication.
Username
The username associated with the ServiceNow account you want LogicMonitor to use to open, update and close ServiceNow incidents. Ensure that this user account is assigned the “LogicMonitor Integration” (x_lomo_lmint.LogicMonitor Integration) role, which was automatically added to your ServiceNow instance as part of the LogicMonitor application installation performed in step 1.
Password
The password associated with the ServiceNow username you specified.
OAuth 2.0
The following Grant types are supported for OAuth 2.0:
Grant type: password
In the Grant type drop-down, select password and then provide the following details:
- Client ID – OAuth application client ID
- Client Secret – OAuth application client secret
- Username and Password – OAuth username and password
- Scope – The scope of the access request.
Grant type: client_credentials
In the Grant type drop-down, select client_credentials and then provide the following details:
- Access Token URL – A third party authentication token URL
- Client ID – OAuth application client ID
- Client Secret – OAuth application client secret
- Scope – The scope of the access request.
ServiceNow Default Settings
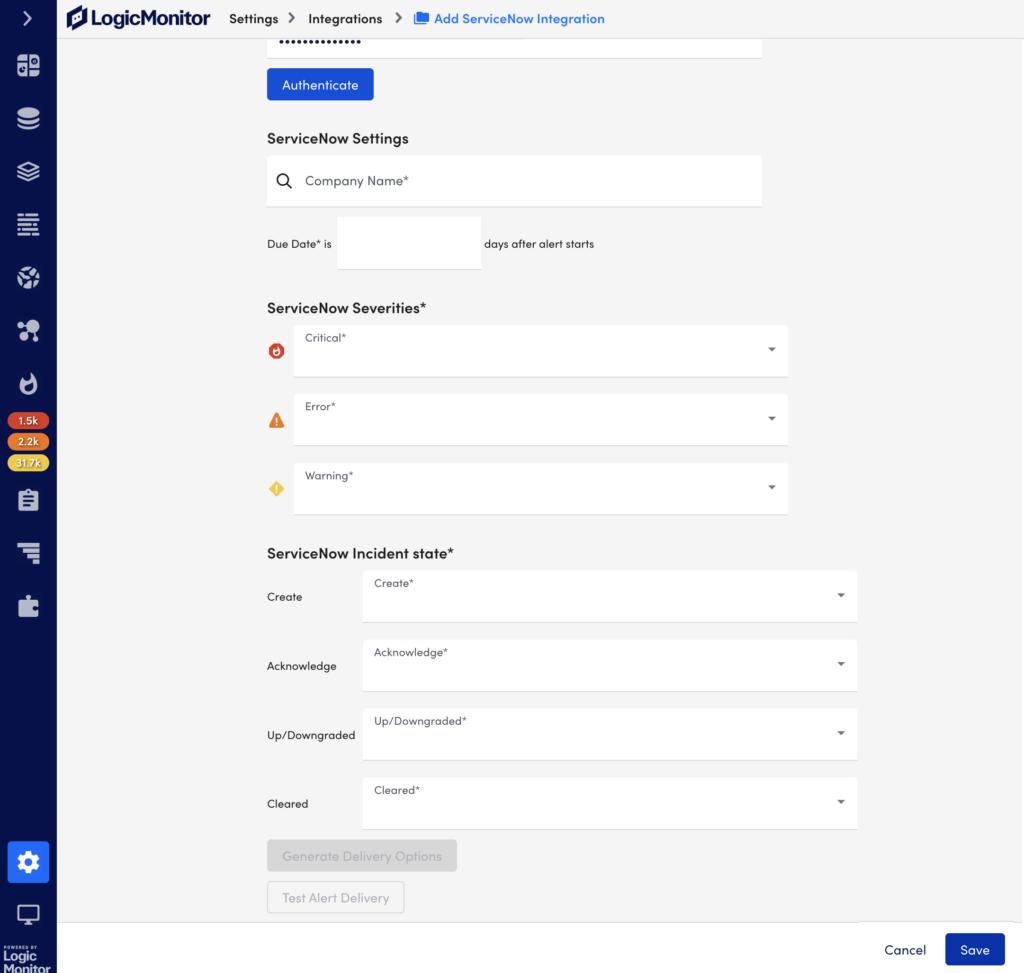
The ServiceNow Settings section enables you to configure how incidents are created in ServiceNow for LogicMonitor alerts.

Company
The ServiceNow company that incidents will be created for.
Note: If you’d like to create, update and delete tickets across multiple ServiceNow companies, you can do that by setting the following property on the device whose alerts should trigger a new or change to existing ServiceNow incident:
servicenow.company
When an alert is triggered and routed to the ServiceNow Integration, LogicMonitor will first check to see if this property exists for the device associated with the alert. If it does exist, its value will be used instead of the value set in the Integration form.
Due Date
This field will determine how LogicMonitor sets the due date of the incidents in ServiceNow. Specifically, the ServiceNow incident due date will be set to the number of days you set this field to.
ServiceNow Severities
Indicate how the LogicMonitor alert severities should map to incidents created in your ServiceNow portal.
Note: This mapping determines severity level only for the ServiceNow incident. It does not play a role in determining the incident’s priority level.
ServiceNow status
Indicate how the LogicMonitor alert statuses should update the incidents created in your ServiceNow portal.
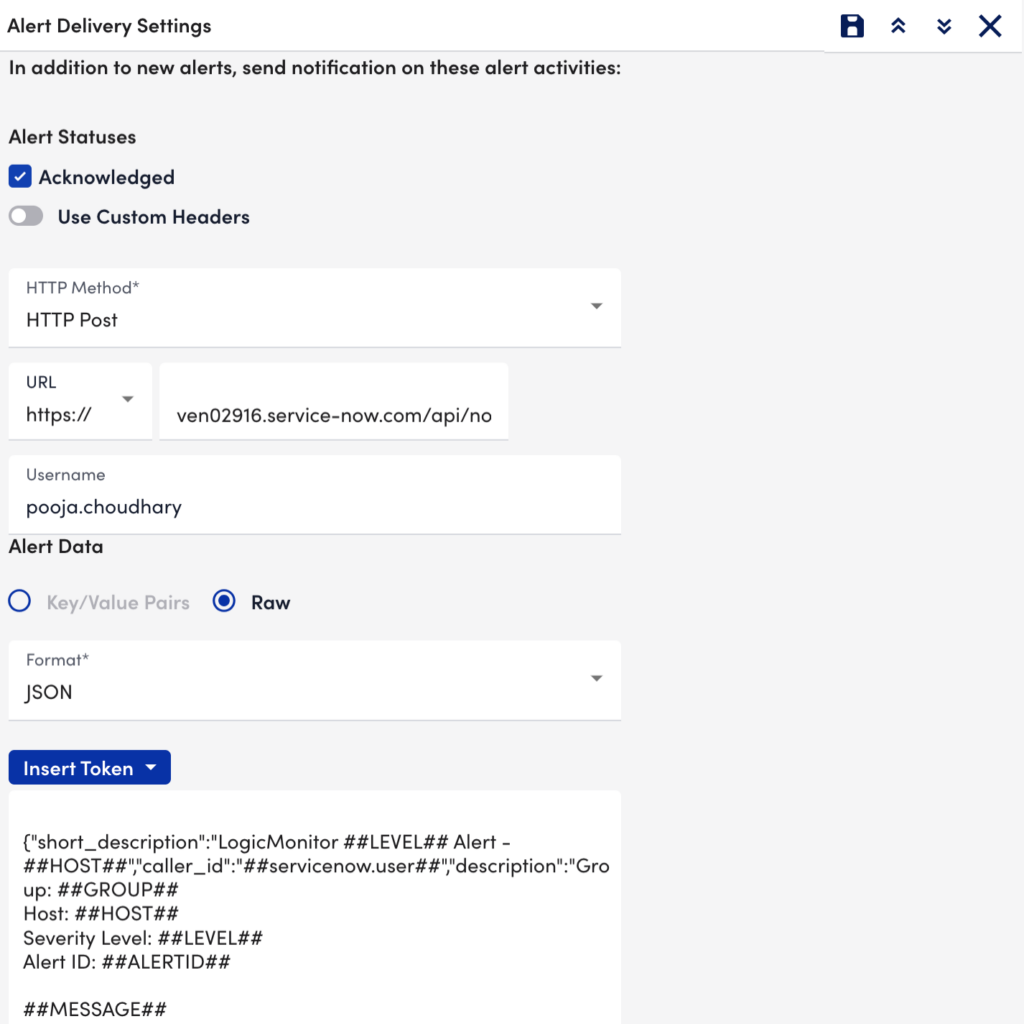
HTTP Delivery
The HTTP Delivery section controls how LogicMonitor formats and sends the HTTP requests to create, update and/or close incidents. You shouldn’t need edit to anything in the HTTP Delivery section, but if you wish to customize something you can use the information in the following sections to guide you. If not, you can save the integration now and proceed to the Configuring Alert Rule and Escalation Chain section.
By default, LogicMonitor will pre-populate four different HTTP requests, one for each of:
- new alerts (Active)
- acknowledged alerts (Acknowledged)
- cleared alerts (Cleared)
- escalated alerts (Escalated)
- Updated note (Notes updated): Use this HTTP delivery method to update the Work notes section of the incident in ServiceNow.
Note: If the HTTP URL and HTTP method of the Notes updated section of your existing ServiceNow integration is blank, use your existing working configuration of Active HTTP delivery options to update the configuration. Use the following token configuration for alert data for the Notes updated HTTP delivery method:
{
“number”: “##EXTERNALTICKETID##”,
“logicmonitor_alert_id”: “##ALERTID##”,
“work_notes”: “##ALERT_NOTE##”
}

For each request, you can select which alert statuses trigger the HTTP request. Requests are sent for new alerts (status: Active), and can also be sent for alert acknowledgements (status: Acknowledged), clears (status: Cleared) and escalations/de-escalations/adding note (status: Escalated).
Note: If the escalated status is selected and a note is added to the alert, an update request is sent whether the alert is active/cleared. If the escalated status is not selected and a note is added to the alert, a request is not sent.
HTTP Method
The HTTP method for ServiceNow integrations is restricted to POST and PUT. For the Notes updated method only the Patch HTTP method is used.
URL
The URL that the HTTP request should be made to. This field is auto-populated based on information you’ve provided.
Alert Data
The custom formatted alert data to be send in the HTTP request (used to create, update and close ServiceNow incidents). This field will be auto-populated for you. You can customize the alert data field using tokens.
Test Alert Delivery
This option sends a test alert and provides the response, enabling you to test whether you’ve configured the integration correctly.
Tokens Available
The following tokens are available:
- LogicModule-specific alert message tokens, as listed in Tokens Available in LogicModule Alert Messages.
- ##ADMIN##. The user the alert was escalated to.
- ##MESSAGE##. The rendered text of the alert message. This token will also pass all relevant acked information (e.g. the user that acknowledged the alert, ack comments, etc.).
- ##ALERTTYPE##. The type of alert (i.e. alert, eventAlert, batchJobAlert, hostClusterAlert, websiteAlert, agentDownAlert, agentFailoverAlert, agentFailBackAlert, alertThrottledAlert).
- ##EXTERNALTICKETID##. The ServiceNow incident ID.
Configuring Alert Rule and Escalation Chain
Alert rules and escalation chains are used to deliver alert data to your ServiceNow integration. When configuring these, there a few guidelines to follow to ensure tickets are opened, updated, and closed as expected within ServiceNow. For more information, see Alert Rules.
Alert Acknowledgement
You can configure an incident form in ServiceNow to acknowledge LogicMonitor alerts from ServiceNow. This involves adding an Acknowledge option to a ServiceNow Incident form, and allows technicians to view acknowledged LogicMonitor alerts from ServiceNow.
Requirements
To acknowledge LogicMonitor alerts from ServiceNow, you must have the LogicMonitor instance set up in the Incident Management Setup tab in ServiceNow. This involves providing your LogicMonitor Account Name and corresponding API Tokens.
For more information about configuring an incident in ServiceNow, see ServiceNow’s Incident Management documentation.
For more information about creating LogicMonitor API tokens, see API Tokens.
Adding Acknowledge Option to ServiceNow Incident Form
Recommendation: Add the LogicMonitor Alert Acknowledge field to an Incident View in addition to the base setup.
- As a ServiceNow administrator open an incident form.
- Click the Menu button > Configure > Form Design.
3. Drag “LogicMonitor Alert Acknowledge” to the appropriate section of your form.
Additional ServiceNow solutions can be found in our Communities and Blog Posts that demonstrate custom implementations using the LogicMonitor Marketplace application as a base.
Accessing ServiceNow Incident from LogicMonitor
You can use a link from LogicMonitor to directly access an incident ticket in ServiceNow portal. The incident links are available on the Alerts page in the ServiceNow incident column.
To view an incident in ServiceNow, do the following:
- In LogicMonitor, go to Alerts.
- On the Alerts page, navigate to the ServiceNow incident column, and select the incident number that you want to open in ServiceNow.

Note: To view the ServiceNow link of an incident, in the ServiceNow incident column, hover over the incident number.
The selected incident opens in the ServiceNow portal.