Adding Collector
Last updated - 08 December, 2025
LogicMonitor Collector monitors your infrastructure and collects data defined by LogicModules for each resource in that location. You only need to install one Collector per location. A single Collector on a server can monitor all resources in that location. For more information, see About the LogicMonitor Collector.
Installing Collector in a Container
LogicMonitor supports installing and running a Collector in a Docker container. Installation of a containerized Collector does not support all install options. For example, you can only run the full installation, not the bootstrap, and must run the Collector process as root. For more information, see Installing the Collector in a Container.
Installation Settings
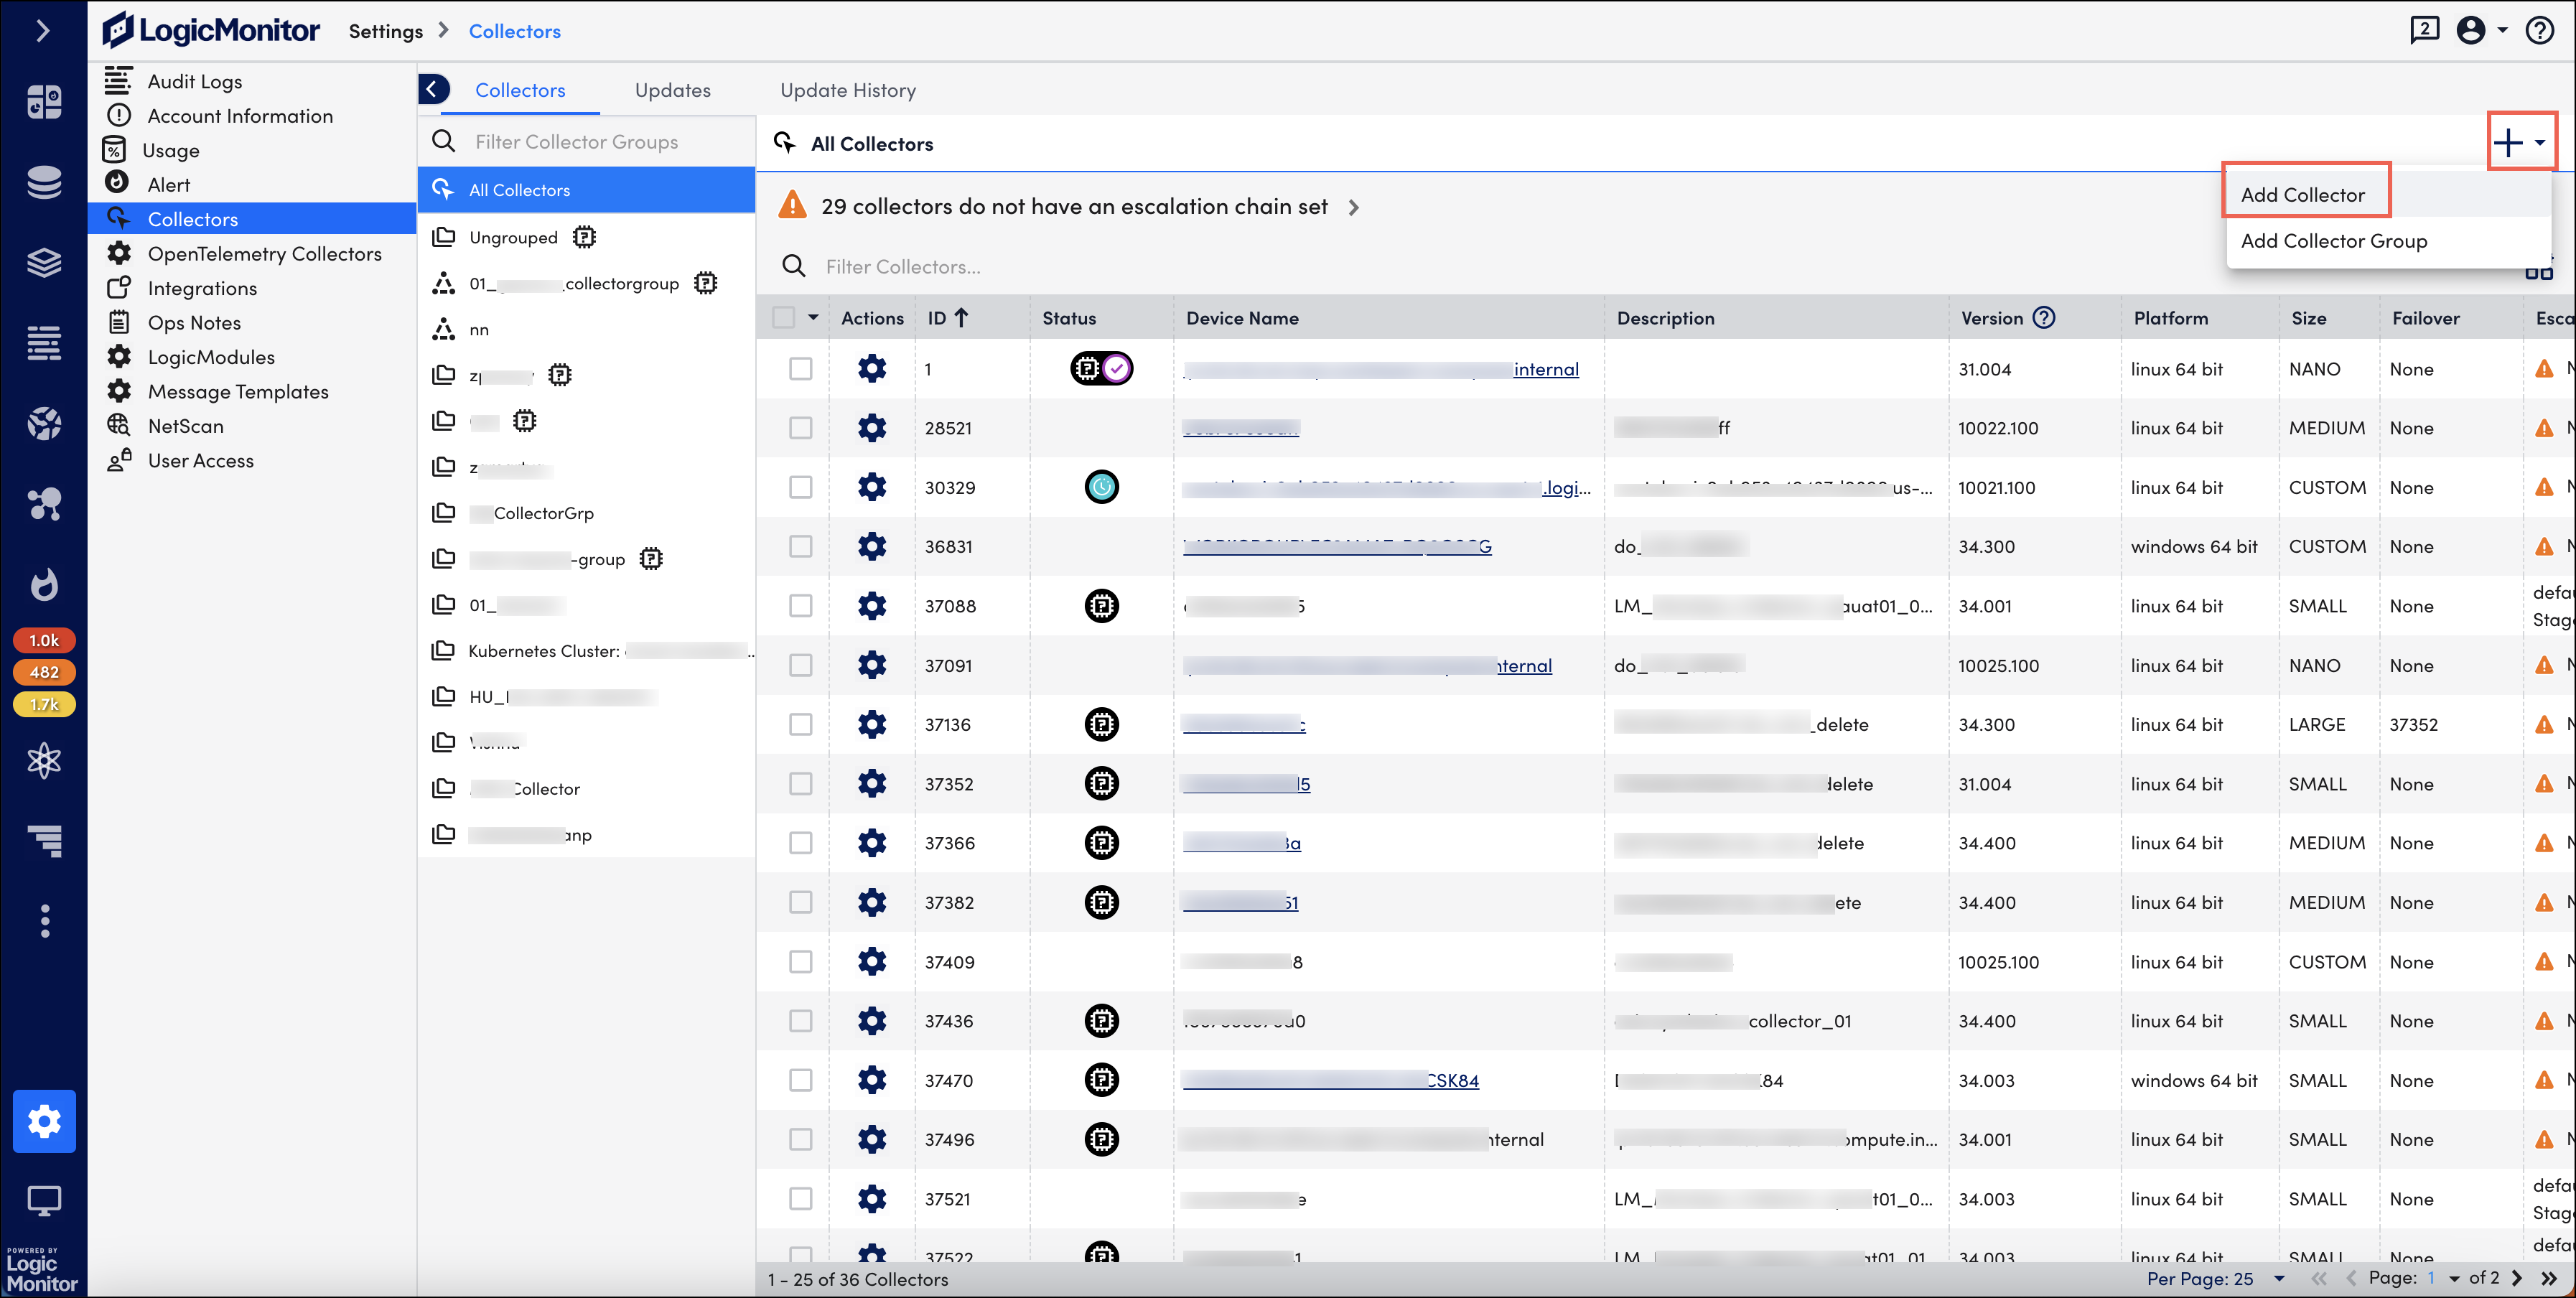
- In LogicMonitor, navigate to Settings > Collectors.
- In the Collectors tab, select
 Add Collector Options dropdown menu.
 - Select Add Collector.

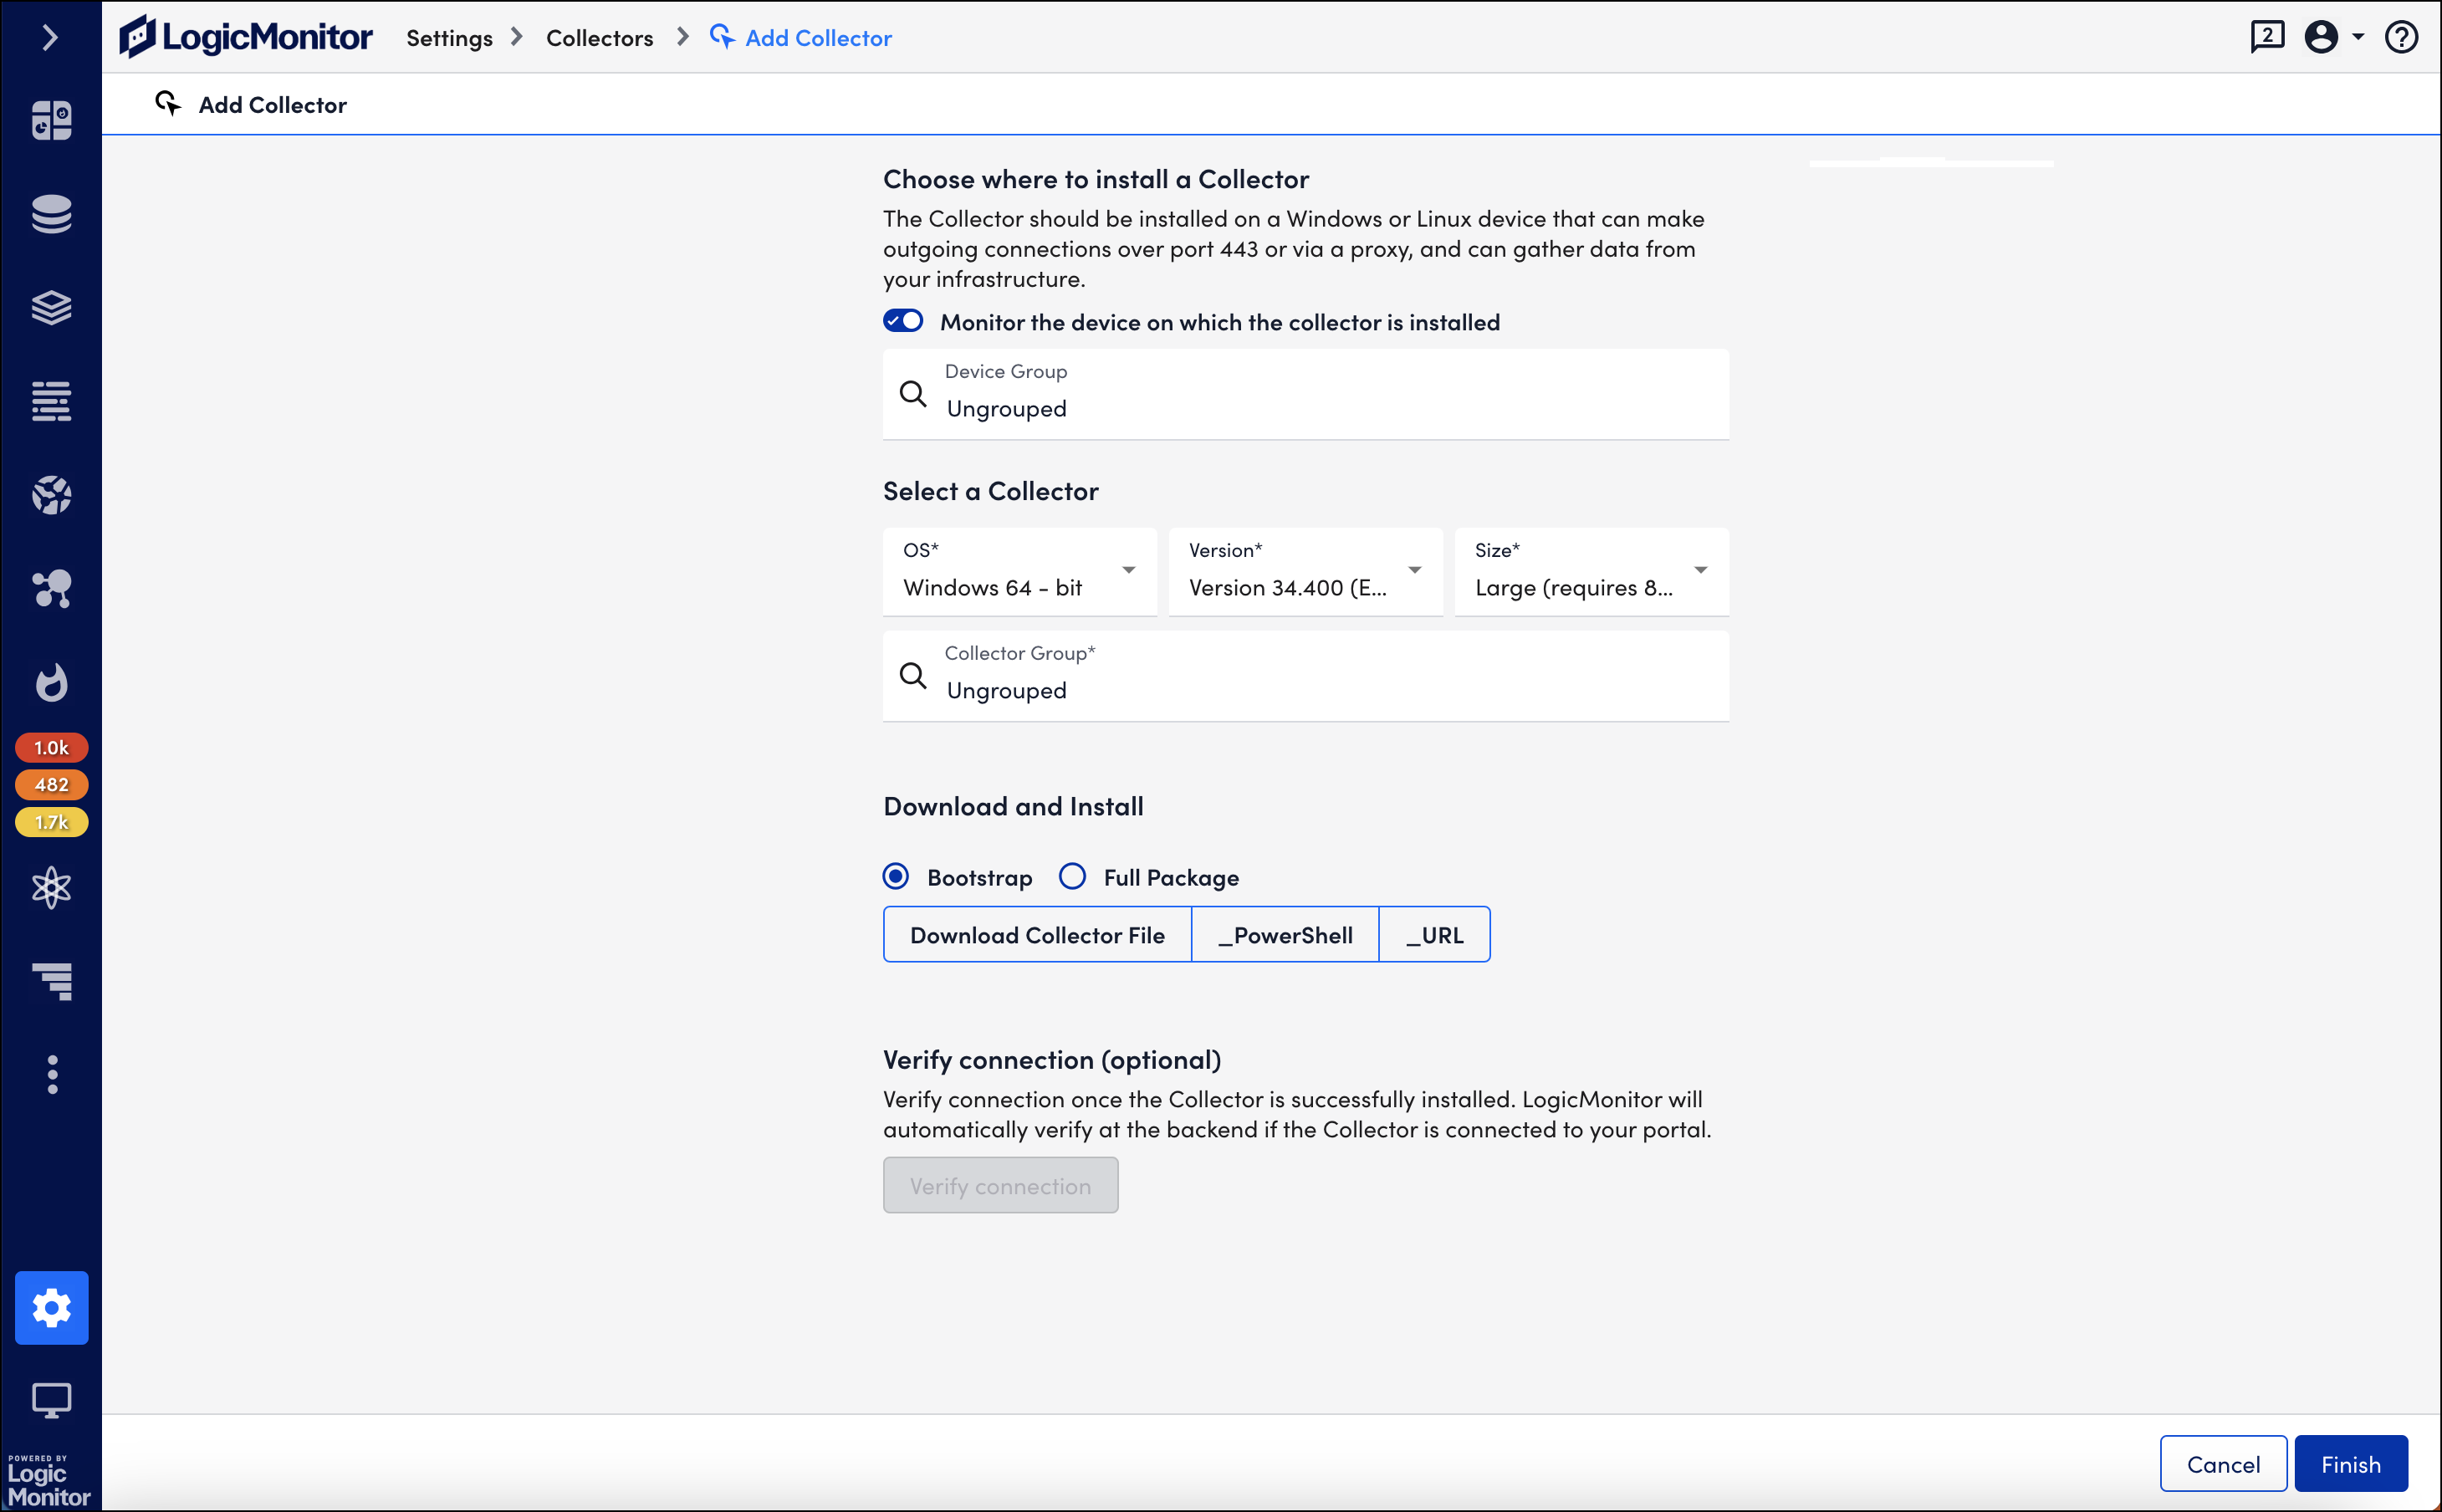
Follow the steps on the Add Collector page to complete and verify the Collector installation.

Selecting Device to Install Collector
The first step in adding a Collector is deciding which device will host the Collector.
For each location of your infrastructure, install a Collector on a Windows or Linux server that is physically close to or on the same network as the resources it will monitor. Typically, Collectors are installed on machines that function as syslog servers or DNS servers.
To ensure reliability, the Collector must not communicate across the internet to poll resources in another datacenter, through firewalls or network address translation (NAT) gateways.
Collector Server Requirements
The following table lists general requirements for choosing a server to host the Collector.
| Requirement | Details |
| Windows Server or Linux running on a physical or virtual server | LogicMonitor follows the Microsoft Lifecycle Policy for the “Extended Support End Date” and the Red Hat Enterprise Linux Life Cycle for the “End of Maintenance Support 2 (Product retirement)” date to determine which Windows Server and Linux operating systems are supported for Collector installation. LogicMonitor supports the following Linux distributions:
|
| Comprehensive port access | The server must be able to make outgoing HTTPS (port 443) connection to the LogicMonitor servers (proxies are supported). In addition, the ports for the monitoring protocols you intend to use (such as SNMP, WMI, JDBC, etc.) must be unrestricted between your Collector and the resources you want to monitor. For a detailed list of the ports, see About the LogicMonitor Collector. |
| 2GB of RAM | A minimum of 2GB of RAM. (More memory permits a Collector to collect data from more resources.) For more information, see Collector Capacity. |
| Reliable time | The Collector must have reliable time, thus the server must have NTP setup or Windows Time Services to synchronize via NTP. If running on a VMware virtual machine, install VMware tools with VMware tools periodic Time Sync disabled. |
| English-language support | LogicMonitor does not support non-English languages. |
Monitoring Collector Performance
It is recommended that you select the Monitor the Device on which the collector is installed checkbox. This allows you to keep track of the CPU utilization, disk usage and other metrics to ensure that the Collector is running and keeping up with its data collection load. For more information, see Monitoring Your Collectors.
You may also assign the Collector device into a Device Group. If you leave the device “Ungrouped”, LogicMonitor automatically adds it to the dynamic group “Collectors”. For more information, see Device Groups Overview.
Selecting Collector
The next step in adding a Collector is specifying the type, version, and the monitoring capacity (size) for the Collector you will install onto your server. You may also assign the new Collector to a Collector Group.
Selecting Collector Type
Select the appropriate Collector download file for your server: Linux or Windows. For both Windows and Linux, we support only 64-bit Operating System. The type of Collector you choose to install depends on the resources it will monitor. For example, to collect data from Windows devices, you need to install the Collector on a Windows server.
Selecting Collector Version
Select from the available General Release and Early Release Collectors.
| Version | Description |
| General Release | General Release Collectors are our stable release versions. We recommend this version for most infrastructures. |
| Early Release | Early Release Collectors offer new features and functionality which may still be under development. You may want to install this to test the new features. But if you have a large deployment we don’t recommend installing this version to monitor your entire infrastructure. |
You can always change the version by uninstalling and installing a new Collector.
Selecting Collector Size
The Collector size refers to the monitoring capacity for the Collector. The number of resources that a Collector can monitor depends on the data collection method that it uses (such as SNMP, JDBC, WMI, and so on). For more information, see Collector Capacity.
You can choose from four available Collector sizes:
| Size | Description |
| Nano | This Collector is intended for testing purposes and not recommended for production environments. It does not have a memory requirement as it consumes less than 1GB system memory and monitors a limited number of Resources. |
| Small | This Collector consumes approximately 2GB system memory and is capable of monitoring roughly 200 (Linux Collector) or 100 (Windows Collector) Resources. |
| Medium | This Collector consumes approximately 4GB system memory and is capable of monitoring roughly 1000 (Linux Collector) or 500 (Windows Collector) Resources. |
| Large | This Collector consumes approximately 8GB system memory and is capable of monitoring roughly 2000 (Linux Collector) or 750 (Windows Collector) Resources. |
| Extra Large | This Collector consumes approximately 16GB system memory. |
| Double Extra Large | This Collector consumes approximately 32GB system memory. |
Assigning Collector Group
You may assign the new Collector to an existing Collector Group or create a new group. Collector Groups pool your Collectors based on their physical locations, defined environments (QA, Development, or Production), or if you are an MSP customer and streamlines the configuration and management of multiple Collectors. For more information, see Adding Collector Groups.
Downloading and Installing Collector
This step provides options for you to download the installer file for the collector you selected. For both Windows and Linux Collectors, regardless of the installer package and installation method, you must install and verify the Collector (through automatic system verification) within two hours of starting the installation. If not installed within two hours, the system deletes the Collector record. You must download and install the Collector again using a new installer package.
Selecting Installer Package
You have to choose between two installer packages:
- Bootstrap—It downloads a smaller installation package (~500kB) for a faster install using the LogicMonitor CDN.
- Full Package—It downloads the installation package which is approximately 200MB.
Installing Windows Collector
Starting with EA Collector 37.100, the default installation method for Windows collector will use a non-admin user logicmonitor as the new collector service user. This user is automatically created with all the necessary permissions.
Recommendation: Although you can choose the LocalSystem or Administrator user, it is recommended to use the default non-admin user for Windows collector installation to follow security best practices.
- Download the installer file directly to your Windows server or use one of the download command options.
For Windows, we provide options to download and install using PowerShell or a URL. Select the option to copy the download command to your clipboard and then run it on your server. - After downloading, open it to start the Install Shield Wizard.
The Install Shield Wizard extracts the binary and prompts you for credentials. These credentials correspond to the account that the Collector will run under, which may be Local System or a domain account with local administrator permissions.
- If this Collector is not monitoring other Windows systems, run the service as Local System.
- If this Collector is monitoring other Windows systems in the same domain, run the service as a domain account with local administrator permissions.
- If this Collector is monitoring other Windows systems and they are not part of the same domain, run the service as a local administrator and connect to each resource with local administrator credentials. You may choose to set up the password so that it doesn’t expire, to reduce authentication issues between the Collector and its monitored resources. For more information, see Credentials for Accessing Remote Windows Computers.
The LogicMonitor Collector service must be granted “Log on as a service” under “Local Policy/User Rights Assignment” in the Windows server’s local security policy settings. For more information, see Troubleshooting Windows Collectors.
If the Windows server is running antivirus software, you will need to add a recursive exclusion for the LogicMonitor Collector application directory. For more information, see About the LogicMonitor Collector.
Installing Linux Collector
Prerequisites to install a Linux Collector are as follows:
- For Collectors running version 28.500 (or higher numbered versions), the Bourne shell is required for the Linux installation script. You may need to install the
vim-commonpackage to get thexxdbinary that the installer depends on. - For Collectors running version 28.100 (or higher numbered versions), the
sudopackage must be installed on Linux when running the Collector as a non-root user. The installer also makes additions to/etc/sudoersto handle service restart and memory dumps. - In Linux environments with the Collector running in containers, the Collector must run as root: suid root is
/bin/ping.
- Download the installer file directly to your server (if your server supports web browsing) or onto another server and use a file transfer option (such as scp) to copy it to the server where you will install the collector.
For Linux, we also provide options to download and install using cURL or Wget. Select the option to copy the download command to your clipboard and then run it on your server. - After downloading the installer onto your Linux server, change the permissions to make the binary executable.
# chmod +x <installer-file>.bin - Run the executable.
# ./<installer-file>.bin
When the installation is complete, the system displays a message confirming successful installation. You can now start adding resources to be monitored. For more information, see Adding Resources.
Note: Installing the Collector on Linux creates a default user, called logicmonitor, to run the Collector as a user without root privileges. Although you can select a different user or run as root, LogicMonitor recommends using this logicmonitor user created by the install script.
If you want to install Linux collector as root, please contact LogicMonitor product team or technical support team.
If you have issues with your Linux collector, see Troubleshooting Linux Collectors.
Verifying Connection
After successfully installing the Collector on your Windows or Linux server, return to the Add Collector page in LogicMonitor and verify that the Collector is connected to your portal.
Collector Hostname
Each Collector has a name or ID that is registered with the LogicMonitor server when you download the Collector. The Collector’s hostname refers to the IP address or DNS name of the server that the Collector has been installed on.
- For Linux, the Collector will resolve the hostname by running the
hostname -forhostnamecommands. If both commands fail, the hostname defaults to:localhost.localdomain. - For Windows, the hostname is a combination of the domain and
computername.


