Setting up the ServiceNow Integration
Last updated - 22 March, 2023
The following describes how to install and configure the LogicMonitor Data Exchange (LMDX) integration application for data synchronization between ServiceNow (SN) and LM Dexda. The application has default mappings to transfer incident and CMDB information between LM Dexda and ServiceNow. You can also configure the application for data synchronization with any table within ServiceNow. LMDX also supports domain separated instances, see Domain Separation Support.
You can get notified about issues in ServiceNow, and through links access the information in LM Dexda to investigate them. You can look at insight details, see associated alerts and type of issue, and understand why they were correlated. For information on how to investigate issues in LM Dexda, see Exploring Data.
Requirements
Ensure you have the following before getting started with the configuration:
- A ServiceNow user account with the “admin” role. This is required to configure the LMDX application, since LMDX saves changes in update sets.
- A ServiceNow user account to allow LogicMonitor to access the API. To do this, the account must have the x_lomo_dx.api_user role that comes with the application installation. You can safely enable the “Web Service Access Only” setting for the account.
- An LM Dexda API endpoint and token provided by your LM Dexda administrator. For more information, see API Tokens.
Installation and Configuration
The data synchronization is controlled using LMDX configuration records in ServiceNow. The Config (x_lomo_dx_config) record is the main table determining which tables are set up to be synchronized using the LMDX application.
The integration comes with these fully working (inactive by default) configuration records:
- Incident (LMDXDefaultInc)—Manages synchronization with the
incidenttable in ServiceNow. - CMDB (LMDXDefaultCmdb)—Manages synchronization with the
cmdb_citable in ServiceNow (outbound only).
The default configuration for the Incident table created in LMDX contains the following related artifacts:
- Business Rules
—LMDXDefaultIncsyncandLMDXDefaultCmdbsync, defining when to run. - Import Set Table—
LMDXDefaultInc(x_lomo_dx_incident) with relevant fields, Inbound Transform Map with Field Maps and Transform Script (for LMDXDefaultInc only). - Outbound Transform Map and Field Maps.
You can use these configurations as-is, or modify them as desired.
In addition, you can create your own configuration records to synchronize other tables if needed. You can use the pre-existing Incident (LMDXDefaultInc) configuration and artifacts as a reference when setting up synchronization for other tables.
Note: LMDX can process outbound records, for example to export data to LM Dexda. However, LMDX does not support processing of inbound records into CMDB tables in ServiceNow. For inbound CMDB record processing, use the Service Graph Connector for LogicMonitor, or the LogicMonitor CMDB integration.
You can find these in the ServiceNow App Store.
Installing the Application
To get started, install the LMDX application from the ServiceNow App Store and complete the built-in configurations as described in the following.
Note: The built-in configurations are inactive by default, and must be activated.
Setting Configuration Properties
Before you can use LMDX you need to define a set of authentication properties. Consult your LM Dexda administrator to get the specific values for your account.
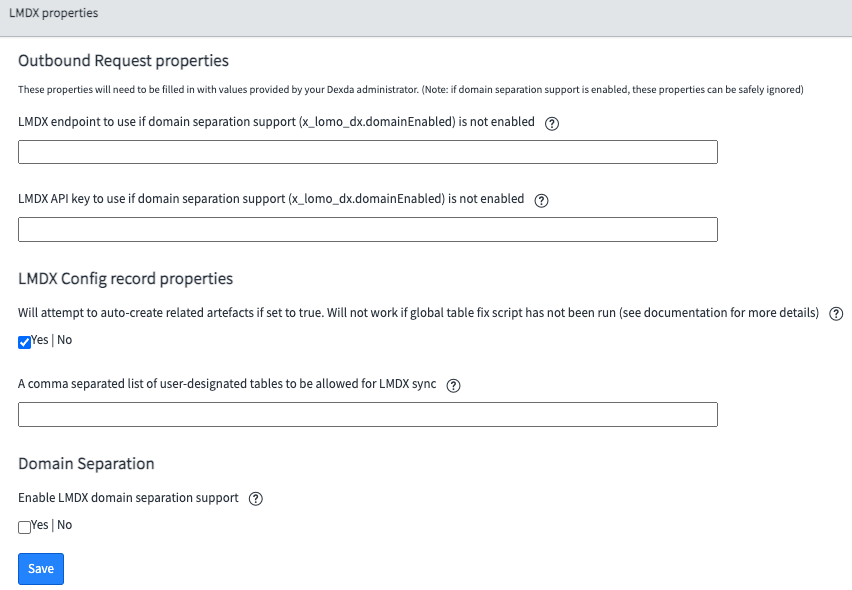
Navigate to Configuration properties and add values as follows:
- Value for
x_lomo_dx.outbound.endpointin the field LMDX endpoint to use if domain separation support (x_lomo_dx.domainEnabled) is not enabled. - Value for
x_lomo_dx.auth.apiKeyin the field LMDX API key to use if domain separation support (x_lomo_dx.domainEnabled) is not enabled.
The LMDX Config record properties are used when creating new Config records. For more information, see Setting up a new Table.
Completing the Default Configurations
Follow these steps to complete the setup and activation of the default configurations in ServiceNow.
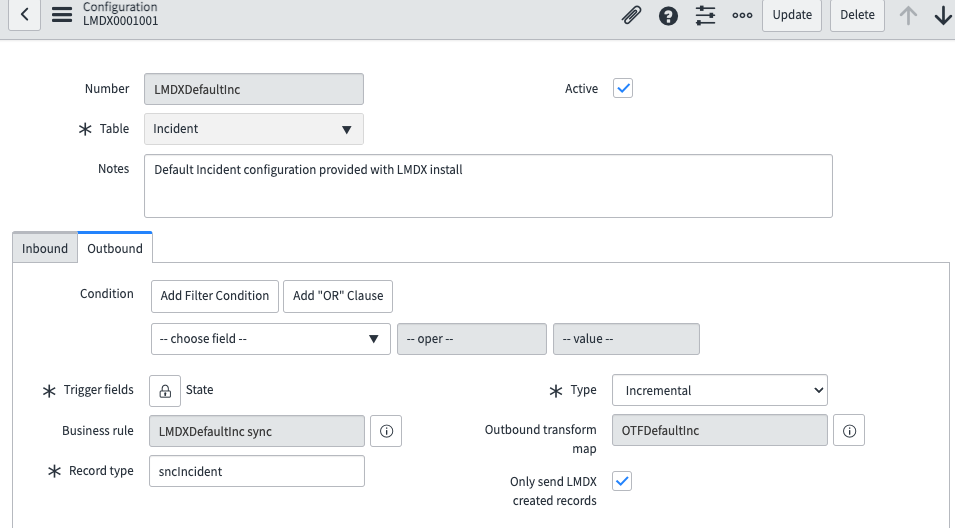
- In the list under Configuration, select the record for which you want to update the configuration, for example “Incident (LMDX0001001)”.
- On the Outbound tab, enter values as described in the following.
- Condition—You can add a condition to the Outbound payload creation so that only records that match the condition are considered for processing.
- Trigger fields—A list of fields that triggers a payload to be sent to LMDX only when any of the listed fields changed, as you may not want to send every change on the record. All changes in the fields are considered. If you wish to filter for a specific value in a field, use the Condition field. Typical trigger fields of interest are “State” and “Configuration item”.
- Record type—The value (string) depends on the selected table, for example “sncIncident” for the Incident table. Consult your LM Dexda administrator for what to put in this field for your specific tables.
- Type—Defines how a payload should be sent to LMDX. Options:
- Incremental—The payload is sent as soon as it is generated. Recommended for task-like records such as incidents.
- Batch—The payload is periodically sent in a batch. Recommended for data records such as CMDB. For more information, see Sending Batch Payloads.
- Only send LMDX created records—Select this if you only want records created by LMDX to be synchronized. This means you do not need to set up a condition that relies on records being created or updated by a specific user. This setting is intended primarily for task-like records such as incidents, and cannot be used in conjunction with batch records.
- Active—Check this option when you want the configuration to be activated. This activates the configuration record, along with the associated Business Rule, Transform map and Outbound transform Map.
- Select Update to save the configuration record.
Sending Batch Payloads
The Type setting does not affect when a payload is generated, but it does affect when a payload is sent to LM Dexda by LMDX. All payloads are generated as soon as a change is detected in a “valid” record. This is specified in the conditions and trigger fields, through the associated Business Rule on the table. Incremental payloads are sent as soon as they are generated, while batch payloads are sent periodically. The “Batch” payload type is intended to be used for background data records like “cmdb_ci”.
To send batch payloads, you must activate the LMDX – Process batch outbound payloads scheduled job and set a repeat interval. The minimum repeat internal is recommended to be no less than every 5 minutes. Batch payloads are merged so that only a single payload is sent with the latest values, even if there are multiple changes to the record within the repeat interval period.
Setting up a new Table
You can set up a new table for synchronization if the default configurations do not support the requirements in your specific use case. To do this through LMDX, you need to first create a new configuration record. By default, only the following tables (and their children) can be selected from the drop-down on a new configuration record:
- Task
(task) - Configuration item
(cmdb_ci) - Asset
(alm_asset)
You can specify other tables to be included in the drop-down by using the x_lomo_dx.internal.tableWhitelist system property under the LMDX Config record properties section. This property can be filled with the names (not labels) of any other table (including custom tables) that you wish to synchronize.

You can have LMDX automatically create the artifacts by setting a system property and running a script once on your instance. You can also create the artifacts manually each time you create a new configuration record. Both methods are described in the following.
Creating a new Configuration Record
Navigate to Configuration and select New. Add configuration values as described in Completing the Incident Configuration.
Creating Artifacts Automatically
Follow these steps to allow LMDX to create artifacts automatically after a new Config record is created.
Step 1. Run the Global Table Script
Run the following script on your instance, either as a “Fix” script or a “Background” script.
Note: You cannot add the script into the application as it must be run in global scope, and not as part of the scoped application.
function update(tableName){
  var updateGR = new GlideRecord('sys_db_object');
  updateGR.setWorkflow(false);
  updateGR.get('name', tableName);
  updateGR.setValue('create_access', true);
  updateGR.setValue('update_access', true);
  updateGR.setValue('delete_access', true);
  updateGR.update();
  GlideTableManager.invalidateTable(tableName);
  GlideCacheManager.flushTable(tableName);
}
update('sys_db_object');
update('sys_dictionary');
update('sys_transform_map');
update('sys_transform_entry');
update('sys_transform_script');
update('sys_script');The script selects the “Can create”, “Can update”, and “Can delete” checkboxes for the following tables:
- Tables
(sys_db_object) - Dictionary
(sys_dictionary) - Table Transform Map (
sys_transform_map) - Field Maps (
sys_transform_entry) - Transform Scripts
(sys_transform_entry) - Business Rules (
sys_script)
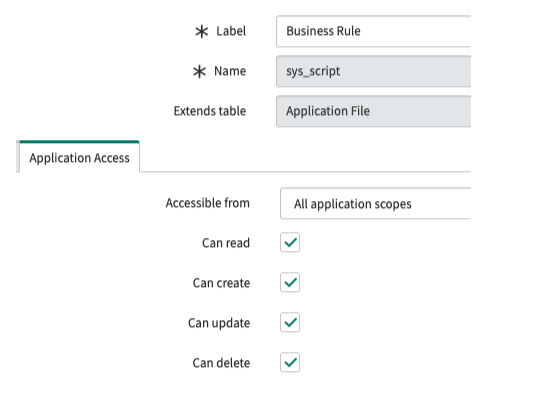
This lets the application create, update, and delete records on those tables from within the application scope.
Note: The calls to GlideTableManager and GlideCacheManager functions reset the table cache so that the newly updated values are used across all node instances. If these calls are not made, the automatic creation may fail due to security rules not being refreshed across all node instances. For more information, see the ServiceNow documentation.
Step 2. Update Configuration Properties
When you have run the script, do the following:
- Navigate to Configuration properties.
- Select the checkbox for Will attempt to auto-create related artifacts if set to true.
- Select Save.
This sets the x_lomo_dx.config.artefactAutoCreation property to “true” (false by default).
Note: Even if you have run the script in step 1, you must set this system property to “true” for the artifacts to be automatically created. If all of these conditions are met, the artifacts are created through a Flow inside of the application scope. If the system property is set to “true”, but the script has not been run, the Flow does not create the artifacts.
LMDX will now create a new Business Rule record for the selected table, each time a new Config record is created.
If the selected table is not part of the CMDB hierarchy, LMDX will also create:
- A new Table extending Import Set Row (
sys_import_set_row). - The following Dictionary records for the new Table (used for LMDX processing purposes):
- Coalesce type
- External reference
- A new Table Transform Map for the new Table.
- A Field Map for the
sys_idfield. - An
onAfterTransform Script (used for LMDX processing purposes).
Creating Artifacts Manually
If you do not want to run the script on your instance, you can manually create the required artifacts for data synchronization to a new table. An Outbound Transform Map is always created automatically whenever a new Config record is created.
Before you start creating artifacts, do the following:
- Ensure that the checkbox for Will attempt to auto-create related artifacts if set to true… on Configuration properties is deselected. The system property
x_lomo_dx.config.artefactAutoCreationwill then be set to “false”, indicating that artifacts are created manually. - Ensure that you are creating your artifacts within the LogicMonitor Data Exchange (
x_lomo_dx) application scope.
Inbound artifacts
Note: This is not required for any tables in the CMDB hierarchy.
Follow these steps to create the artifacts:
- Create a new Import Set Table extending Import Set Row (
sys_import_set_row) within the LMDX scope. - Create a new Inbound Transform Map within the LMDX scope.
- Create
coalesce_typeandexternal_referencestring fields on the new Import Set Table. - Create a
sys_idfield map on the new Inbound Transform Map, set it to “coalesce” and copy the script from the existingsys_idfield map from the existing Incident Transform Map. - Create an
onAfterTransform Script and copy theonAftertransform script from the existing Incident Transform Map.
Outbound artifacts
Create a Business Rule by copying the existing “LMDXDefaultInc Sync” on the Incident table to your SN table.
Note: When you have finished creating your Inbound and Outbound artifacts, you must associate them with your newly created LMDX Config record using the reference fields.
After Creating Artifacts
You can now add new fields on the new Import Set Table, and Field Maps on the new Transform Map for inbound processing. You can also add Outbound Field Maps on the Outbound Transform Map for outbound processing.
Outbound Transform Maps
Outbound transform maps work in the same way as ServiceNow transform maps. Using these you can configure which fields on a given record should be sent from ServiceNow to LogicMonitor. The fields are specified using Outbound Field Maps, similar to ServiceNow field maps.
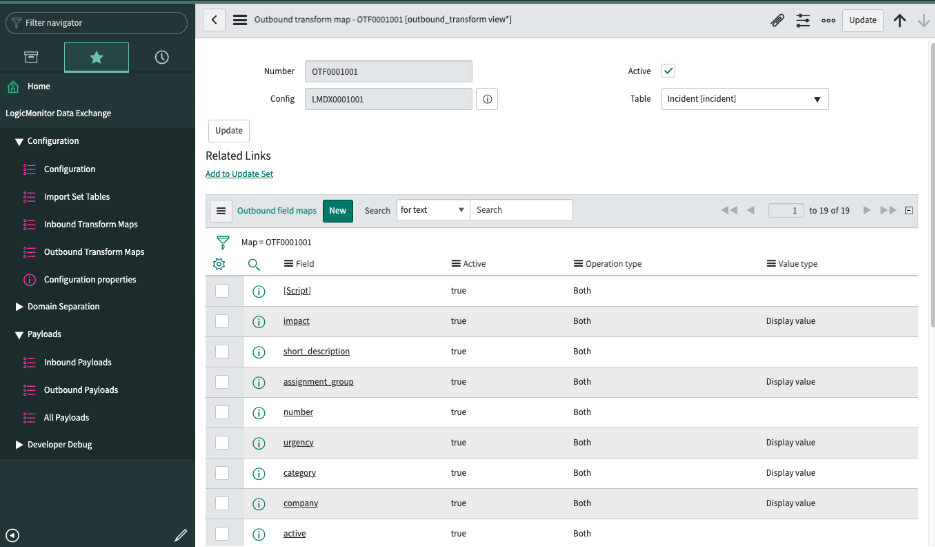
Outbound Field Maps Features
The following features for Outbound Field Maps are specific to the LogicMonitor integration.

- Value type—Available for fields which have an underlying value along with the value displayed in the user interface. It indicates if a field should send the “real” value (for example, a
sys_idfor a reference field), the “display value” (the value you see in a reference field), or both values.
Selecting “Both” sets the “display” value to be the value for the field, along with a field with a suffix of “_fv” that will contain the “real” value.
- Operation type—Indicates if a field is to be sent for a specific record operation type. For example, a field should only be sent if a record has been inserted, updated, or both.
Scripting in Outbound Field Maps
Similar to field maps in ServiceNow, Outbound Field Maps can run scripts during the transform process. In the Outbound Field Map form, select the Use script checkbox to display the Script field and the associated Field name.
When adding scripts in the Scripts field you can use the following variables:
- current—A
GlideRecordof the record being processed by the outbound transform. The same current object as in Business Rules. - ignore—A boolean indicating if a field should be ignored. This value does not need to be returned.
To use the script field, you must return a value as shown in the following example. Alternatively, you can set “ignore” to “true”.
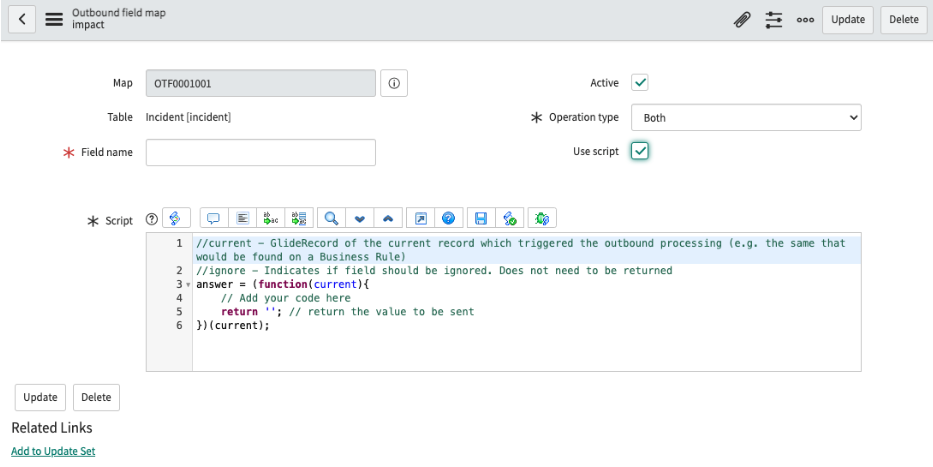
Note: There is validation to ensure that the Field name is unique within the outbound transform map across all outbound field maps, regardless of whether they are scripted or non-scripted. This is because JSON is used as data format. Therefore you cannot have duplicate keys as the keys will overwrite the newest value. If you enter a duplicate field name, an error is returned and the action is aborted.
There is also validation to ensure that GlideRecord.insert() and .update() are not used in the Script field. This is because there may be consequences to the logical data flow if the script here is used to insert or modify any records.
Payloads Table
LMDX captures all incoming (inbound) and outgoing (outbound) payloads. This allows you to easily see what information is coming and going from your instance, the sequential processing of payloads, and error recovering.
Automatic Retry Policy
Outbound payloads have an automatic retry policy. Payload retries are automatically attempted 3 times if certain HTTP response status codes are detected. If the payload has been attempted to be sent 3 times, or certain HTTP response status codes are detected, the payload will stay in the **Error** state waiting for a manual retry attempt.
Inbound payloads do not have an automatic retry policy. This is because any error or warnings for inbound payloads must be resolved manually by a ServiceNow admin. Therefore inbound payloads have a sequential processing feature.
Manual Retry Policy
Both inbound and outbound payloads allow for manual retries.
Inbound payloads display the Reprocess button if the status of the payload is “Error” or “Complete (with warning)”. Manual retries will perform sequential processing of inbound payloads, if applicable.

Outbound payloads display the Retry button if certain HTTP response status codes are detected, or if the payload has been attempted 3 times.

Sequential Processing of Inbound Payloads
LMDX has a sequential processing feature for inbound payloads. If an error or warning occurs during the processing of an inbound payload, any new inbound payload records with the same External reference (external_reference) value will automatically assume the same warning or error.
Once the root cause of the warning or error has been resolved, it is possible to use any of the payloads with the same External reference value to Reprocess all existing payloads in sequential order. This is done using the Created on (sys_created_on) value for each payload. This results in all payloads being processed in the same order in which ServiceNow received them from LM Dexda.
Deletion of Payload Records
Payload records are automatically deleted using the built-in Table Cleaner function in ServiceNow. By default, the application is set to delete payloads that have been updated 2 days ago, and where the status is “Completed” for inbound payloads, or “Sent” for outbound payloads. This threshold can be changed depending on your needs. However, it is recommended to not make it too long, as a build up of records in the table can lead to performance issues.
There is no automatic deletion of any payloads in “Error” state, or inbound payloads with status “Complete (with warning)” to allow for recovery of errors or warnings.
Troubleshooting
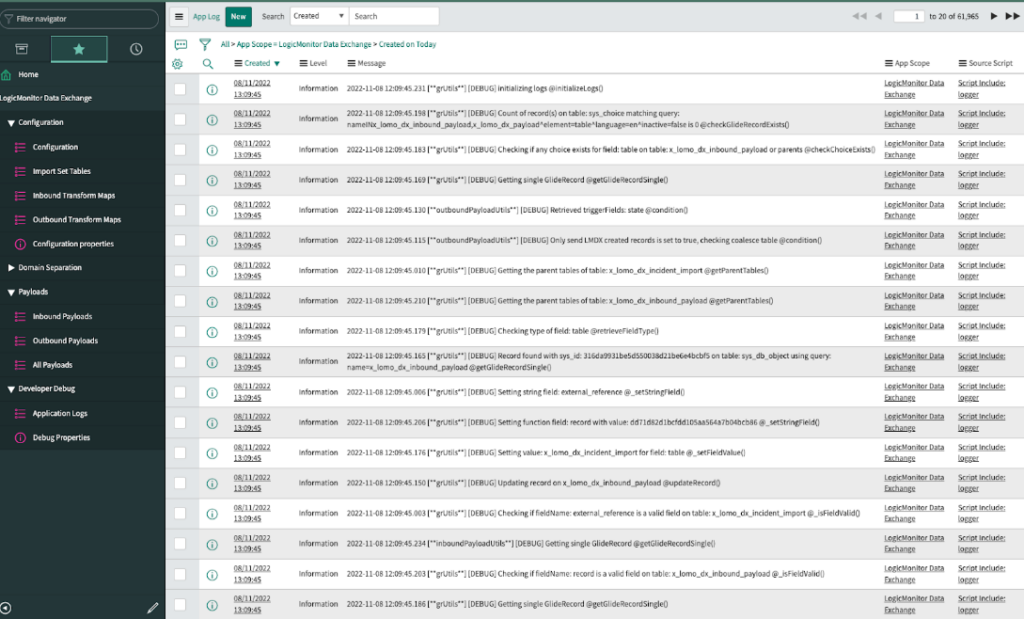
LMDX has a set of system properties that lets you turn on debugging messages for specific areas. You can find all debugging properties in ServiceNow under Developer Debug.
| Property Name | Description |
| x_lomo_dx.inbound.logLevel | Inbound HTTP requests. |
| x_lomo_dx.payload.inbound.logLevel | Inbound payload processing. |
| x_lomo_dx.coalesce.logLevel | Transform map coalescing. |
| x_lomo_dx.internal.logLevel | ServiceNow application configuration, for example reference qualifier and client scripts. |
| x_lomo_dx.payload.outbound.logLevel | Outbound payload processing. |
| x_lomo_dx.outbound.auth.logLevel | LM Dexda authentication. |
| x_lomo_dx.outbound.logLevel | Outbound HTTP requests. |
| x_lomo_dx.debug | Overall debug switch. Only use this if you are unsure of which area is causing errors. |
Recommendation: All logging messages have a timestamp in the message body that is more granular than the Created field. Filter the Message field in descending order when looking at the Application Logs to get the newest messages first.

